
A drill press is built for precision — every hole straight, every rotation balanced. But over time, the chuck, the part that grips your drill bits, begins to loosen, rust, or slip. Suddenly, your trusted machine wobbles and loses its once-perfect accuracy.
Replacing a chuck might sound intimidating, especially if you’ve never taken one apart. Yet once you understand how it connects to the spindle, the process becomes remarkably simple. Learning how to change the chuck on a drill press in minutes can transform your machine’s performance and extend its life.
Most chucks fit using either a friction-fit taper or a threaded arbor. Both are designed for easy removal — provided you use the right method. The trick lies in balance: clean contact, gentle force, and precise alignment.
Whether you’re swapping a damaged chuck or upgrading to a keyless model for faster bit changes, this guide walks you through every step. From safe disassembly to perfect seating, we’ll show you how to restore accuracy and eliminate vibration.
By the end, you’ll not only replace a key part of your tool but also gain the confidence to maintain your drill press like a professional machinist.
Understanding the Drill Press Chuck
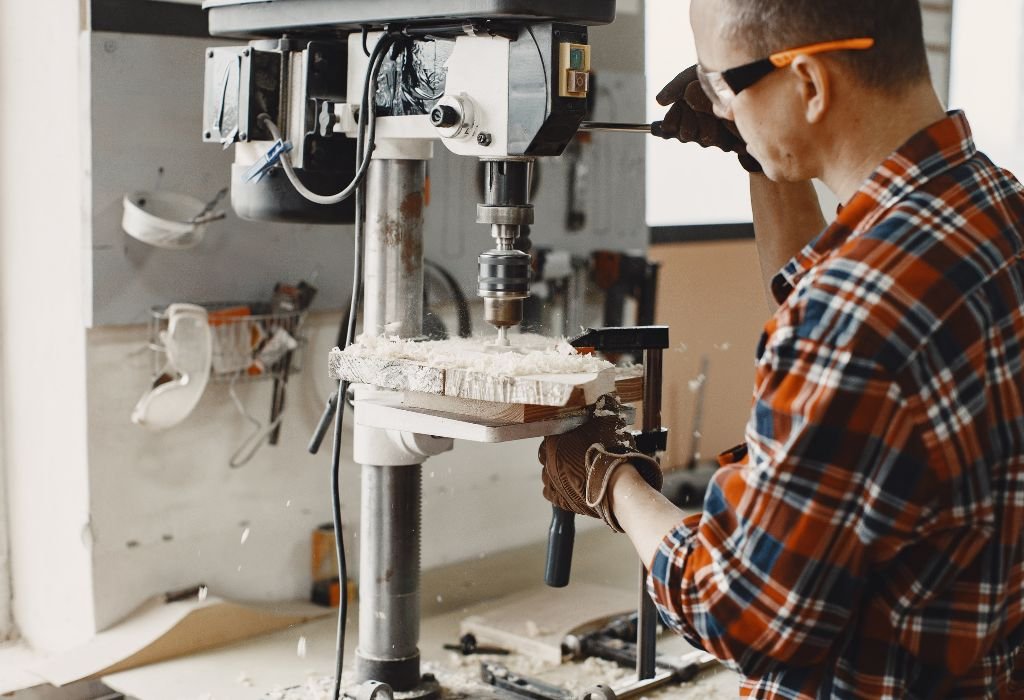
The chuck is the core of your drill press — it grips the bit, transfers torque, and ensures your cuts are perfectly centered. Without it, even the best drill can’t deliver precision.
There are two main designs: taper-mounted and threaded. Taper chucks rely on friction between the spindle and the chuck’s interior cone, while threaded versions screw into place. Recognizing which type you have determines how you’ll remove and install it correctly.
Reference charts from Grainger Industrial Supply help identify taper sizes like JT33 or JT6 so you can choose compatible replacements.
What is the function of a drill press chuck?
It holds the drill bit securely and keeps it centered while drilling.
How do I know which chuck type I have?
Look at the connection — taper fits are smooth; threaded ones have visible threads.
Can I use keyless chucks on old presses?
Yes, if the mount type matches the spindle.
Do all chucks support the same bit range?
No, they vary by model — check the capacity before buying.
Is a taper or threaded chuck better?
Taper mounts offer better alignment; threaded ones are easier to swap.
Safety Precautions Before You Begin
Safety should always come first when handling heavy metal parts. Unplug your drill press before touching any moving components. A disconnected power source eliminates the risk of accidental startup.
Next, raise the drill table or remove workpieces to create open space. Wear safety glasses to protect your eyes from metal dust or loose debris. If using wedges or mallets, inspect them to ensure they’re clean and undamaged.
The OSHA Machine Guarding Guidelines recommend avoiding oils or lubricants during disassembly — these can cause parts to slip unexpectedly.
Should I wear gloves?
Avoid thick gloves — they reduce grip precision.
Why not use oil when removing a chuck?
It reduces friction and may cause the new chuck to slip later.
Can I hold the spindle while loosening?
Yes, lock or stabilize it to prevent damage.
Do I need to remove the table?
No, just lower it for better clearance.
Is power lockout necessary?
Absolutely — always ensure full power isolation.
Tools and Materials You’ll Need
Preparation makes the job faster. Gather a drill press wedge set, a rubber mallet, clean cloth, isopropyl alcohol, and your replacement chuck before starting.
If your chuck uses a taper mount, you’ll also need wedges designed for that taper size. These fit into the gap between the spindle and chuck, allowing gentle separation without damage.
Threaded mounts may require an adjustable wrench. Keeping everything nearby saves time and prevents mid-process interruptions. Many machinists use McMaster-Carr’s chuck wedge tools for precise, damage-free separation.
Can I use screwdrivers instead of wedges?
No, they can deform the taper and ruin alignment.
Is alcohol mandatory for cleaning?
Yes, it removes grease and metal dust completely.
Can I reuse my old chuck key?
If compatible, yes — most keys are universal by size.
Should I prepare both chucks before removal?
Yes, clean both for faster fitting.
Do I need thread tape for installation?
No, dry contact ensures a tighter mechanical hold.
Removing the Old Chuck
Start by lowering the spindle until you can clearly see the space between it and the chuck body. Insert your wedge tools from both sides into the opening where the taper connects.
Tap the wedges lightly with a mallet until the chuck drops free. Use steady, controlled strikes — not forceful blows. The taper fit releases with a pop once friction breaks.
If you have a threaded model, hold the spindle firmly and twist the chuck counterclockwise. Use a strap wrench if it’s tight. Heat from a hair dryer can expand the metal slightly, helping loosen it safely.
Inspect the spindle and chuck bore immediately after removal. Wipe them clean using alcohol to remove dust, oil, or rust.
Why does the chuck stick so tightly?
Over time, metal friction and debris strengthen the taper bond.
Can I hammer the chuck directly?
Never — it damages bearings and bends the spindle.
Does heating help with removal?
Yes, moderate heat expands the metal for easier separation.
Can I reuse the same taper arbor?
Yes, if undamaged and still perfectly smooth.
What if wedges don’t fit properly?
Use a size that matches your taper or consult a machine tool supplier.
Cleaning and Inspecting the Spindle
After removing the chuck, inspection ensures proper reseating. Examine the spindle’s taper or threads under bright light to check for scratches or burrs.
Use 600-grit sandpaper to polish out small imperfections carefully. Always move along the taper direction, never across it. Wipe everything clean with isopropyl alcohol and let it dry completely before reassembly.
For threaded spindles, a small wire brush clears residue effectively. Keep threads sharp and clean for consistent grip. Proper cleaning prevents future vibration and ensures the new chuck sits perfectly centered.
Industry experts in Popular Mechanics emphasize that precision contact surfaces should always remain dry and free of residue to maintain drilling accuracy.
Do I need to polish the spindle every time?
No, only when dirt or corrosion is visible.
Can I oil the spindle after cleaning?
Avoid oil; it weakens taper friction.
Why use fine sandpaper?
Coarse grit removes too much metal and changes dimensions.
Should threads feel tight or smooth?
Smooth, with no grinding or resistance.
Is rust on the taper serious?
Even small spots can affect accuracy — always clean thoroughly.
Installing the New Chuck
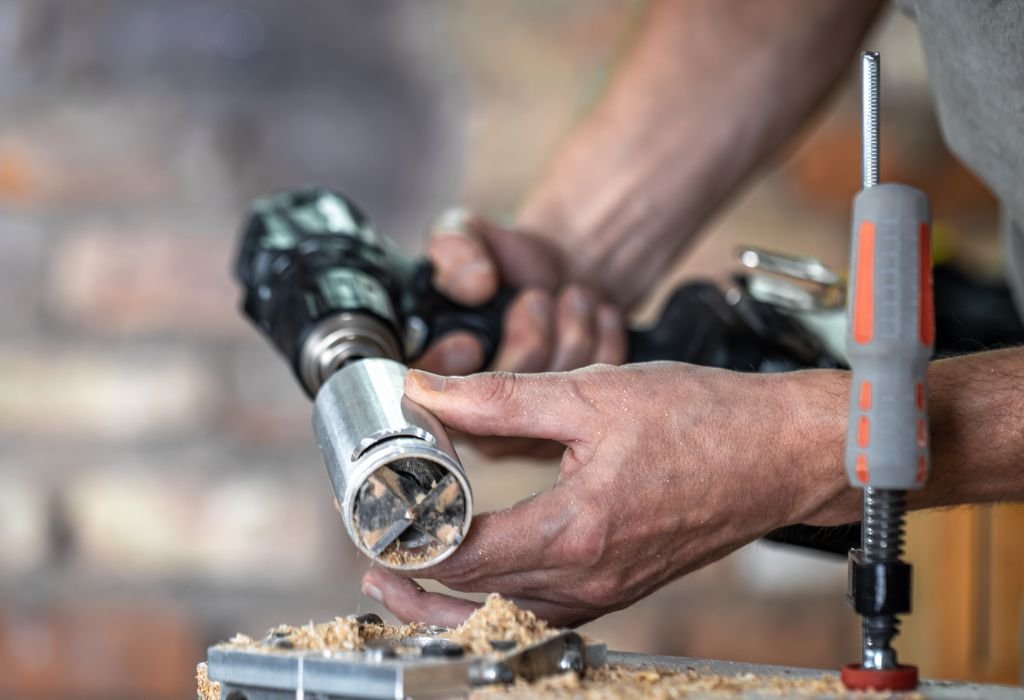
Hold the new chuck with its jaws slightly open. Align the taper hole with the spindle nose carefully. Push the chuck upward firmly by hand until it feels snug.
Lower the spindle slightly and position a wooden block on the drill table. Tap the bottom of the chuck lightly with a rubber mallet to seat it securely. This ensures even contact pressure across the taper.
For threaded models, screw the chuck clockwise until fully seated. Tighten gently with a wrench, avoiding over-torque. The goal is snug contact, not excessive force. Proper seating guarantees balanced rotation at high speeds.
Guidelines from Fine Woodworking highlight that dry-fit pressure locks better than lubricated joints when dealing with taper mounts.
Should I use grease before inserting?
No, clean and dry surfaces create stronger friction fits.
How tight should the chuck feel?
Firm, with zero play or rocking motion.
Can I hammer to seat the taper?
Only gentle taps using a soft mallet — never metal on metal.
What if the chuck doesn’t sit flush?
Remove, clean again, and realign; dirt may block full seating.
Does the spindle direction matter for threading?
Yes, most drill presses use standard right-hand threads.
Testing and Aligning the Chuck
Once installed, test for concentric rotation. Insert a straight drill bit and rotate the chuck by hand. Observe if the bit wobbles or moves side to side — perfect alignment shows no visible runout.
For professional accuracy, use a dial indicator against the bit’s tip. Slowly rotate the spindle and measure deviation. Anything under 0.003 inches is acceptable for woodworking; below 0.001 is ideal for metal drilling.
If runout exceeds tolerance, remove the chuck, clean again, and reseat it. Consistent, vibration-free spinning ensures precision and longer bearing life. Many machinists rely on Starrett Dial Indicators for these fine adjustments.
Why does my bit wobble slightly?
The chuck may not be seated evenly — reinstall it carefully.
Can I test runout by sight alone?
Yes, but a dial indicator gives measurable precision.
Should I tighten the jaws during testing?
Yes, use even pressure across all three jaws.
Does spindle damage cause runout?
In rare cases, worn bearings or bent shafts contribute.
Can I use the motor for testing?
Spin manually first to avoid damage if misaligned.
Maintaining the Chuck for Long-Term Use

Maintenance keeps your chuck performing smoothly for years. After each use, open the jaws fully and blow out sawdust or metal chips using compressed air.
Apply a dry lubricant like Teflon spray monthly to prevent corrosion. Avoid greasy oils; they attract dust that can cause jaw sticking. If the chuck feels stiff, disassemble and clean the internal jaws with alcohol.
Never store the drill press with a bit clamped inside — this can weaken spring tension over time. Regular inspection of the taper or thread keeps seating tight and vibration-free. Family Handyman’s maintenance guide offers simple cleaning habits to prevent wear.
How often should I clean the chuck?
Every few months, or sooner in dusty environments.
Can rust ruin the chuck fit?
Yes, it increases runout and weakens grip.
Should I oil the jaws?
No, use dry lubricant to avoid buildup.
Why remove bits after use?
It relieves internal spring tension, prolonging jaw life.
Can I disassemble the chuck easily?
Yes, most use retaining rings or screws for quick access.
Conclusion
Replacing your drill press chuck isn’t just maintenance — it’s precision restoration. A clean, well-fitted chuck transforms performance, reduces vibration, and keeps every hole perfectly centered.
The process is straightforward once you understand how tapers and threads work together. Removing the old chuck gently, cleaning the spindle meticulously, and seating the new one firmly ensures years of smooth operation.
By following each step and handling parts carefully, you can easily master how to change the chuck on a drill press in minutes. What once seemed mechanical becomes second nature — a skill every craftsman should know.
A properly aligned chuck saves bits, protects bearings, and restores drilling confidence. With regular cleaning and mindful handling, your drill press will deliver accuracy that rivals new equipment.
Mastering this small but essential task keeps your entire workshop running efficiently and your craftsmanship at its finest.

I’m John F. Nicholas, the founder, lead writer, and drill enthusiast behind 101drill.com. With years of hands-on experience in power tools and DIY projects, I created this platform to share practical knowledge, expert tips, and real-world insights to help others master the art of drilling.