
A perfectly aligned drill bit hovers above a flat workpiece as the drill press hums quietly. Suddenly, the piece jerks, spins, and jumps off the table, leaving behind a crooked hole and a startled operator. This is a moment every DIYer or workshop professional dreads — and it happens more often than you think.
Many assume that holding the material tightly or using a simple clamp will keep it steady. In reality, precision drilling begins with one crucial setup step — securely attaching the drill press vise to the table. Without it, accuracy suffers, bits break, and safety takes a back seat.
The simple act of learning how to attach a drill press vise safely and securely can transform your entire drilling experience.
A properly mounted vise keeps your workpiece aligned, absorbs vibration, and ensures each hole is straight, centered, and clean. It’s the difference between sloppy, inconsistent work and professional-grade precision.
According to EMC Insurance, hand and finger injuries make up nearly 23% of all workplace incidents in the United States. Most of these injuries occur because materials or vises weren’t secured properly — a mistake that’s entirely avoidable with the right setup.
Know Your Drill Press Table and Vise Types
Before learning how to attach a drill press vise safely and securely, it’s essential to understand the foundation you’re working with — the drill press table and the vise itself. These two components determine how stable, accurate, and safe your entire setup will be.
A drill press table isn’t just a flat surface. It’s a precision platform with T-slots, mounting holes, and tilting features that allow for versatile work positioning. The table is designed to support various workholding tools like vises, fences, and clamps.
Understanding how these features interact with your vise will help you mount it correctly and ensure long-term accuracy.
Most tables include T-slot channels that accommodate T-slot nuts, T-bolts, or step clamps. These allow the vise to be locked firmly in place without slipping, even during heavy drilling.
Choosing the right hardware for your table’s slot size is critical — using undersized or mismatched bolts can cause wobble, poor alignment, or even damage to the slot lips.
Different vise types serve different purposes. The standard drill press vise is the most common for general drilling. It has parallel jaws, a solid base, and slots for bolts or clamps.
For more precision work, a cross-slide vise allows fine X-Y movement of the workpiece without repositioning. Some professionals prefer low-profile vises or rotary bases for angled drilling, while others use strap clamps when the vise holes don’t align perfectly with table slots.
Every vise base has its own mounting pattern — either through-slots, counterbored holes, or center bolt holes. Knowing your pattern helps you select the correct bolt length and placement, ensuring the vise sits flat and stable during use.
A well-matched table, vise, and hardware setup means greater precision, reduced vibration, and improved safety for all future drilling tasks.
What size T-slot nuts fit most drill press tables?
Measure the width and depth of your table’s slot. Standard bench drill presses often use 10 mm or 3/8-inch T-slot nuts, but always verify the fit before tightening.
What’s the difference between a standard vise and a cross-slide vise?
A standard vise holds the material firmly, while a cross-slide vise allows fine front-back and side-to-side adjustments for precise hole placement.
Can I mount a vise without T-slots on my table?
Yes. You can use step clamps or strap clamps across the vise feet, or drill custom holes in a mounting plate to secure it.
Why is matching bolt size important?
Using bolts that are too small or too long can cause the vise to shift or crack the table surface. Always choose bolts that seat snugly without bottoming out.
Is it okay to keep the vise slightly loose for quick adjustments?
No. A vise must always be fully tightened before drilling. A loose vise can vibrate or twist, affecting both accuracy and safety.
Safety First: Clamping Rules Before Mounting
Before tightening a single bolt or aligning your vise, safety must come first. Even experienced users overlook this step, assuming their hands or a single clamp can control the workpiece. In reality, improper clamping is one of the leading causes of accidents and ruined drill bits.
A drill press is designed to deliver power and precision — but when the workpiece spins or slips, that same power becomes dangerous.
A securely mounted vise not only protects the operator but also keeps the bit aligned through every pass, ensuring consistent, clean holes. Every step that follows relies on a stable foundation.
The golden rule is simple: always clamp the workpiece in the vise, and clamp the vise to the table. Never rely on friction alone.
According to OSHA’s safety guidelines, most workshop hand injuries result from unsecured materials or poor vise attachment. Even a small misalignment can twist the bit, cause it to bind, or send the stock flying across the shop.
Besides mechanical stability, personal protective equipment matters too. Wear safety glasses, remove loose jewelry, and keep sleeves rolled tight.
Gloves should only be used during setup, not when the drill press is running, as they can catch on rotating parts. Clean the table surface before mounting, and make sure no metal chips or debris interfere with proper contact between the vise and the table.
Once these steps are followed, every drilling operation becomes more predictable, efficient, and safe — exactly how a professional workshop should operate.
Why should the vise be clamped to the table if the workpiece is already in it?
Because the vise itself can shift or spin under pressure. Clamping it down locks the entire setup, preventing dangerous movement.
Can I use C-clamps instead of T-slot hardware?
C-clamps are fine for light work, but T-slot bolts and step clamps provide far greater holding power and stability, especially for metal drilling.
How tight should the vise bolts be?
Tighten firmly but not excessively. The goal is to achieve solid contact between the vise base and the table without bending the metal or damaging the slot lips.
Are quick-release cam clamps safe for drill presses?
Only if they’re designed for your machine’s slot size and load rating. Cheap or poorly sized clamps can loosen under vibration and cause slipping.
What’s the most common cause of drilling accidents?
Holding the workpiece by hand or relying on a loosely mounted vise. Even small parts can catch the bit and spin violently, risking serious injury.
Tools & Hardware Checklist
Before attaching your drill press vise, having the correct hardware ready makes the process smooth and precise.
The right tools prevent wobble, ensure proper alignment, and keep every part stable under drilling pressure. Each component plays a vital role in the vise’s overall security and accuracy.
Start with the basics: T-slot nuts, T-bolts, and washers. These are the core fasteners that anchor your vise to the drill press table. T-slot nuts fit inside the grooves of the table, and the bolts thread upward through the vise base.
Always make sure the nut and bolt size match your table’s slot width to prevent unwanted movement or slot damage.
Next, include step clamps or strap clamps in your setup. These are perfect when the vise’s mounting holes don’t align perfectly with your table slots.
Step clamps apply downward pressure evenly across the vise’s feet, giving superior grip even under vibration or heavy drilling load. They also allow for quick adjustments without completely removing hardware.
Don’t overlook washers and spacers — they distribute force evenly and prevent bolts from digging into the vise base. For high-precision work, keep parallels or soft jaws nearby to elevate delicate materials and avoid scratching or distortion.
A torque wrench is also useful to apply consistent pressure when tightening bolts, preventing over-torque that might crack the table or warp the vise.
Finally, prepare tools for alignment and protection: a dial indicator for squaring the vise jaws to the bit path, a sacrificial board to protect your table surface, and a cleaning brush or air gun to remove chips and debris before clamping. Small details like these contribute to big improvements in accuracy and longevity.
Organizing this checklist before you begin ensures the setup is efficient, accurate, and stress-free. With everything within reach, you can mount the vise quickly and focus entirely on drilling performance and precision.
What if my drill press table doesn’t have standard T-slots?
You can use a custom adapter plate or strap clamps to secure the vise. Always check that the base sits flat and the pressure is evenly distributed.
Which washers should I use for my bolts?
Use thick, flat washers made of hardened steel. They spread clamping pressure evenly and protect both the vise base and the table surface.
Can I use step clamps instead of bolts?
Yes, step clamps are ideal for uneven mounting holes or quick setup changes. They hold firmly without over-stressing the table slots.
Why is a torque wrench recommended?
It ensures every bolt is tightened with equal force, preventing uneven pressure that can shift the vise or distort the alignment.
Do parallels and soft jaws make a difference?
Absolutely. Parallels keep workpieces level for accurate drilling, and soft jaws protect polished or delicate materials from jaw marks.
Step-by-Step: How to Attach a Drill Press Vise
Attaching a drill press vise isn’t just about tightening bolts — it’s about precision, alignment, and control. Each step determines how safely and accurately the drill performs.
A correctly mounted vise reduces vibration, keeps the workpiece stable, and prevents the bit from wandering or binding during operation.
Before beginning, clean both the drill press table and the base of the vise thoroughly. Any metal shavings or oil can cause misalignment. Once the surfaces are smooth and clean, you’re ready to begin the mounting process.
1. Prepare the Table and Plan the Layout
Start by adjusting the drill press table to a comfortable height. Place a sacrificial board or zero-clearance insert on the table to protect it from through-holes. This board also prevents tear-out when the bit exits the workpiece.
Position the vise where you want it, considering both access and stability. Ideally, the vise jaws should align with the spindle centerline so drilling forces distribute evenly.
Why is this important?
If the vise is too close to the edge or misaligned, the drill bit may deflect, leading to crooked or off-center holes.
2. Insert T-Slot Hardware and Position the Vise
Next, slide T-slot nuts or T-bolts into the table slots. Align them roughly with the vise mounting holes. Carefully lower the vise onto the bolts, ensuring that its base sits flat and centered.
Once it’s positioned, add washers and nuts over the bolts and tighten them lightly. Don’t fully tighten yet — you’ll need room for fine adjustments later.
Why use T-slot bolts instead of C-clamps?
T-slot bolts create direct downward pressure and won’t shift under vibration, giving a much more secure hold during drilling.
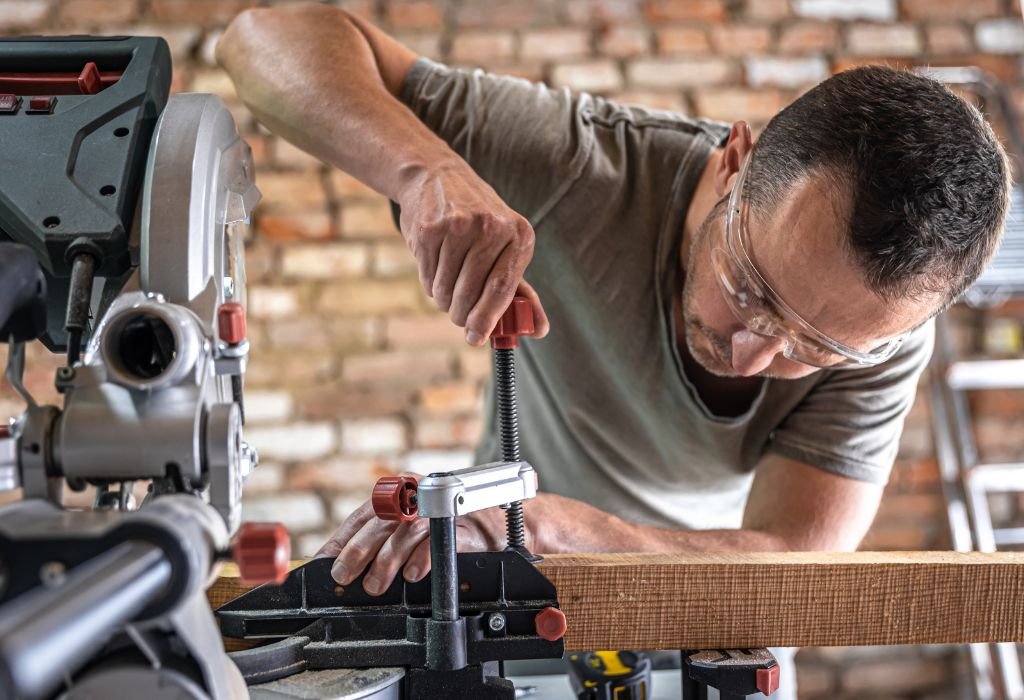
3. Align and Square the Vise
Before tightening completely, the vise must be perfectly aligned. Use a dial indicator or square to check that the vise jaws are parallel to the drill bit’s path.
Tap the vise gently with a rubber mallet to adjust its position. Small movements make big differences in alignment. Keep the indicator needle or edge of the square as close to zero deviation as possible.
Why does alignment matter?
Even a one-degree offset can cause holes to drift, especially on deep drilling operations. Perfect alignment guarantees straight, repeatable holes every time.
4. Tighten and Secure the Mounting Bolts
Once alignment is confirmed, gradually tighten each bolt using a wrench or torque wrench. Alternate between bolts to maintain even pressure.
Avoid over-tightening — too much force can warp the vise or damage the table’s slot lips. You want firm, solid contact without flexing the metal. After tightening, give the vise a gentle shake; it should feel completely immovable.
Pro Tip:
After drilling your first test hole, recheck the vise tightness. Slight settling may occur as the hardware seats fully.
5. Perform a Final Safety and Alignment Check
Lower the drill bit and visually check that it meets the center of the vise jaws. Rotate the spindle by hand to ensure full clearance through the drilling motion.
Confirm that all clamps, nuts, and bolts are tight. Make sure no part of the vise obstructs the drill’s travel path or table rotation.
Your vise is now securely attached, aligned, and ready for use.
How do I know if the vise is sitting flat?
If the vise rocks or shifts when pressing on opposite corners, there’s debris underneath. Clean the surfaces and reseat the vise before tightening.
Can I use only one bolt for quick jobs?
No. Always use at least two mounting points. One bolt allows rotation under pressure and can cause unsafe kickback.
Do I need to re-align after tilting the table?
Yes. Anytime the table angle changes, the vise alignment must be rechecked for accuracy.
How tight should the bolts be?
Tight enough to prevent movement, but not enough to deform the vise base or stretch the threads. A moderate hand torque is ideal.
Can I leave the vise permanently attached?
Yes, if your drill press is used for similar operations. For varied work, mark the mounting position to reinstall it accurately later.
Accuracy Upgrades After Mounting
Once your drill press vise is firmly attached, it’s time to fine-tune for performance and precision. A solid mount is only half the job — the other half lies in making sure every drill hole lands perfectly where intended.
Accuracy upgrades not only improve the quality of your work but also extend the life of your tools and materials.
Start by checking the parallelism of the vise jaws with the drill bit. Lower the bit to just above the jaws and sweep it across the surface. If you notice uneven spacing, use a dial indicator to measure deviation and make micro-adjustments. Even a small misalignment can result in holes that drift or taper.
Adding parallels or soft jaws is another effective way to upgrade precision. Parallels keep the workpiece elevated and level, preventing drill-through damage to the vise base.
Soft jaws, on the other hand, protect delicate materials like aluminum or brass from being marred by the vise teeth.
Consider installing a fence or drill press table extension to improve repeatability. A fence serves as a reference edge that aligns your workpiece quickly for multiple identical holes. It also helps reduce setup time and eliminates guesswork between projects.
For repetitive drilling, a rotary base or cross-slide vise allows controlled movement along the X and Y axes, ensuring hole patterns are perfectly spaced.
Lubrication and speed control are often overlooked but critical for precision. Apply cutting fluid to reduce heat and friction during drilling, especially on metal. Adjust the RPM and feed rate according to material type — slower speeds for harder metals, higher for wood or plastic.
Lastly, inspect for runout by rotating the drill bit manually and watching for wobble. Excess runout affects accuracy and can be corrected by tightening the chuck or replacing a bent bit. Regularly checking these elements ensures long-term reliability and sharp performance in every operation.
Why should I use a fence on my drill press?
A fence provides a consistent reference edge, helping you align workpieces quickly and drill multiple identical holes with ease.
When should I use soft jaws instead of standard jaws?
Soft jaws are ideal when working with finished or delicate materials that can be scratched or dented by hardened vise teeth.
Do parallels really improve accuracy?
Yes, they keep your workpiece level and prevent uneven drilling depth or bit deflection during operation.
What causes excessive runout?
Runout usually comes from a loose chuck, bent bit, or debris inside the spindle taper. Always clean and inspect before drilling.
How do I pick the right drilling speed?
Follow manufacturer charts: use slower RPM for steel and cast iron, and higher speeds for wood, plastic, or aluminum.
Alternative Mounting Methods (When Slots Don’t Line Up)
Sometimes, even the most precise setup runs into a simple problem — the vise mounting holes just don’t line up with the drill press table’s T-slots.
This mismatch is common, especially with aftermarket vises or smaller benchtop drill presses. But that doesn’t mean accuracy or safety has to be compromised. There are several alternative mounting solutions that can give you a rock-solid hold, even when standard hardware won’t fit.
One of the most effective alternatives is using strap clamps or step clamps. These clamps apply strong downward force across the vise’s feet and can adapt to uneven hole spacing.
By positioning the clamp over the vise base and securing it with a T-slot bolt or stud, you create an adjustable hold that grips evenly and resists vibration during drilling.
Another solution is to use a mounting adapter plate. This is a flat steel or aluminum plate drilled to match both your table’s T-slot pattern and the vise’s hole spacing.
Once the plate is secured, the vise can be bolted directly to it. This method not only bridges mismatched slots but also provides a larger, stable surface for mounting accessories like fences or stops.
For frequent vise swaps, some users install a quick-change system using cam clamps, locating pins, or rotary bases. These let you remove and reattach the vise within seconds while keeping consistent alignment.
However, it’s crucial to ensure these mechanisms are rated for your vise’s weight and the drilling load — low-quality quick-release systems can loosen under vibration.
Magnetic bases or suction clamps are sometimes marketed as alternatives, but they are not safe for drilling operations. Mechanical clamps always provide a more reliable grip, especially for heavy materials or high torque drilling.
By combining flexibility and security, these alternative methods let you adapt to any table configuration without sacrificing precision or safety.
What should I do if my vise holes don’t align with the table slots?
Use step or strap clamps to secure the vise base. These provide a strong, adjustable hold even when the holes don’t match perfectly.
Are adapter plates safe for heavy vises?
Yes. When made from 6–10 mm steel or thick aluminum, adapter plates can handle heavy vises while maintaining rigidity and balance.
Can I drill new holes into my drill press table?
It’s possible but not recommended. Drilling into the table weakens the casting and can cause alignment issues. Instead, use adapter plates or clamps.
Are magnetic mounts safe for holding a drill press vise?
No. Magnetic or suction mounts can lose grip under torque and vibration. Always use mechanical fasteners for safety.
What’s the fastest way to switch between vises?
Install locating pins or a quick-release cam system that lets you return the vise to the same position without re-squaring each time.
Conclusion
Mastering how to attach a drill press vise safely and securely is more than a technical skill — it’s a habit that defines precision and professionalism. A properly mounted vise ensures every hole is straight, every surface stays stable, and every project meets the standard of true craftsmanship.
By understanding your drill press table, choosing the right T-slot hardware, and following the proper alignment and clamping sequence, you not only protect your equipment but also eliminate the risk of dangerous kickbacks and material damage.
Adding upgrades like parallels, fences, and soft jaws further enhances accuracy, allowing you to complete tasks faster with consistent, repeatable results.
Even when slot alignment challenges arise, simple solutions like strap clamps or adapter plates keep your setup flexible without sacrificing safety. The key is always to double-check alignment, tighten evenly, and perform a final inspection before drilling.
A well-secured vise is the foundation of flawless drilling — combining control, accuracy, and confidence in one setup. Make these steps part of your regular routine, and every drilling operation will feel smoother, safer, and far more professional from start to finish.

I’m John F. Nicholas, the founder, lead writer, and drill enthusiast behind 101drill.com. With years of hands-on experience in power tools and DIY projects, I created this platform to share practical knowledge, expert tips, and real-world insights to help others master the art of drilling.