
A drill press is one of the most versatile tools in any workshop, capable of delivering precision that handheld drills can’t match.
But for many beginners, one of the most confusing tasks is adjusting its speed. Changing the belt position on the pulleys determines how fast or slow your bit rotates — and mastering this process is essential for safety, accuracy, and tool longevity.
If you’ve ever wondered why your drill bit burns wood or struggles to cut metal, it’s probably running at the wrong speed. Each material and bit size requires a specific rotation speed.
Faster speeds work best for soft materials like wood, while slower ones are ideal for metal and dense hardwoods.
Unfortunately, many new users avoid touching the belt system out of fear of misalignment or damaging their press.
The truth is, once you understand the layout of your pulleys and belts, changing speeds becomes a quick and simple task — one that takes less than two minutes with practice.
Understanding Drill Press Speed and Belt System
A drill press operates on a simple principle — the belt and pulley system determines how fast the spindle rotates. This mechanism transfers motor power through belts that loop around pulleys of varying sizes. Changing which pulleys the belt sits on directly alters your drilling speed.
When the belt is placed on a smaller spindle pulley and a larger motor pulley, the spindle spins faster. Reversing the belt position slows the rotation, providing greater torque for harder materials. This flexibility allows users to adapt the drill press for woodworking, metalworking, or delicate finishing.
Most modern drill presses have two or three pulleys, giving several speed combinations. Inside the top cover, manufacturers often include a speed chart printed for reference. It shows which pulley arrangement produces specific RPM values.
For an illustrated guide on pulley alignment and belt ratios, you can check Grainger’s equipment chart, which provides detailed visuals for industrial setups.
Why Belt Speed Matters
Belt speed affects drilling performance more than most beginners realize. Too much speed generates friction that overheats bits, burns wood, or melts plastic. Too little speed causes the bit to chatter, wander, or even seize during deep cuts.
Every material responds differently. For example, hardwoods and metals require slow, controlled drilling for smooth results, while softwood and plastics benefit from faster speeds. Adjusting belt speed ensures your bit works efficiently and lasts longer.
Incorrect speed settings also stress the motor and bearings. Running metal projects at wood speeds can overwork the motor, leading to vibration or internal wear. Matching speed to material ensures consistent torque and longer machine life.
A reliable chart from Fine Woodworking details ideal RPMs by material type and bit size, helping you choose the safest, most accurate settings.
Safety Precautions Before Adjusting the Belt
Safety should always come before speed adjustments. Start by unplugging the drill press completely to eliminate any chance of accidental startup. Never rely on just turning off the switch — always disconnect from the outlet.
Wait until the spindle stops spinning fully. Some belts retain slight movement or tension after the power shuts off. A brief pause ensures your hands stay safe when opening the pulley cover.
Wear safety glasses to protect your eyes from dust or loose belt particles. Avoid gloves, as they can get caught between pulleys. Also, keep long hair and sleeves secured to prevent entanglement.
The OSHA Machine Guarding Guide emphasizes using proper guarding and clear work areas to avoid injury during maintenance or adjustment.
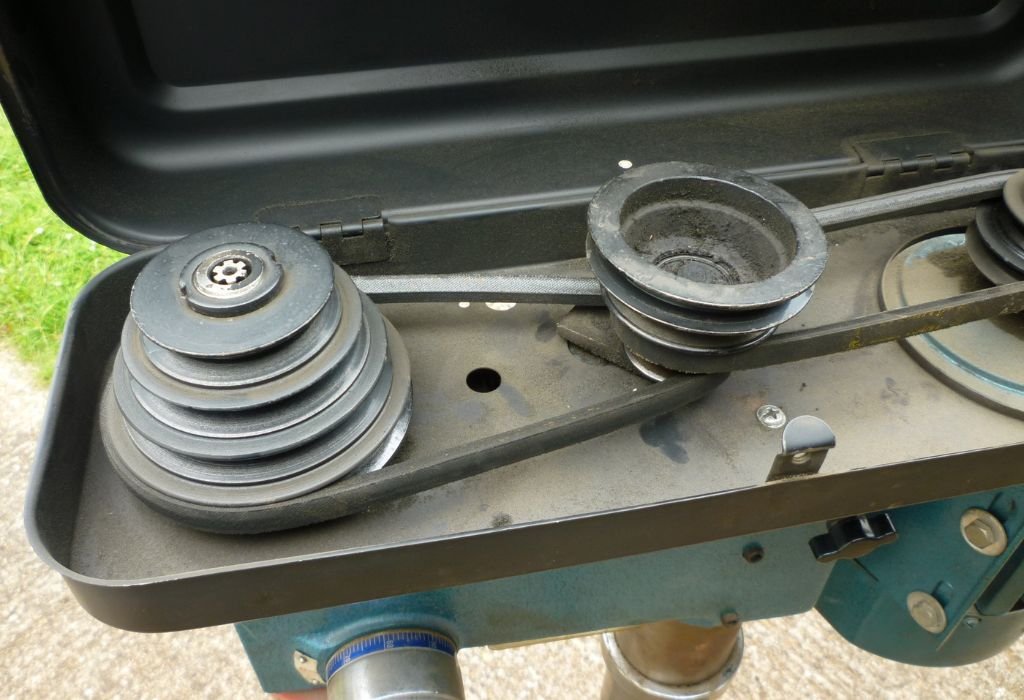
Identifying the Belt and Pulley Layout
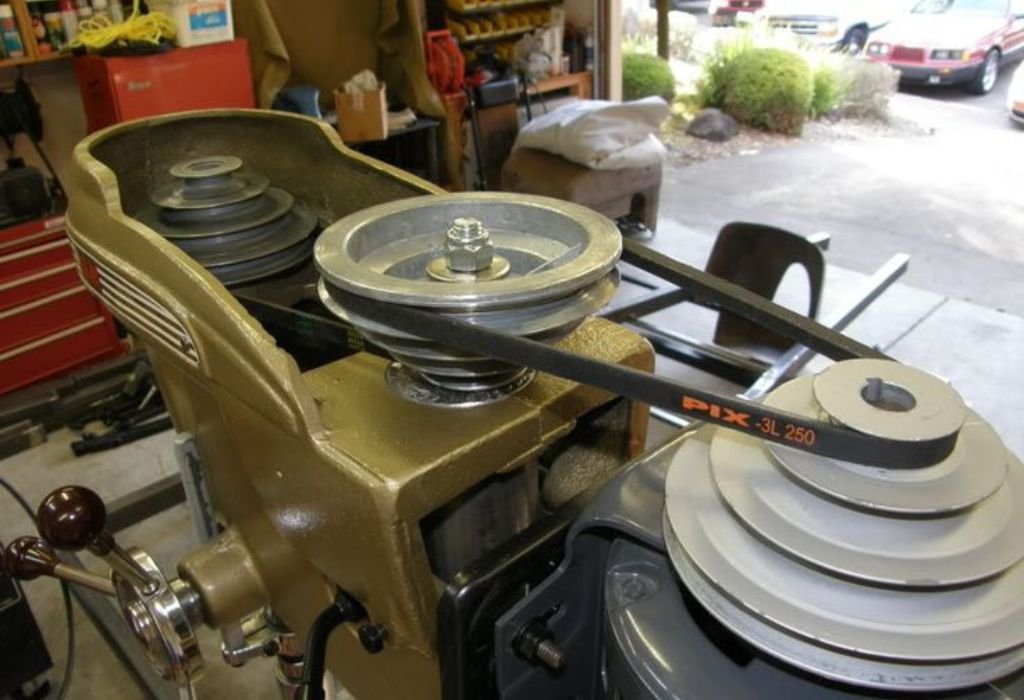
Inside the belt housing, you’ll see two or three pulleys — one on the motor shaft, one on the spindle shaft, and sometimes a third in between called the idler pulley. The belt loops across these pulleys to transfer power.
Each pulley has multiple “steps” or grooves of different diameters. The smaller the groove, the faster the speed; the larger the groove, the slower it becomes. Knowing which combination gives which speed helps you fine-tune precision for different projects.
Some drill presses even include labeling above the pulleys that correspond directly to the RPM range. This saves time and avoids trial and error. Study your drill press layout before touching the belt to avoid misplacement.
You can refer to Family Handyman’s drill press pulley diagram for a visual breakdown of belt paths and tension adjustments.
How to Change Belt Speed on a Drill Press
Changing the belt speed starts with releasing tension. Open the top cover and locate the motor mount lock. Loosen it carefully to allow the motor to pivot forward — this releases tension on the belt.
Next, check your speed chart to find the correct pulley combination. Move the belt from its current grooves to the new positions that match the desired RPM. Ensure the belt sits evenly in the grooves without twisting or overlap.
Once positioned, pull the motor backward gently to apply new tension. Tighten the motor lock bolt to secure it. Test the belt by pressing down midway — it should flex about ½ inch. Reconnect power, start the drill briefly, and listen for smooth operation.
For a short visual demonstration, you can visit Popular Mechanics’ belt adjustment tutorial.
Setting the Correct Speed for Different Materials
Different materials require different speeds for clean drilling and reduced tool wear. Running a drill too fast through metal can overheat it, while running too slow through wood can cause rough edges and binding.
Here’s a quick reference for beginners:
- Softwood: 2500–3000 RPM
- Hardwood: 1500–2000 RPM
- Aluminum: 1000–1500 RPM
- Steel: 400–700 RPM
- Cast Iron: 250–500 RPM
Larger bits need slower speeds regardless of material, while smaller bits can handle faster rotation. Always use a sharp, appropriate bit type for each material.
Grainger’s RPM guide lists recommended speeds based on both diameter and composition for professional results.
Adjusting Belt Tension Correctly
Belt tension determines how efficiently power transfers from motor to spindle. Too tight, and you strain bearings; too loose, and the belt slips, reducing torque. The ideal tension gives firm grip without resistance.
After moving the belt, press it at the midpoint — it should flex roughly ½ inch under moderate pressure. Adjust the motor position accordingly until this range is achieved. Then retighten all locking bolts to secure the alignment.
Inspect the belt edges for wear, fraying, or cracking while adjusting. Replace worn belts immediately to prevent sudden failure during drilling. Clean pulley grooves with a dry cloth before reassembly.
For more detailed guidance, review Grainger’s belt maintenance manual that covers correct tensioning procedures and troubleshooting.
Common Mistakes Beginners Make
Many beginners forget to disconnect power before adjustments, assuming the drill press switch is enough. This is the most dangerous error and must be avoided entirely. Always pull the plug first.
Another common mistake is overtightening the belt. While this seems safe, it actually increases wear on motor bearings and pulley shafts. A properly tensioned belt feels snug but not stiff.
Neglecting to align the belt evenly in the pulley grooves causes vibration and uneven wear. Also, ignoring the speed chart leads to drilling at wrong RPMs, damaging both the bit and the material.
Learning from these early missteps saves time, prevents injury, and ensures smoother, safer operation of your drill press.
Maintenance Tips After Changing Belt Speed
Routine maintenance extends your drill press’s lifespan and accuracy. After each speed change, inspect belts for cracks or shiny spots that indicate slippage. Clean the pulleys regularly using a lint-free cloth to remove sawdust or metal shavings.
Never use oil or grease on belts — they depend on friction for power transfer. Keep pulleys dry and dust-free. Monthly inspections help spot misalignment early before vibration worsens.
Replace worn belts before they break. Modern belts are inexpensive and easy to swap, often available at tool suppliers or hardware stores. Consistent cleaning and inspection maintain smooth performance for years.
You can review additional tips in Family Handyman’s maintenance checklist for drill presses and other workshop tools.
How often should I change belt speed?
Whenever you switch materials or bit sizes that need different RPMs.
Can I change belt speed while the drill press is running?
Never. Always unplug and let the spindle stop fully.
What happens if the belt is too tight?
It strains bearings and shortens motor life.
How can I tell if my belt is too loose?
It will squeal or slip during drilling.
Can I use any replacement belt?
Use the exact size and type specified in your manual.
Do all drill presses have the same pulley setup?
No, models vary — always check your specific configuration.
Why does my belt squeak after changing speed?
It’s likely misaligned or needs minor tension adjustment.
How long does a belt usually last?
Typically 2–3 years with regular maintenance.
Can I apply lubricant to reduce friction?
No — dry operation ensures proper grip and speed consistency.
What should I do if speed feels inconsistent?
Check for belt slippage, alignment, or pulley wear.
Conclusion
Adjusting belt speed may look intimidating at first, but once you understand the pulley system, it becomes one of the easiest maintenance steps on a drill press. It’s a skill every beginner should learn to ensure safe, precise, and efficient drilling.
Proper speed adjustments improve cut quality, prevent bit damage, and keep your drill running smoothly for years. It’s not just about following a chart — it’s about feeling how your machine responds under different settings and learning to fine-tune it naturally.
Make sure to unplug before any adjustment, clean pulleys regularly, and inspect belts often. The few extra minutes spent maintaining your drill press save hours of frustration later.
Mastering how to change belt speed on a drill press for beginners empowers you to tackle wood, metal, and plastic projects with equal confidence. Once you’ve practiced a few times, switching speeds becomes instinctive — a sign you’ve moved from beginner to skilled craftsman.

I’m John F. Nicholas, the founder, lead writer, and drill enthusiast behind 101drill.com. With years of hands-on experience in power tools and DIY projects, I created this platform to share practical knowledge, expert tips, and real-world insights to help others master the art of drilling.