
You place a standard drill bit on a thick piece of wood, start drilling, and quickly realize the hole isn’t big enough. The bit smokes, the edges burn, and the wood begins to chatter. What seemed like a simple task turns into a test of technique and patience.
Drilling large holes requires more than power—it demands control, preparation, and the right tools. Regular twist bits can only handle small diameters. To go beyond that, you must use specialized equipment designed to cut wide, clean openings.
Whether building furniture, installing wiring, or fitting plumbing, large holes often play crucial roles. Yet, the process can easily damage your workpiece if handled incorrectly. Mastering it helps you create smooth, accurate results that look professional.
Understanding how wood behaves under pressure makes all the difference. Large bits generate more torque, friction, and heat, and knowing how to manage those forces ensures clean cuts. This guide will take you through each step with clarity and confidence.
Once you learn the right approach, even thick hardwood becomes easy to handle. Drilling wide holes will feel precise and effortless instead of risky and frustrating.
Understanding Why Large Holes Need Special Tools
Standard drill bits aren’t designed for big openings. Their small flutes remove limited material, and friction quickly builds as the bit widens. That heat leads to smoke, dull edges, and scorched wood surfaces.
Specialized bits like hole saws, spade bits, and Forstner bits solve this problem. They cut with broader edges and channel wood shavings efficiently. Each serves a distinct purpose depending on depth, diameter, and finish requirements.
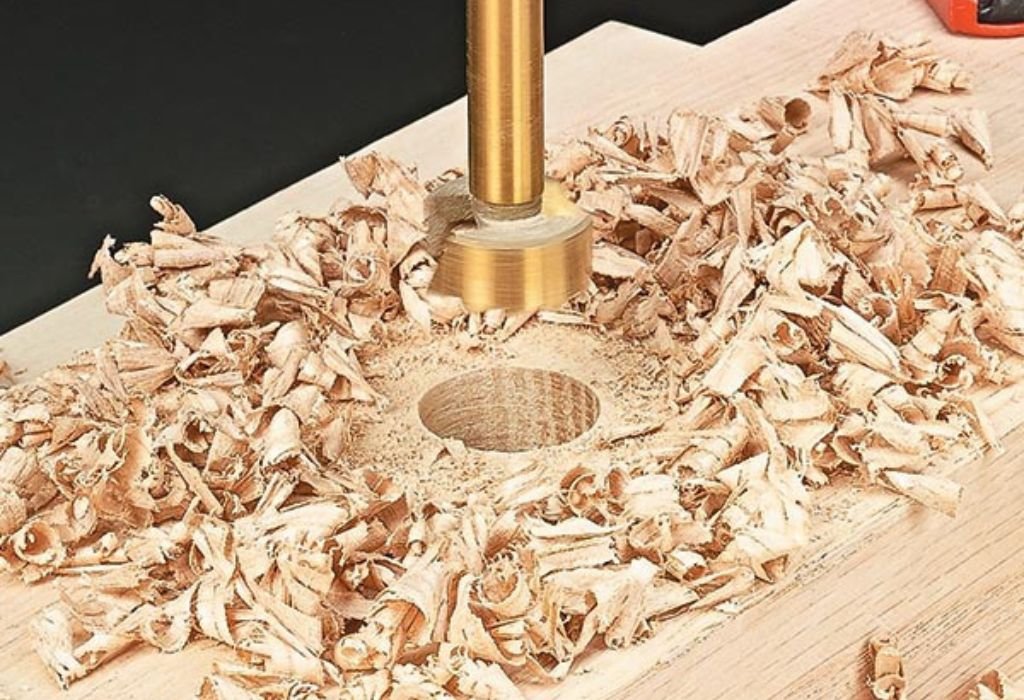
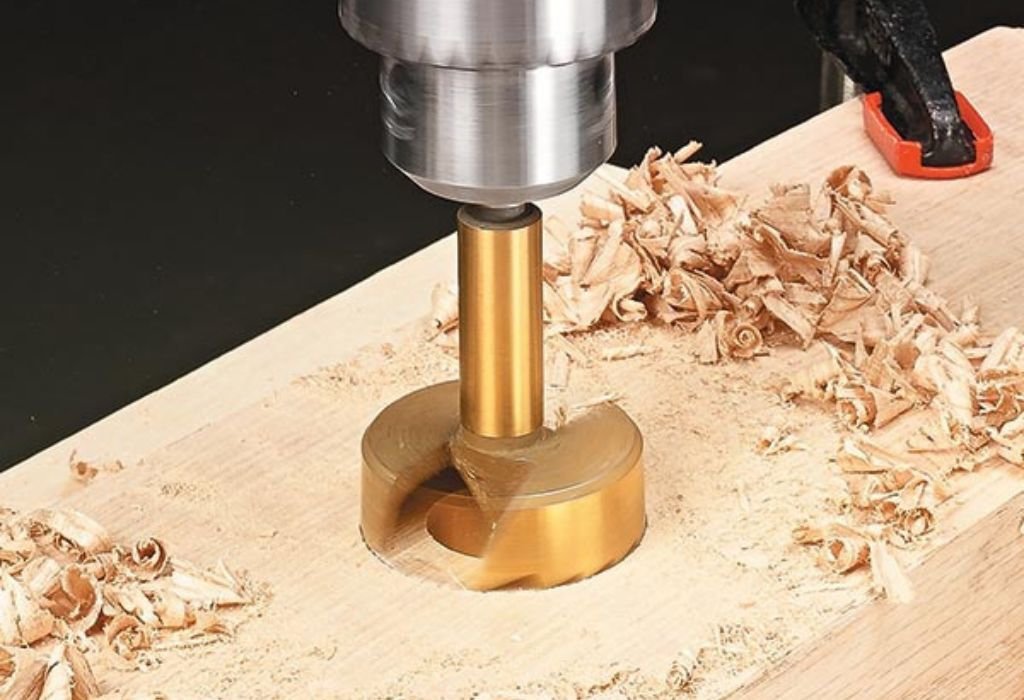
Hole saws create circular cuts ideal for pipes or doorknobs. Spade bits are faster but rougher, used where surface finish matters less. Forstner bits, however, deliver clean, flat-bottomed holes perfect for carpentry and cabinetry.
Choosing the right bit ensures clean results and prevents tool strain. Pushing a small bit to perform a big job risks overheating both wood and drill motor. Selecting proper tools saves time and frustration.
Large-hole drilling is not about brute force but about precision and control. The right bit does the hard work while you guide it smoothly. Understanding each tool’s strengths helps you select confidently for every project.
Can I use a regular twist bit for large holes?
Only for small increases in size. Beyond half an inch, twist bits struggle and can snap under torque. Switch to a spade or hole saw for anything wider.
Do all large bits fit standard drills?
Most do, but check shank size. Some heavy-duty bits require ½-inch chucks or larger. Always verify compatibility before starting.
Which bit makes the cleanest hole?
Forstner bits produce the smoothest finish with minimal tear-out. They’re ideal for furniture and visible joints.
Are hole saws safe for hardwood?
Yes, with slow speed and steady pressure. Too much speed burns edges and dulls teeth quickly.
Can I drill large holes with cordless drills?
Yes, if they have sufficient torque and battery power. Keep speed low and recharge between tasks for consistent results.
Choosing the Right Bit for the Job
Every project demands a specific approach. The diameter, depth, and surface type determine which bit works best. Choosing wisely saves effort and produces cleaner results.
For shallow holes where speed matters, spade bits perform well. Their flat, paddle-shaped design removes material quickly. However, they leave rough edges that often require sanding afterward.
When appearance matters, Forstner bits excel. Their sharp rims cut precise outlines, and their center points keep drilling steady. These are the go-to choice for joinery, dowel holes, and furniture work.
Hole saws, by contrast, excel at cutting completely through thick boards. They remove a solid plug of wood instead of turning it into dust. Their interchangeable arbors allow multiple sizes using one core.
Selecting the correct bit also means matching it to drill power. Large hole saws require slower speeds and high torque. Pairing the wrong bit and drill often leads to stalling or overheating.
Can I use spade bits on finished wood surfaces?
Only if appearance doesn’t matter. Spade bits splinter edges easily. For visible surfaces, stick with Forstner bits instead.
Do Forstner bits work with hand drills?
Yes, though they perform best on drill presses. Using a hand drill requires slow speed and firm alignment to avoid wobble.
How long do hole saws last?
High-quality bi-metal saws last for dozens of cuts. Keep them cool and clear debris often to extend life.
Are auger bits good for wide holes?
Yes, especially for deep drilling in softwood. Their screw-tip design pulls the bit through efficiently.
What bit size should I start with?
If unsure, start smaller and expand gradually. It’s easier to enlarge a hole than to correct an oversized one.
Preparing the Wood Before Drilling
Preparation prevents damage and guarantees precision. Begin by marking the exact center of your hole with a pencil or awl. This gives your bit a clear starting point and stops wandering.
Clamp the wood securely to a flat surface. Movement during drilling causes uneven holes and potential injury. Firm support ensures both accuracy and safety.
For smooth finishes, place scrap wood beneath your workpiece. It prevents tear-out when the bit exits the opposite side. Always check that your drill bit won’t hit the surface below.
If the wood is thick or hardwood, consider drilling a small pilot hole first. It helps guide larger bits and reduces resistance. Pilot holes also make it easier to align Forstner or hole saw centers.
Double-check alignment before starting. Once a large bit begins cutting, it’s nearly impossible to correct mistakes. Careful setup leads to clean, professional results.
Do I need to sand before drilling?
Not necessarily, but sanding reduces splintering. A smooth surface helps bits cut cleanly. Rough textures increase friction and chatter.
Can I use tape to mark the hole area?
Yes, masking tape gives a clear visual guide and minimizes surface chipping. It also helps catch sawdust for cleaner work.
Should I wet the wood before drilling?
No, moisture softens fibers unevenly and dulls bits. Always drill on dry, stable material.
Can I drill large holes near edges?
Avoid it if possible. Wide holes weaken structural integrity near edges. Move inward by at least twice the hole’s diameter.
Is pre-drilling needed for softwood?
Only for very large bits. A small pilot hole stabilizes the entry and reduces bit wandering.
Controlling Speed, Pressure, and Torque
Drilling large holes isn’t about brute strength. The key lies in steady control of speed and pressure. Too much force overheats bits and scorches the wood, while too little stalls progress.
Start at the lowest speed your drill allows. As the bit begins cutting evenly, increase speed slightly but never to maximum. Large bits need slower RPMs to clear chips efficiently.
Maintain consistent downward pressure without leaning heavily on the tool. Let the bit’s cutting edges do the work. Over-pressing only strains the motor and roughens the edges.
Pause periodically to remove sawdust and cool the bit. Continuous cutting traps heat inside the flutes and reduces sharpness. Short breaks keep the process smooth and safe.
If resistance feels uneven, back the bit out slightly and continue slowly. This clears blockages and restores control. Smooth rhythm ensures balanced torque and cleaner cuts.
Why does smoke appear when drilling?
It means friction is too high. Reduce speed, clear chips, or sharpen the bit. Proper cooling eliminates burn marks.
Can I use lubricant for wood drilling?
Not usually necessary, but beeswax or bar soap reduces friction on large bits. Avoid oil—it stains unfinished wood.
Why does my drill jerk suddenly?
Torque kickback happens when the bit binds. Hold the drill firmly with both hands and reduce pressure.
How do I avoid uneven edges?
Keep steady speed and perfect alignment. Wobbling or tilting creates oval holes instead of clean circles.
Can overheating damage my drill?
Yes, excessive torque shortens motor life. Use low gear and rest the tool between cuts.
Preventing Tear-Out and Splintering
Large bits can cause ugly tear-out when exiting the wood. The fibers at the bottom surface break apart instead of cutting cleanly. Preventing this problem separates amateurs from professionals.
Always use backing wood beneath your workpiece. It supports fibers as the bit breaks through. The backing board absorbs the exit pressure and leaves a smooth edge.
Sharp bits are the best defense. Dull edges tear rather than slice. Inspect cutting teeth frequently and sharpen or replace them when needed.
Drilling halfway from each side also minimizes damage. When the bit’s point emerges through the bottom, flip the board and finish from that side. This method guarantees clean edges on both surfaces.
Reducing speed near the end of the cut further helps. Slower motion gives the bit time to shear fibers gently. Attention at this stage ensures professional-grade finishes.
Why does wood chip around the hole?
It’s usually from dull bits or no backing board. Always combine sharp tools and support to prevent chipping.
Can painter’s tape stop tear-out?
Yes, tape holds fibers in place during drilling. Remove it gently after the hole is complete.
Is drilling from both sides necessary?
For thick wood, yes. It produces cleaner exits and reduces binding. Always align carefully to meet holes perfectly.
What causes fuzzy hole edges?
Low speed or dull bits. Increase RPM slightly and use sharper edges for smooth results.
Can sanding fix minor tear-out?
Yes, light sanding smooths small imperfections. Use fine-grit paper to maintain accuracy.
Using Hole Saws for Extra-Large Cuts
When holes exceed typical bit sizes, hole saws become indispensable. They cut around the perimeter, leaving a solid wooden plug in the center. This design removes less material while still creating wide openings.
Attach the hole saw to its arbor, ensuring the pilot bit is tight. The pilot bit guides the saw and prevents wandering. Always confirm both parts are straight before starting.
Begin drilling at low speed to score the circle. Once the saw teeth bite, increase speed moderately while maintaining control. Let the saw glide—forcing it only increases vibration.
Periodically lift the saw to clear sawdust and reduce friction. Packed debris overheats blades and burns edges. Frequent clearing keeps the tool sharp and efficient.
After cutting through, remove the wooden plug by twisting gently with pliers. Smooth the edges with sandpaper for a professional finish. Hole saws make large holes easier and safer than forcing oversized bits.
What’s the maximum size hole a hole saw can make?
Common sets go up to 6 inches, but industrial versions reach 8 inches or more. Always match saw size to your drill’s power capacity.
Do I need lubricant when using hole saws?
For deep cuts, yes. A small amount of wax prevents heat buildup. It extends blade life significantly.
Can I use a hole saw on a drill press?
Yes, it offers perfect control and alignment. Keep feed pressure light to avoid binding.
Why does my hole saw keep binding?
Chips are clogging the teeth. Pause, clear debris, and resume slowly. Clean blades cut more smoothly.
Can I reuse hole saws on other materials?
Yes, with proper type. Bi-metal saws handle plastic and light metal as well as wood.
Finishing and Cleaning Large Holes
After cutting, your work isn’t finished yet. The edges may feel rough or slightly burned from friction. Proper finishing perfects the appearance and protects against damage.
Use sandpaper wrapped around a dowel to smooth inner edges. Move evenly along the circumference until surfaces feel clean. Start with medium grit, then finish with fine.
If the wood darkened from heat, rub gently with fine steel wool. It removes scorch marks without enlarging the hole. Avoid aggressive sanding that could change diameter.
For decorative work, sealing edges with clear varnish prevents moisture absorption. This step is vital for holes used in furniture or cabinetry. It keeps expansion minimal and preserves color.
Cleaning all sawdust after drilling ensures accuracy for fittings or hardware. Dust left behind can interfere with mounting and alignment. Always inspect the result under good lighting before final assembly.
Can I paint the inside of large holes?
Yes, thin coats applied with a small brush protect wood fibers. Allow full drying before inserting hardware.
Why does my hole feel slightly uneven?
The drill may have wobbled. Wrap sandpaper on a round file to even it out gradually. Avoid removing too much material.
Is sealing necessary for interior projects?
It’s optional but recommended. Sealing adds strength and a polished look, especially for furniture.
How do I clean burn marks?
Light sanding or fine steel wool removes them. Keep the tool moving to avoid creating dips.
Can I polish edges for a glossy finish?
Yes, apply clear wax or buffing compound. It enhances appearance and protects from moisture.
Maintaining Tools for Long-Term Accuracy
Clean, sharp tools define the quality of every project. After drilling, remove all dust and resin buildup from bits and saws. Resin reduces sharpness and increases friction in future work.
Inspect bits for dull or chipped edges. A dull tool not only cuts poorly but can damage your drill motor by forcing extra load. Sharpen or replace as soon as wear appears.
Lubricate moving parts of your drill lightly. This prevents corrosion and keeps mechanical components running smoothly. Proper care extends tool lifespan dramatically.
Store bits organized by size and type in a dry environment. Moisture causes rust that ruins precision edges. Labeling storage cases speeds up selection for the next task.
Periodic maintenance transforms cheap tools into long-term assets. Respecting your equipment ensures consistency and professional quality every time you drill.
Can I sharpen spade or Forstner bits myself?
Yes, with a small file or diamond hone. Follow the original cutting angle carefully. Incorrect sharpening changes performance.
Should I oil my hole saws?
A light coat prevents rust. Wipe clean before storage and re-oil occasionally. Avoid excess that attracts dust.
How long do Forstner bits last?
With proper care, years. Keep them sharp and avoid overheating for extended life.
Can rusty bits still be used?
Only after cleaning and sanding off corrosion. Deep rust weakens metal and should be discarded.
What’s the best way to clean sawdust buildup?
Compressed air or a stiff brush works well. Never wash bits with water—it accelerates rust.
Conclusion
Drilling large holes in wood isn’t about brute force—it’s about control, patience, and the right technique. The best results come from understanding both the material and the tool. When approached carefully, even the toughest hardwood yields clean, perfect openings.
Each step matters, from choosing the correct bit to managing speed and cooling. Mastering these techniques transforms a challenging job into a satisfying, repeatable craft. The difference shows not just in smooth edges but in your growing confidence.
Remember, a skilled craftsman never fights the tool. They guide it, respect it, and let it perform its purpose. The hole you create isn’t just a gap in wood—it’s proof of precision and care.
Once you hear the gentle hum of a steady cut instead of harsh grinding, you’ll know you’ve done it right. That’s the moment where practice meets mastery.

I’m John F. Nicholas, the founder, lead writer, and drill enthusiast behind 101drill.com. With years of hands-on experience in power tools and DIY projects, I created this platform to share practical knowledge, expert tips, and real-world insights to help others master the art of drilling.