
You set your new drill against a wooden board, squeeze the trigger, and expect a perfect hole. But the bit wanders slightly, the edge splinters, and the exit side tears apart. What looked simple suddenly feels tricky, and you wonder how professionals make such clean holes so easily.
Drilling wood might seem straightforward, yet precision requires the right tools, setup, and rhythm. Each type of wood behaves differently, pine chips quickly, oak burns under high speed, and plywood splinters without support.
Mastering the technique means understanding these small differences and adapting your approach.
Woodworking experts often say that drilling isn’t about power but control. Too much speed scorches the surface; too little pressure makes the hole uneven. The key lies in balance — steady speed, correct bit, and smooth entry.
According to carpentry studies, over 70% of rough or misaligned holes happen because of improper bit selection or excessive pressure. Avoiding these mistakes means cleaner results, stronger joints, and a professional finish.
In this guide, you’ll learn everything about drilling into wood: choosing the right bit, setting up your work, drilling straight and clean, avoiding tear-out, and finishing perfectly.
Understanding Wood Before You Drill
Wood isn’t uniform like metal or plastic; it’s a living material with fibers, grain, and moisture content. These natural patterns affect how a drill bit moves through it. Softwoods like pine and cedar cut easily, while hardwoods like oak or maple resist more and need sharper bits.
The direction of the grain matters too. Drilling with the grain feels smoother but risks splitting if the bit exits too close to the edge. Drilling across the grain provides stability but requires careful speed control to prevent chipping.
Moisture changes everything. Damp wood tends to grab the bit and produce messy holes, while very dry wood may crack under high torque. Always work with seasoned, dry lumber for best accuracy.
Plywood, MDF, and particle board add another challenge. Their layered construction or compressed fibers react unpredictably. Supporting these materials with a scrap board prevents blow-out on the backside.
Understanding your material is the foundation of good drilling. When you know how the wood behaves, you can adjust your tools and technique to match perfectly.
Choosing the Right Drill and Speed
There are many drills on the market, but not all are ideal for woodworking. For small projects, a cordless drill with variable speed control gives flexibility and comfort. For deeper or larger holes, a corded drill offers consistent power.
Always ensure your drill has a clutch or torque setting. This feature prevents overdriving and protects both the bit and the wood surface. A light setting works for thin panels, while thicker hardwoods may need higher torque.
Speed control is critical. Use high speed for small holes under 6 mm, and slower speeds for large bits above 10 mm. The harder the wood, the slower you should drill.
Professional carpenters often start drilling at medium speed and reduce rotation once the bit nears exit. This prevents tear-out and keeps the hole edges sharp.
If you’re working frequently with large bits like Forstner or hole saws, consider a drill press. It keeps the bit perpendicular and ensures repeatable precision every time.
Types of Drill Bits for Woodwork
Choosing the right drill bit is half the job done. Different bits are designed for different results — speed, precision, or depth.
Twist bits are the most common for general woodwork. They create clean holes quickly but can wander if not centered properly. Use them for pilot holes or general fastening work.
Brad-point bits are the favorite among woodworkers. Their sharp center spur anchors the bit and prevents wandering, producing crisp, accurate holes. They’re perfect for cabinetry, furniture, and joinery.
Spade bits remove material fast but create rougher edges. They’re best for hidden holes or large-diameter openings like wiring or plumbing.
Forstner bits cut flat-bottom holes with perfect edges, ideal for hinge cups and dowel joints. Use low speed and firm pressure to avoid overheating.
Hole saws cut large circular holes and work best with a pilot bit in the center. Keep speeds low to prevent burning.
Each bit type brings unique benefits, and having a full set ensures you’re ready for every wood-drilling scenario.
Preparing the Workpiece for Drilling
Proper preparation ensures accuracy and safety. Start by marking your hole location using a pencil and center punch or awl. This small indentation helps guide the bit and prevents it from wandering.
Secure the workpiece firmly using clamps. Wood can shift under pressure, and even slight movement ruins alignment. A stable surface guarantees smoother drilling and cleaner holes.
If you’re drilling through a thin board or veneer, place a scrap backing board beneath. It supports the exit side and prevents splintering as the bit breaks through.
Check that your bit is sharp and clean. A dull bit overheats and burns the surface, while a dirty bit causes chatter. Always inspect before starting.
Lastly, plan your drilling depth. Mark the desired depth on the bit using masking tape or a depth stop attachment. This prevents drilling too deep and damaging the other side of the material.
Preparation may seem simple, but it determines how professional your final result will look.
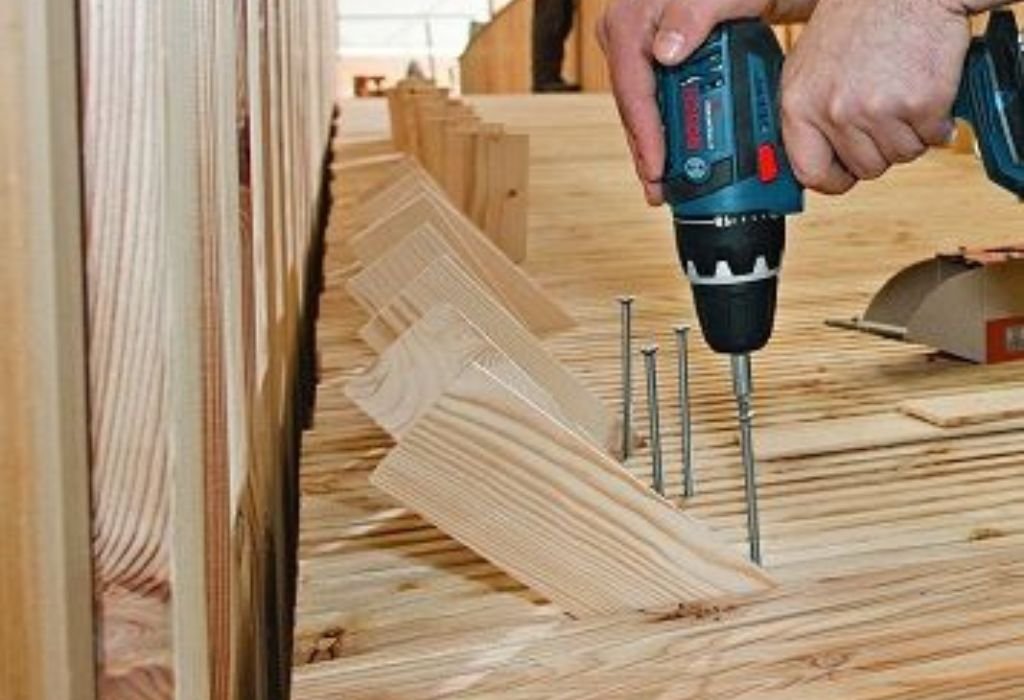
Step-by-Step: How to Drill a Hole in Wood
- Mark and Punch: Clearly mark the center of your hole and make a small dent with an awl to guide the bit.
- Secure the Piece: Clamp the wood tightly to your workbench or table. Movement ruins accuracy.
- Align the Drill: Hold the drill perpendicular to the surface. If necessary, use a drill guide or square for alignment.
- Start Slowly: Begin at low speed until the bit bites into the wood. Gradually increase speed as it stabilizes.
- Maintain Pressure: Apply steady, even pressure. Don’t force the bit; let it cut naturally.
- Clear Debris: Periodically lift the bit slightly to let sawdust escape. This keeps the hole clean and prevents overheating.
- Slow Down at Exit: As the bit nears the other side, reduce speed and pressure to avoid splintering.
- Finish Cleanly: Remove the bit gently and inspect the hole. Sand lightly if needed for smooth edges.
Following these steps ensures your hole is straight, clean, and free from tear-out.
Avoiding Common Drilling Mistakes
Even experienced woodworkers sometimes make small errors that lead to poor results. One of the most frequent mistakes is drilling too fast. High speed creates heat that burns the wood and dulls the bit.
Another mistake is not clamping the piece securely. Movement during drilling causes wobbling, oval holes, or bit breakage. Always stabilize your work before starting.
Using the wrong bit is also common. Metal bits can work on wood temporarily but leave rough edges and shorten tool life. Always choose bits made specifically for wood.
Applying too much pressure is another issue. Forcing the drill compresses the fibers, causing tear-out and splintering around the edges. Let the bit do the cutting work.
Finally, many people forget to clear debris mid-drilling. Packed sawdust increases friction, slows the drill, and creates heat. Lifting the bit occasionally keeps things cool and efficient.
Avoiding these errors keeps your drilling clean, accurate, and effortless.
How to Drill Straight Holes Without a Drill Press
Keeping a hand drill straight takes practice. Start by marking your center and visualizing a vertical line through it. Holding the drill perpendicular to this imaginary line helps maintain accuracy.
A simple trick is using a drill guide block — a small piece of wood with a pre-drilled straight hole. Place your bit through the guide while drilling to keep the angle consistent.
If you don’t have a guide, you can tape a small mirror next to your work area. Watch your reflection as you drill; when the drill remains upright, the reflection stays centered.
Some drills come with built-in bubble levels to check vertical alignment. Glance at the indicator while drilling to ensure consistency.
For long or deep holes, stop occasionally to check alignment by inserting a dowel or pencil into the hole. Adjust if it’s leaning.
Practicing on scrap wood before your main project builds confidence and accuracy over time.
Drilling Large Holes in Wood
Large holes require more torque and control. For sizes above 13 mm, choose spade bits, Forstner bits, or hole saws. Each one removes material differently, so adjust speed and pressure accordingly.
For spade bits, use medium speed and moderate pressure. Their flat blades cut quickly but can cause tear-out on exit. Always use a backing board.
Forstner bits create smooth, flat-bottom holes ideal for hinges or dowel joints. They need low speed, consistent pressure, and frequent dust clearing.
Hole saws are best for very large openings such as pipes, knobs, or cable pass-throughs. Start slowly and ensure your drill has enough power to handle the torque.
When drilling large holes, maintain a firm two-hand grip. The sudden catch of the bit can cause kickback if you lose control.
Patience and consistent technique yield perfect circular holes even in thick hardwoods.
How to Prevent Tear-Out and Splintering
Tear-out occurs when fibers on the back side of the wood break outward as the bit exits. It’s one of the most frustrating issues in woodworking.
The easiest way to prevent it is by placing a scrap backing board beneath your workpiece. The bit cuts into this secondary layer instead of tearing the wood’s underside.
Drilling from both sides also helps. Start the hole halfway from one side, then flip the board and complete it from the other. This keeps both edges clean.
Reduce drill speed before the bit breaks through. Lower RPM means less impact on the fibers, resulting in smoother edges.
Using sharp bits with clean cutting spurs makes a huge difference. Dull or damaged edges tear rather than slice the fibers.
Finally, masking tape over the drill mark can hold the fibers together, especially on veneer or plywood surfaces. Small details like this make your final piece look professional.
How to Drill Holes for Screws and Dowels Accurately
When attaching two pieces of wood, accuracy is everything. Drilling the right pilot holes prevents splitting and ensures tight, aligned connections. Every professional woodworker starts with proper hole sizing and marking.
For screws, choose a drill bit slightly smaller than the screw’s shank (the solid core without threads). This gives the threads enough material to bite into while relieving pressure on the wood fibers.
For dowels, the bit should match the dowel’s diameter exactly. Even a fraction of a millimeter off can cause loose joints or impossible fits. Measure your dowels with calipers to confirm their size before drilling.
Mark the hole locations carefully using a square or marking gauge. Double-check alignment on both pieces before drilling. Misalignment leads to offset joints that look uneven.
To maintain perfect depth, use masking tape on the bit as a depth guide. For repeated drilling, a stop collar works best and gives uniform results.
If joining two boards, drill the first piece completely, then use it as a guide for the second. This guarantees holes line up perfectly.
Finally, test-fit your dowels or screws before applying glue or driving fasteners. Taking time here ensures flawless assembly and long-lasting joints that won’t loosen over time.
How to Drill Angled Holes in Wood
Sometimes woodworking projects require angled holes — for dowel joints, furniture legs, or decorative mounts. Drilling these correctly without a drill press can feel tricky, but with the right setup, it’s easy to master. The key is controlling both angle and depth consistently.
Start by marking your angle using a protractor or bevel gauge. Draw a guideline across the wood surface so you have a visual reference to follow. If the angle must be precise, build or buy a drilling jig that holds the drill at the correct angle.
Position the drill so that its body follows the guideline. Begin slowly to let the bit bite in before applying full speed. Moving too quickly can cause slipping and ruin the angle.
For shallow angled holes, you can raise one side of the workpiece using scrap wood blocks. This tilts the surface instead of your drill and provides better stability. Clamp everything securely before starting.
Always drill from the visible side of the wood toward the hidden side. This minimizes tear-out where it matters most. If you must drill through completely, place a backing board on the exit side.
After drilling, test the fit with your dowel or screw. If the angle feels slightly off, sand the entry side gently to adjust the alignment. Practicing on scrap wood first ensures accuracy on your main project.
Mastering angled drilling allows you to create stronger joints, elegant frames, and perfect furniture designs with ease and confidence.
Maintenance Tips for Your Drill and Bits

Even the best technique won’t help if your tools are neglected. Regular maintenance keeps your drill running smoothly and your bits sharp for precise results every time. Clean, lubricate, and inspect often.
After each use, wipe your bits with a dry cloth to remove dust and resin buildup. Sap and glue residues can dull cutting edges quickly. For stubborn residue, use mineral spirits or a bit-cleaning solvent.
Inspect bits for dullness, chips, or bent shafts. A dull bit produces heat, smoke, and ragged holes. Replace or sharpen as soon as you notice performance dropping.
Keep drill chucks clean and lightly lubricated. Dust and sawdust can jam the jaws, preventing bits from seating securely. Use compressed air or a soft brush for cleaning.
Store bits in a dedicated holder or case. Tossing them loosely into a toolbox causes edge damage and rust. A dry environment prevents corrosion and extends their lifespan.
For cordless drills, charge batteries regularly but avoid leaving them on the charger indefinitely. Clean vents and check brushes on corded models for wear.
Proper maintenance means your tools always perform at their best, saving both time and money. Sharp bits and smooth drills produce cleaner, more professional woodworking results every time.
Safety Tips for Drilling Wood
Drilling might look harmless, but safety should always come first. Always wear safety glasses to protect against flying chips and dust. Even small splinters can cause eye irritation.
Avoid loose clothing or jewelry that can catch in the spinning bit. Tie back long hair before starting.
Use clamps instead of hands to secure the material. A spinning drill bit can easily catch and twist wood if it’s not stable.
Keep both hands on the drill for balance and control. Sudden binding or kickback can occur unexpectedly.
Never change bits or adjust settings while the drill is plugged in or the trigger pressed. Unplug first, then make adjustments.
Work in a clean, well-lit area. Sawdust can hide cracks or marks that affect accuracy.
Good safety habits make your woodworking both productive and risk-free.
Finishing the Hole: Sanding and Cleaning
Once your hole is drilled, finishing touches make all the difference. Start by removing any burrs or splinters around the edges using sandpaper or a countersink bit.
If the hole will be visible, smooth the surface with fine-grit sandpaper for a polished look. For holes meant for screws or plugs, countersinking helps screws sit flush with the wood.
Vacuum or blow away sawdust from the hole interior before inserting hardware. Dust buildup affects glue or finish adhesion.
If you drilled multiple holes, inspect each one for consistency. Uniform edges reflect precision and care.
Apply a bit of wood finish or sealant inside exposed holes to protect from moisture and prevent swelling.
Taking time for these small details gives your project a clean, professional appearance.
FAQ: Pro Secrets and Fixes for Wood Drilling Problems
Why does my drill bit smoke when drilling wood?
You’re likely using too high a speed or a dull bit. Slow down and clear chips frequently to avoid overheating.
What’s the best bit for clean holes in hardwood?
Brad-point bits provide the sharpest, most accurate results in hardwoods like oak or maple.
How can I drill without splintering plywood?
Use masking tape over the mark, drill slowly, and support the backside with a scrap board.
Can I use metal drill bits on wood?
Yes, but they produce rough holes and dull quickly. Always use wood-specific bits for smooth results.
How do I drill a deep hole straight?
Use a guide block or drill press, withdraw the bit periodically to remove chips, and check alignment often.
What speed should I use for softwood vs hardwood?
Softwood can handle higher speeds around 2,500 RPM, while hardwood should stay near 1,000–1,500 RPM.
Why does my drill skid when I start?
You need a starting point. Use a center punch or awl to make a small indentation before drilling.
How do I fix a hole that’s too large?
Fill it with a dowel or wood plug glued in place, let it dry, then re-drill at the correct size.
Conclusion
Drilling a hole in wood might look easy, but achieving professional results takes understanding and attention to detail. The key is to match your bit, speed, and pressure to the wood type.
A well-chosen bit, steady hands, and proper support prevent splintering, burning, and misalignment. By working patiently, you’ll get clean holes that fit fasteners snugly and look flawless.
Always prepare your work, check your equipment, and respect the material’s grain and texture. Every type of wood tells you how it wants to be drilled — you just need to listen.
Whether building furniture, shelves, or crafts, precision and patience turn a simple drilled hole into a mark of craftsmanship. The next time you pick up your drill, let knowledge guide your hand and perfection follow naturally.

I’m John F. Nicholas, the founder, lead writer, and drill enthusiast behind 101drill.com. With years of hands-on experience in power tools and DIY projects, I created this platform to share practical knowledge, expert tips, and real-world insights to help others master the art of drilling.