
You hold a screw and drill in your hands, thinking it’s a quick job. Yet as soon as you start, the bit slips, the screw wobbles, and the wood splinters. What seemed like a two-minute task suddenly feels like a delicate art.
Drilling a screw into wood might look simple, but doing it properly requires technique, the right tools, and understanding of the material. Wood can split or strip easily if you rush the process. The secret lies in precision and preparation rather than force.
Many beginners ruin projects by skipping pre-drilling or using the wrong screw size. Even experienced builders can damage softwood if they apply uneven pressure. Knowing how wood reacts under a drill ensures cleaner results and stronger joints.
Wood fibers behave differently depending on the type and grain direction. Some are soft and forgiving, while others resist penetration and need more torque. Once you understand these differences, your screws will go in effortlessly.
This guide will walk you through every detail, from selecting the right screw to the final tightening. With practice and patience, you’ll master the skill of drilling screws like a true craftsman.
Understanding the Basics of Wood and Screws
Before drilling any screw, you must understand both materials — the wood you’re working with and the screw you plan to use.
Every type of wood, whether pine, oak, or plywood, has its own density and resistance. Softwoods allow easier penetration, while hardwoods require pre-drilling for precision.
Screws come in different sizes, thread types, and materials. The threads determine how well they grip the fibers inside the wood. Coarse-thread screws work best for softwoods, while fine-thread screws suit hardwoods.
The length of the screw is equally important. A general rule is that at least half of the screw should be embedded in the base material. Longer screws hold stronger but risk splitting thin wood if not guided properly.
The drill bit you use should match the size of the screw’s shaft, not the threads. Using too large a bit weakens grip, while too small a one makes the screw difficult to drive in. Matching both ensures a perfect balance of strength and ease.
Knowing these simple fundamentals makes all the difference. The wood, screw, and bit must work together as one precise system. When they align perfectly, you’ll get a clean, solid, and lasting connection.
Choosing the Right Tools for the Job
The success of drilling depends on having the right tools. A reliable power drill or driver is essential, and cordless versions offer flexibility for home projects. A drill with variable speed control helps maintain precision, especially when starting a hole.
Use sharp drill bits suitable for wood. Dull bits create friction, heat, and splinters, weakening both screw and surface. Investing in quality bits ensures clean holes and prolongs your drill’s life.
Countersink bits can also improve results. They create a shallow recess that allows the screw head to sit flush with or below the surface. This not only looks better but prevents the head from damaging paint or finishes.
For beginners, magnetic bit holders make handling easier. They hold screws firmly in place, allowing one-handed operation in tight spaces. This prevents wobbling and misalignment.
Lastly, having the right screwdriver bit shape — Phillips, flat, or Torx — ensures a firm grip and prevents slipping. Matching the bit to the screw head avoids stripping and frustration.
Can I use a hammer drill for wood?
No, hammer drills are designed for masonry. The percussive motion can split wood fibers instantly. Always use a regular drill or driver for wooden surfaces.
Is it okay to use impact drivers for screws?
Yes, impact drivers are excellent for driving long screws. Their torque control prevents stripping and ensures smooth, controlled driving even in dense hardwood.
Do I need special drill bits for hardwood?
Yes, use high-speed steel or brad-point bits. They cut cleaner and faster through dense wood grains. Always pre-drill to prevent splitting.
Can one drill bit work for all screw sizes?
No, each screw size needs a corresponding bit diameter. Using mismatched sizes leads to weak grip or difficult insertion. Keep a bit chart handy for reference.
Are cordless drills powerful enough for long screws?
Modern lithium-ion cordless drills have plenty of torque. Use lower speed settings and firm pressure. Recharge regularly to maintain consistent performance.
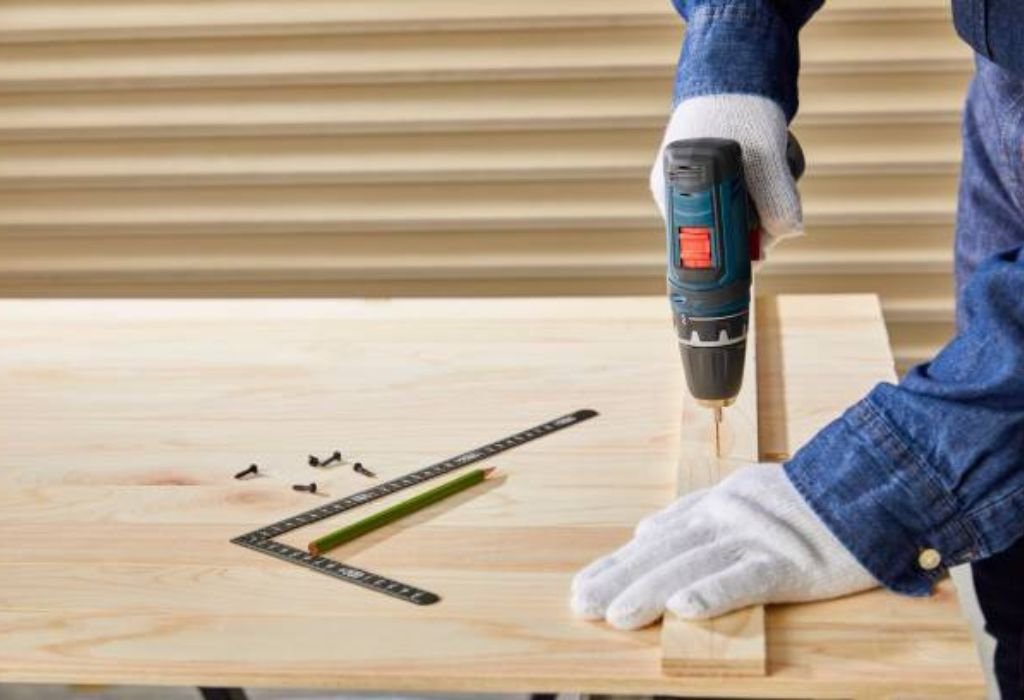
Preparing the Wood Before Drilling
Good preparation prevents most mistakes before they happen. Start by marking the exact spot where the screw should go. Use a pencil and ruler to keep alignment straight, especially for multiple screws.
Next, make a small indentation using an awl or nail. This helps the drill bit grip the surface without wandering. It’s a simple step that ensures accuracy and saves you from crooked screws.
If you’re working near the edge of a board, move inward by at least twice the screw’s diameter. Screws placed too close to edges tend to split the wood. Proper spacing ensures both stability and strength.
Check that your drill bit and screw match correctly. Test on a scrap piece of wood to see how the screw fits before committing to your actual workpiece. Adjust as needed to avoid irreversible errors.
Finally, clamp your wood firmly to a stable surface. Movement during drilling causes uneven holes and stripped threads. Stability guarantees smooth control throughout the process.
Why does wood split when drilling?
It happens when screws are too close to edges or no pilot hole is drilled. Always pre-drill slightly smaller than the screw’s diameter. This gives the wood room to compress around the threads.
Can I skip clamping small pieces?
No, even small boards can twist or move. Clamping keeps everything stable and prevents injury. It’s one of the safest and most overlooked steps.
How deep should I pre-drill?
Drill to about two-thirds of the screw’s length. This allows enough room for threads to bite while reducing pressure on the wood. Going deeper can weaken grip.
Is it necessary to drill for softwoods?
Not always, but it’s still recommended. Pre-drilling improves accuracy and prevents over-tightening that could strip the hole. It’s a good habit even with pine or cedar.
What should I do if the hole becomes too wide?
Fill it with wood glue and a small dowel or toothpick. Let it dry completely, then re-drill carefully. This restores the grip without compromising structure.
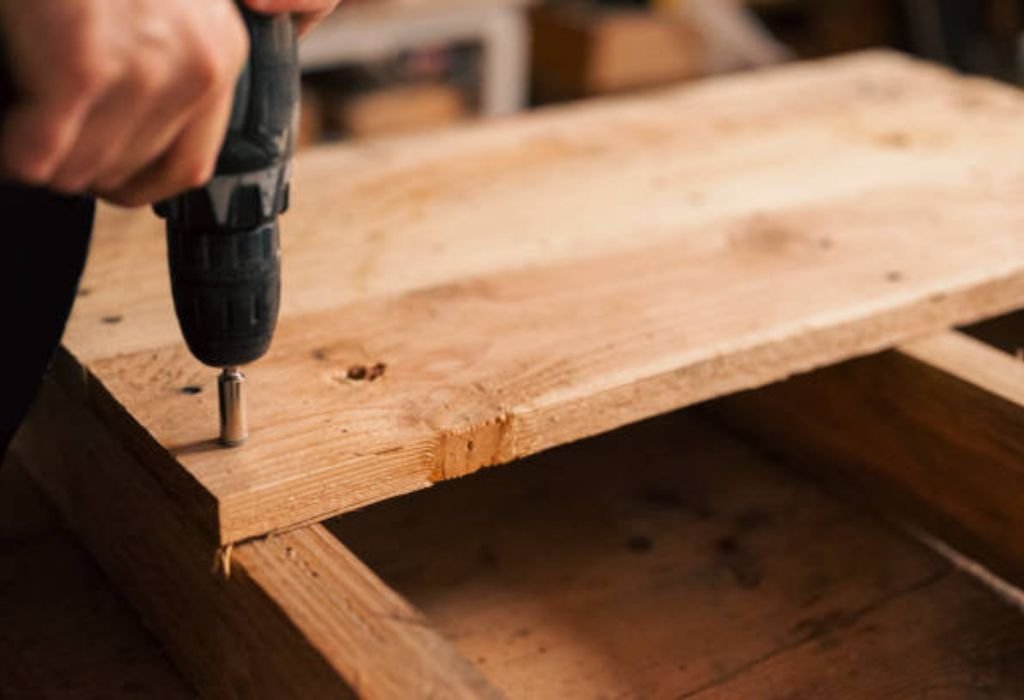
How to Drill the Perfect Pilot Hole
The pilot hole is the foundation of a clean screw joint. It guides the screw into place without forcing the fibers apart. Done properly, it makes driving easier and prevents cracks.
To drill one, attach the right-sized bit to your drill. Hold the tool perpendicular to the surface to maintain straight entry. Apply steady pressure while letting the drill do the work — never force it.
Stop drilling once you reach the proper depth. Using tape on the bit as a depth marker helps prevent drilling too far. Clean out any sawdust from the hole to ensure a tight fit.
If you’re driving a countersunk screw, follow the pilot hole with a countersink bit. This creates a tapered edge so the screw head sits neatly inside. It’s an easy way to achieve a professional finish.
Pilot holes also reduce the torque needed to drive the screw. This means less strain on your drill and fewer stripped heads. It’s a step that saves both time and frustration in the long run.
Driving the Screw Cleanly and Securely
Now comes the part most people rush — driving the screw. Start by aligning the screw’s tip with your pilot hole and ensure your drill bit matches the screw head perfectly. Hold the drill straight and apply gentle pressure.
Use a slow speed to start. Once the screw catches, increase power gradually. Sudden bursts of torque can cause slipping, stripping, or head damage. Smooth, controlled motion ensures accuracy.
Watch the screw as it sinks into the wood. Stop just before it becomes flush with the surface if you plan to finish later. If you overdrive it, the head might sink too deep or split surrounding fibers.
For visible surfaces, drive screws slightly below the surface, then fill with wood putty. This hides imperfections and prepares the area for paint or varnish. Clean, flush heads look professional and durable.
Avoid switching drill direction mid-way unless absolutely necessary. Reversing too often can loosen the grip inside the wood. A steady, one-direction motion guarantees a strong and lasting hold.
Why does my screw keep stripping?
Your bit may not match the screw head, or you’re applying too much pressure. Let the tool do the work and maintain alignment. Replacing worn bits also prevents stripping.
Can I drive screws without pilot holes in softwood?
Yes, but use caution. The risk of splitting increases near edges or in thin boards. Always start slowly and back off if resistance feels uneven.
Should screws be flush or slightly recessed?
It depends on appearance and function. Flush is ideal for visible surfaces, while recessed screws suit joints or areas requiring filler.
Why do screws wobble during driving?
This happens when bits or screws aren’t centered properly. Magnetic bit holders or guide sleeves help maintain balance and reduce shaking.
Can I reuse the same screw hole?
Not if it’s loose. Fill the old hole with a wooden plug or glue-coated dowel before re-screwing. This restores strength and prevents movement.
Controlling Torque and Speed While Drilling
Controlling torque is crucial when driving screws into wood. Too much torque can overdrive or strip the screw, while too little leaves it loose and unstable. Using a drill with adjustable settings allows you to manage both power and precision effectively.
Most drills have a clutch ring marked with numbers. These numbers represent torque levels that regulate how much force is applied. Start at a lower setting and increase gradually until the screw drives in smoothly without resistance or skipping.
Speed also matters as much as torque. High speed works for light, softwood applications, while lower speeds suit hardwoods or thick planks. Using the right speed prevents the drill from burning the screw or damaging the fibers.
Keep your wrist steady and avoid pushing too hard. Let the drill’s motor handle the work, while your hand guides it. Proper torque control ensures every screw sinks perfectly aligned and securely anchored.
Drilling is about rhythm rather than strength. Once you learn to balance pressure, speed, and torque, the process feels effortless. Mastering this harmony turns even large projects into smooth, consistent work.
Why does my drill stop suddenly while driving a screw?
This usually happens when torque is set too low. Increase the setting gradually until the clutch no longer disengages prematurely. It ensures smooth driving without damaging the screw head.
Can high torque damage screws?
Yes, too much torque can twist or break the screw shaft, especially in softwood. Adjust torque settings according to material density and screw length. Proper torque maintains the screw’s integrity.
Should I change speed for different wood types?
Absolutely. Dense hardwoods require slower speeds for better control, while softwoods allow faster drilling. The right combination prevents overheating and ensures clean entry.
What if the screw keeps spinning without tightening?
That means the hole is stripped. Fill it with a glued dowel, let it dry, and re-drill. The new surface will grip tightly again.
Can torque settings protect my drill motor?
Yes, the clutch prevents the motor from overloading by disengaging when resistance becomes too high. This feature extends the drill’s lifespan and ensures smoother operation.
Types of Screws and Their Purposes
Not all screws are created equal, and choosing the right one makes drilling easier. Wood screws, drywall screws, and deck screws each serve specific functions. Understanding their differences ensures better performance and durability.
Wood screws feature deep, coarse threads designed to grip fibers firmly. They often have smooth upper shanks that pull pieces together tightly. These are ideal for furniture, cabinetry, and framing projects.
Drywall screws, though similar, are thinner and brittle. They can easily snap in hardwood. Use them only for light-duty indoor work where load pressure is minimal.
Deck screws are coated to resist rust and corrosion. They perform well outdoors in humid or wet environments. The star or Torx head prevents stripping, which makes them easier to drive repeatedly.
Self-tapping and self-drilling screws save time by creating their own pilot holes. They’re convenient but require strong drills with precise torque control. Each screw type has a purpose — matching it to your project avoids frustration and ensures professional results.
Fixing Common Screw-Drilling Mistakes
Mistakes happen even to experienced builders, but understanding why they occur helps you correct them easily. One of the most common issues is splitting the wood due to lack of a pilot hole. Splitting weakens the entire joint and is difficult to repair cleanly.
Another frequent mistake is using excessive speed or torque. The friction from high-speed drilling burns both the screw and the wood. It leaves black marks and weakens fibers, reducing long-term strength.
Sometimes the screw head strips before the screw is fully seated. This happens when the bit slips or doesn’t match perfectly. Replacing the bit immediately prevents repeated damage to the screw and the project.
Wobbling or misalignment is another issue that affects precision. The easiest fix is to steady your wrist and maintain direct alignment between the drill and screw. A slight tilt can create uneven stress inside the wood.
If a screw breaks midway, use pliers or a screw extractor tool to remove the remaining part carefully. For deep breaks, drilling a small pilot hole beside it can release the tension. Avoid forcing it, as that often causes more damage.
How can I remove a stripped screw easily?
Use a rubber band between the screw and bit to increase friction. If that fails, switch to a screw extractor bit designed for stripped heads. Gentle, steady pressure works better than force.
What should I do if my screw head breaks off?
Drill a shallow hole around it and use needle-nose pliers to twist it out. Filling the hole afterward with wood filler allows you to re-drill cleanly. Patience is key.
Why does my screw spin endlessly without tightening?
The hole may be stripped. Insert a wooden dowel coated in glue, let it dry, and re-drill the screw. This restores friction and grip.
Can I fix cracked wood after drilling?
Yes, apply wood glue to the crack, clamp it tightly, and allow it to cure. For visible surfaces, sanding afterward hides the repair seamlessly.
Is it okay to reuse old screw holes?
Only if they still grip firmly. Loose holes require filler material or new placement slightly offset from the original spot. Fresh grip ensures stronger hold.
Working with Different Wood Types
Each type of wood behaves differently under a drill. Softwoods like pine or fir are forgiving and allow easy screw insertion. Hardwoods like oak, maple, or walnut demand more preparation and care.
For softwoods, pilot holes can be smaller or even skipped for shallow screws. However, use lower torque to prevent overdriving. The fibers compress easily and hold screws securely when handled gently.
In contrast, hardwoods need precise pilot holes. Their dense structure offers incredible strength but resists penetration. Pre-drilling and lubrication reduce heat and prevent cracking.
Plywood and particle board have layered or composite structures that require careful drilling. Screws near edges can delaminate layers, so move slightly inward for stability. Always use sharp bits to minimize tear-out.
Exotic woods such as teak or mahogany contain natural oils that may interfere with adhesion. Cleaning the surface with alcohol before drilling ensures clean contact. Taking time to prepare each type properly ensures consistency and lasting results.
Can hardwood dull my drill bits faster?
Yes, hardwood’s density wears out bits quickly. Sharpen or replace them regularly to maintain clean drilling performance. Using high-speed steel bits extends their lifespan.
Is pre-drilling necessary for plywood?
Yes, it prevents surface splitting and internal layer separation. Pilot holes ensure the screw enters cleanly without peeling the veneer. Always support the back side with scrap wood.
Why do screws sometimes squeak in wood?
That sound comes from friction between threads and dry wood fibers. Wax or soap coating on screws reduces the noise and improves driving smoothness.
Can I use metal screws for wood projects?
Only if necessary and for temporary fixtures. Metal screws lack proper thread spacing for wood grip. Use true wood screws for permanent stability.
Does humidity affect screw grip?
Yes, wood expands in humid conditions and contracts when dry. Over time, this movement can loosen screws slightly. Retighten occasionally to maintain firmness.
Maintaining Tools and Bits for Longevity
Proper maintenance ensures your drill and bits perform efficiently for years. Always clean bits after use to remove resin, dust, or glue buildup. Dull bits cause friction, generate heat, and reduce precision.
Lubricate moving drill parts regularly if using corded or older models. This keeps motors running smoothly and prevents overheating. For cordless drills, store batteries in a cool, dry place to maintain charge capacity.
Sharpen bits when performance drops. A sharp bit cuts faster, cleaner, and with less vibration. Specialized sharpeners or simple files can restore their edge easily.
Keep your drill set organized to avoid losing bits or mixing sizes. Labeling and grouping them by diameter makes selection faster during projects. Consistency saves time and reduces mistakes.
After long drilling sessions, let your drill cool before storage. Heat is a silent killer of internal components. Regular care not only protects your tools but ensures every screw you drive is perfect.
Can I use metal drill bits on wood?
In emergencies, yes, but wood bits are far better. Metal bits lack the sharp tip needed to start accurately in wood. Always use brad-point bits for clean entry.
How often should I sharpen my bits?
It depends on use frequency. For weekly projects, inspect them monthly. Sharpen whenever you notice smoking wood or rough hole edges.
Should I oil my drill chuck?
Occasionally, yes. A light machine oil keeps it rotating smoothly. Avoid excess oil that may drip onto wood surfaces.
What’s the best way to store drill bits?
Use a dedicated organizer or foam-lined case. Moisture-proof boxes prevent rusting, especially in humid environments. Dry storage extends lifespan significantly.
Can I clean resin buildup with water?
Avoid plain water. Use alcohol or specialized bit cleaner instead. Water can rust steel bits over time.
Conclusion
Drilling a screw into wood is about skill, not strength. By understanding your tools, materials, and methods, you turn a simple task into professional craftsmanship. Every hole, screw, and finish becomes cleaner and stronger when done with care.
From choosing the right screw type to controlling torque, each small detail shapes the final outcome. Wood is a living material that responds best to precision, not pressure. The right approach ensures your work lasts for decades without loosening or cracking.
Remember, every craftsman started with one screw and a shaky hand. With patience, practice, and the techniques you’ve learned here, you’ll soon drive screws perfectly every time. Good technique is what separates frustration from satisfaction.
Whether it’s a small home repair or a furniture masterpiece, let every screw you drive show mastery in motion. Once you get it right, you’ll feel the same quiet pride every time the drill hums — smooth, steady, and perfectly aligned.

I’m John F. Nicholas, the founder, lead writer, and drill enthusiast behind 101drill.com. With years of hands-on experience in power tools and DIY projects, I created this platform to share practical knowledge, expert tips, and real-world insights to help others master the art of drilling.