
You open your toolbox and find a pile of drill bits, all looking nearly identical. Some have sharp points, others appear dull, but without a clear label, it’s hard to know which one to use.
You pick one, start drilling into a brick wall, and within seconds, smoke rises from the surface — the bit is ruined.
This is a common frustration for DIYers and beginners. Many bits look similar at first glance, but their design and purpose are completely different. The bit that cuts through wood easily may fail instantly on concrete or brick.
Masonry materials like stone, concrete, and brick are extremely dense. They require a bit that can crush, not slice, its way through the surface. That’s where masonry drill bits come in, built specifically to handle these tough materials.
Using the wrong bit not only wastes time but also damages your drill and the surface you’re working on. The tip dulls fast, the motor overheats, and you’re left with a hole that’s uneven or incomplete. That’s why identifying the correct drill bit before starting is so important.
In this guide, you’ll learn exactly how to recognize a masonry drill bit by its shape, material, and feel. Once you know what to look for, you’ll never waste time guessing again.
What Makes a Masonry Drill Bit Unique
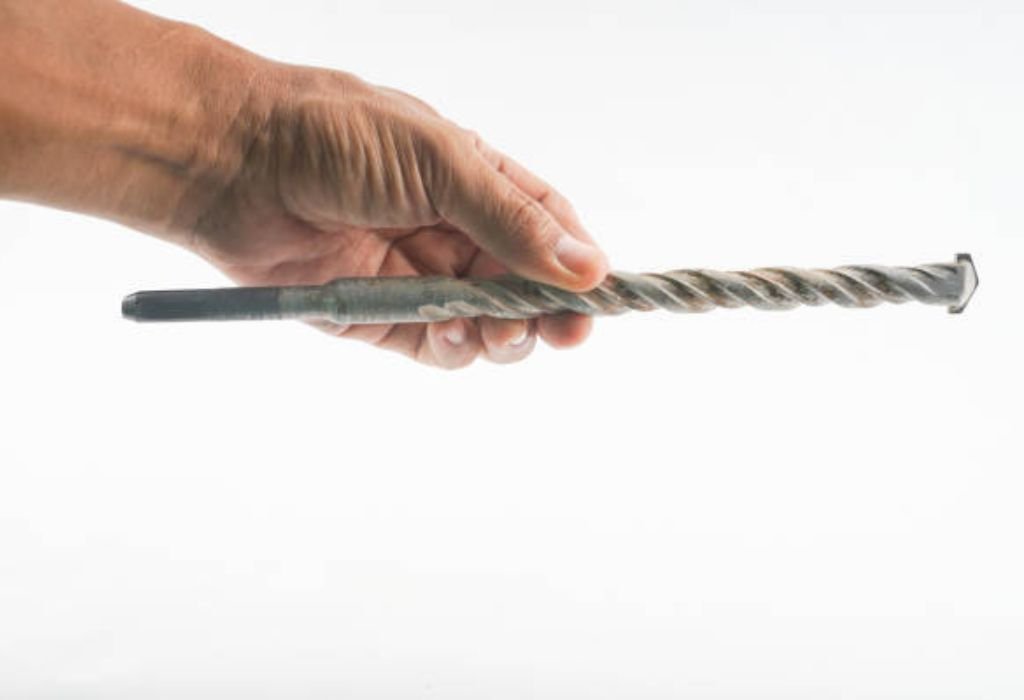
A masonry drill bit is built differently from other types because of its purpose. It doesn’t slice or bore — it grinds and chips. The tip is made from a special tungsten carbide insert that withstands impact and high heat.
This carbide tip is usually fused onto the end of a hardened steel shank. It’s slightly wider than the rest of the body, forming a “spade-like” appearance. That shape allows it to crush stone particles as it rotates.
Unlike wood or metal bits that have sharp cutting edges, a masonry bit looks blunt. Its goal is not precision slicing but brute durability. When paired with a hammer drill, it repeatedly punches into the surface while spinning.
The flutes, or spiral grooves, along the bit’s body are another key feature. They help remove dust and debris as you drill deeper into masonry. This prevents clogging and keeps the bit cooler during use.
Every detail of its design serves a purpose — from the strong shank to the dull tip. The bit may not look impressive, but it’s engineered for endurance, not elegance. Once you understand that, you’ll see why it looks and feels so distinct.
How to Recognize a Masonry Drill Bit by Its Appearance
The most obvious clue lies in the tip. A masonry drill bit’s tip has a small silver or gray carbide insert that looks thicker than the shaft. It’s often brazed or welded into place, forming a sturdy wedge shape.
When you touch the tip, it feels hard and blunt instead of sharp. Wood bits usually have pointed centers for precision starts, while metal bits have fine edges for slicing. Masonry bits lack both — they’re built to endure hammering, not fine cutting.
The body of a masonry bit is heavier and more rigid. It may also appear slightly rough because of the heat-resistant finish used to handle friction. You’ll often find them labeled as “Masonry,” “Concrete,” or “Carbide Tip” on the shank or packaging.
Another giveaway is the color tone. Many masonry bits have darker steel bodies with a silver-gray or bronze carbide tip. That contrast makes them stand out among standard bits.
If you place one beside a wood or metal bit, you’ll immediately notice the difference. It’s thicker, blunter, and built for impact rather than finesse. These physical signs make visual identification simple once you know what to look for.
Material and Tip Composition of Masonry Bits
The tip of a masonry bit is what defines its strength. It’s made of tungsten carbide, one of the hardest industrial materials available. This composition allows it to crush through concrete, brick, and stone without wearing down quickly.
Tungsten carbide is several times harder than steel. When combined with the hammering motion of a drill, it pulverizes tiny portions of the surface as it spins. This grinding effect creates clean holes without cracking the material.
The bonding between the carbide tip and the steel shank is crucial. If the brazing is poor, the tip may detach under heavy vibration. High-quality masonry bits use advanced welding to ensure durability.
The rest of the bit is made of hardened steel for flexibility and shock resistance. It absorbs vibration and transfers energy efficiently from the drill. Together, these materials create a balance of power, endurance, and precision.
You’ll rarely see a pointed end on a masonry bit. The carbide tip’s flat or slightly chisel-shaped surface is what gives it strength. Once you recognize that, identifying a masonry bit by feel and look becomes second nature.
The Function of Flutes in Masonry Drill Bits
The spiral grooves that run along the body of a masonry drill bit are known as flutes. Their purpose goes beyond appearance — they play a vital role in performance. As the bit drills deeper, the flutes carry out crushed dust and debris.
Without proper flute design, debris would clog the hole, increasing friction and heat. This can cause the bit to jam or burn. That’s why masonry bits usually have wide, deep flutes for efficient dust removal.
The spiral pattern also helps maintain balance during drilling. Each rotation pulls the debris upward while stabilizing the bit inside the hole. This keeps drilling smooth and consistent, even in dense materials.
Flutes also improve cooling by allowing air circulation. The continuous movement of dust and air around the bit prevents overheating. This is especially important when drilling into hard concrete where friction is high.
When examining bits, notice how masonry flutes are thicker and less polished than those on wood or metal bits. That rougher structure is intentional — it’s made to survive abrasion from stone particles. Recognizing this design feature is another way to spot masonry bits instantly.
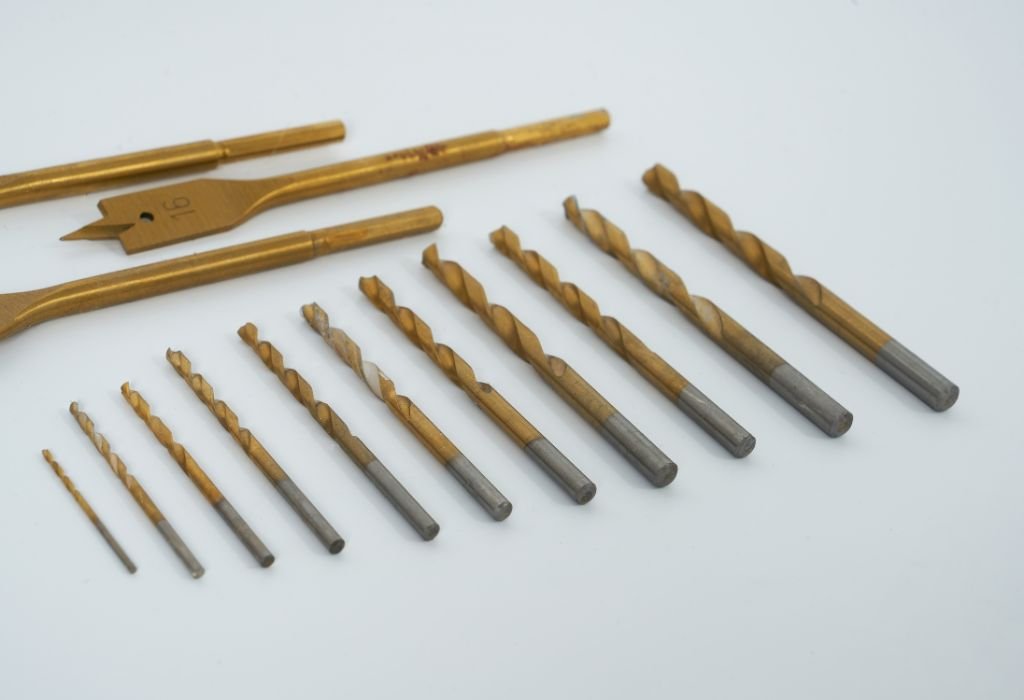
Masonry Drill Bits vs Wood and Metal Drill Bits
Wood drill bits are designed for precision and speed. They have pointed tips that center easily and sharp spurs that cut clean edges. Masonry bits, by contrast, don’t have sharp points because they rely on impact, not slicing.
Metal bits are smoother and more polished. They use high-speed steel or cobalt and have narrow flutes since metal chips are small. If you use a metal bit on masonry, it dulls almost immediately.
Masonry bits are heavier, thicker, and more robust. Their dull-looking carbide tips are the biggest giveaway. Unlike wood or metal bits, they don’t cut — they crush.
When you place these bits side by side, the difference becomes obvious. The masonry bit feels solid and slightly uneven near the tip, while wood and metal bits appear sleek and refined. That toughness is what makes masonry bits ideal for drilling through brick or concrete.
Understanding these distinctions ensures you never mix them up again. Choosing the right bit for the right material protects your tools and ensures cleaner, faster holes.
Common Mistakes When Identifying Masonry Drill Bits
One of the most common mistakes is assuming a dull bit is damaged. Many people think the lack of sharpness means it’s worn out. In reality, a masonry bit is intentionally blunt to handle impact drilling.
Another mistake is confusing SDS bits with regular metal bits. SDS bits have grooves on their shanks that lock into rotary hammer drills. These are almost always masonry bits, but beginners often mistake them for metal bits due to their smooth body.
Some users rely solely on color to identify bits. While color can help, manufacturers sometimes coat bits for branding, which can be misleading. The best approach is to check the tip and shape instead.
People also forget that packaging labels can fade or wear off. That’s why visual recognition skills matter more than printed tags. Knowing the physical traits helps even when labels are missing.
Finally, never test bits directly on walls just to “see if they work.” Using the wrong bit can ruin your surface, dull the tool, or overheat your drill. Identification should always happen before drilling, not during it.
How to Test if a Bit Is Meant for Masonry
If you’re unsure about a bit, a quick inspection can confirm it. Hold it under good light and examine the tip shape. A masonry bit will have a hard, flat carbide insert fused to the front.
Tap the tip gently with another piece of metal. A masonry bit sounds solid and slightly high-pitched because of the carbide tip. Metal or wood bits sound softer and lighter in comparison.
Check the weight as well — masonry bits tend to feel heavier. The steel is denser and the tip adds extra mass. This helps absorb vibration during hammer drilling.
You can also look for engravings or markings. Most masonry bits are labeled with “M,” “Carbide Tip,” or even “Concrete.” These markings are usually near the shank.
Avoid drilling tests unless you are sure. Even a short test can overheat or chip a non-masonry bit. Proper visual inspection is enough to identify them safely.
Can You Use Masonry Drill Bits on Other Materials?
Masonry drill bits can technically drill into other materials, but it’s not recommended. The carbide tip is too hard and blunt for soft wood or metal. Instead of cutting smoothly, it tears and burns the material.
If you try using one on wood, the hole will be rough and oversized. On metal, it barely cuts at all because the edge is not sharp. The vibration can also damage both the bit and the work surface.
Masonry bits are specialized tools built for high resistance. Using them on softer materials reduces efficiency and shortens their lifespan. Always match your bit to the material for best performance.
The same logic applies in reverse — never use wood or metal bits on brick or concrete. They’ll dull immediately, and the drill may overheat. Each bit is designed for a specific purpose, and mixing them only causes problems.
So while a masonry bit is strong enough to survive almost anything, it performs best where it belongs — on masonry surfaces.
Frequently Asked Questions About Masonry Drill Bits
How can I tell if my drill bit is for masonry?
Look for a hard, flat tungsten carbide tip that’s slightly wider than the shaft. The tip appears dull rather than pointed, and the bit feels heavy. Labels like “Masonry” or “Carbide Tip” confirm it.
Can I use a masonry drill bit with a regular drill?
Yes, but only for light work on soft brick or mortar. For dense concrete, a hammer drill is essential to provide the impact needed. Without it, progress will be slow and the bit may overheat.
What happens if I use the wrong bit on masonry?
Using a metal or wood bit will dull it instantly and could burn your drill motor. It also creates uneven, shallow holes that don’t hold anchors well. Always use a proper masonry bit for solid materials.
Are all carbide-tipped bits for masonry?
Most are, but not all. Some specialized metal bits also use carbide for hardness, so check the tip shape — masonry ones are flatter and wider.
How long do masonry bits last?
With proper cooling, moderate pressure, and clean flutes, a good masonry bit can last through dozens of holes. Using it correctly ensures longevity and consistent performance.
Conclusion — Identifying the Right Bit Every Time
Distinguishing a masonry drill bit becomes easy once you know what to look for. Its blunt carbide tip, strong steel body, and wide flutes are unmistakable signs of its purpose. Every design feature contributes to breaking through hard surfaces efficiently.
Using the correct bit for the correct material not only saves time but also extends the life of your tools. It ensures cleaner, safer, and more professional results on every project.
Next time you open your toolbox, take a moment to look closely at each bit. The small differences you notice will make a huge impact on performance. When it comes to masonry, the right drill bit is your best ally.

I’m John F. Nicholas, the founder, lead writer, and drill enthusiast behind 101drill.com. With years of hands-on experience in power tools and DIY projects, I created this platform to share practical knowledge, expert tips, and real-world insights to help others master the art of drilling.