
Learning how to rip boards with a circular saw can seem tricky at first. Many people find it a little intimidating because it requires precision and safety. Don’t worry, though! It’s a common woodworking task, and with a little guidance, you can master it. This post will break down the process step by step, making it easy to learn and execute. We’ll go over everything you need to know to safely and accurately cut boards with your circular saw. Let’s get started!
Key Takeaways
- You will learn how to safely set up your circular saw for ripping.
- You’ll discover how to measure and mark your boards for accurate cuts.
- Learn about essential safety precautions to protect yourself while using the saw.
- You’ll gain insight into choosing the right blade for different types of wood.
- You’ll learn about essential tools and accessories for efficient ripping.
Getting Started with Ripping: Essential Gear and Prep
Before you even think about firing up your circular saw, you’ll need the right tools and gear. Safety should always be your top priority. Preparing your workspace and yourself properly is the first step toward a successful and safe ripping project. This section details what you need to gather and how to set up your work area.
Safety Equipment
Your eyes and ears are precious, so protect them! This goes without saying, but always wear safety glasses to shield your eyes from flying wood chips and debris. Also, wear ear protection like earplugs or earmuffs to reduce the noise from the saw. A dust mask is also advisable to avoid breathing in wood dust. Additionally, consider wearing gloves to improve your grip, and steel-toed boots can provide an extra layer of protection, particularly if you are working with large pieces of lumber.
- Safety Glasses: Protect your eyes from wood chips and debris. Choose glasses that fit snugly and provide good coverage.
- Hearing Protection: Circular saws are loud. Earplugs or earmuffs are essential to protect your hearing.
- Dust Mask/Respirator: Wear a dust mask or respirator to avoid inhaling wood dust, which can irritate your lungs.
- Gloves: Gloves provide a better grip, reducing the chance of slips, and can protect your hands.
- Closed-Toe Shoes: Protect your feet from any accidents.
Essential Tools for Ripping
Beyond safety gear, you’ll need a few essential tools to get the job done. This includes the obvious, like the circular saw itself, but also other instruments that will assist you in cutting straight and precise lines. Remember, a well-equipped workshop is a safe workshop. Also, a well-maintained saw is a safe saw. Regular cleaning and blade inspections are necessary for the best results. Check the power cord, too, for any damage before starting your project. Always unplug the saw when changing blades or making adjustments.
- Circular Saw: Obviously, you need a circular saw. Ensure it’s in good working order.
- Ripping Blade: A specific blade designed for ripping lumber is a must-have.
- Measuring Tape: Accurate measurements are critical, so use a reliable measuring tape.
- Pencil: Use a pencil to mark your cut lines clearly.
- Clamps: Clamps are your best friend for securing your workpiece.
- Straight Edge: A straight edge, like a long level or a factory-edged board, helps guide the saw.
Preparing Your Workspace
Your work area should be spacious, well-lit, and clutter-free. Good lighting is critical, so you can clearly see your cut lines. Make sure there’s enough room around your setup. The more space you have, the easier it is to move around, reducing the chance of accidental bumps or trips. Remove anything that could get in the way, especially things that could cause you to stumble. Also, consider the height of your work surface. Many people find that working at a comfortable height reduces fatigue and improves control.
- Clear the Area: Ensure the area is free from obstructions.
- Good Lighting: Make sure you can see your cut lines clearly.
- Stable Surface: Work on a sturdy workbench or sawhorse setup.
- Power Source: Ensure your power cord can reach without stretching.
Mastering Measurements and Marking
Accuracy starts with how you measure and mark your wood. This step is where many beginners struggle, and taking your time is the key. Rushing will lead to mistakes. Double-check all measurements before you cut. A small error in the marking stage will become a big mistake later on. Now, let’s look into the methods for accurate measuring and marking to ensure your cuts are precise and your project goes smoothly.
Accurate Measuring Techniques
Precise measurements are the foundation of any successful woodworking project. Take a minute to check your measuring tape for accuracy. Place the hook end firmly against the edge of the board. Read the measurement at the point where you want to make your cut. Mark the board accurately with a sharp pencil, and always double-check your measurements before cutting. Also, consider that the thickness of your blade removes some wood. This is known as the kerf and needs to be accounted for, especially when making multiple cuts.
- Use a Sharp Pencil: A fine point will allow for more accurate marking.
- Measure Twice, Cut Once: Always double-check your measurements.
- Position the Tape Correctly: Make sure the tape is flush against the edge.
- Account for Kerf: Remember the blade removes a small amount of material.
Marking Your Cut Lines
Once you have your measurements, the next step is marking your cut lines. The accuracy of your marking directly affects the final outcome. Use a straight edge to create a straight line. If you are cutting multiple pieces, marking the entire length can save time. When marking, use the correct side of the line. Also, use a pencil with a sharp tip. Make sure that your line is clear and easy to see. Consider the type of wood and whether the pencil line will be visible on the finished product.
- Use a Straight Edge: Ensure your lines are straight and true.
- Extend the Line: Mark the entire length of the board.
- Mark on the Waste Side: Cut on the waste side of the line.
- Choose the Right Pencil: Use a pencil that creates a clear line.
Understanding Kerf and Blade Offset
As mentioned, the kerf is the width of the cut made by the saw blade. This is important to understand when you are making a cut. The blade removes a small amount of wood, so the resulting width of the board will be slightly less than your original measurement. Knowing this will influence your approach to cutting, especially when working on projects where precision is critical. Make sure you are aware of the blade offset when making complex cuts.
- What is Kerf?: The width of the cut made by the saw blade.
- Blade Offset: The blade’s position in relation to the cut line.
- Compensation: Adjust measurements to account for kerf.
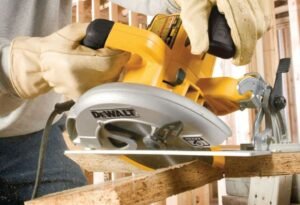
Ripping Boards with a Circular Saw: Step-by-Step
Now, let’s get into the main process of cutting. This part covers the correct methods for ripping boards. Carefully follow these steps to achieve clean, straight cuts. You will go from start to finish to master the skill. Remember to always put safety first, use the right tools, and be patient. This skill takes practice. However, these steps will help you get started on the right foot.
Setting Up Your Saw
Before you make a single cut, you need to prepare your saw. Make sure it has a ripping blade. Adjust the blade depth so that the teeth protrude just above the thickness of the board. This reduces kickback and improves safety. Secure the board to your workbench using clamps. Check that the saw blade is square to the base plate. Make sure the cord is out of the way, and that you have ample space. Doing the right setup ensures that everything goes smoothly when it is time to cut.
- Install a Ripping Blade: Choose a blade designed for ripping.
- Adjust Blade Depth: Set the blade depth just above the material.
- Secure the Board: Clamp the board firmly to the workbench.
- Check Blade Squareness: Make sure the blade is square to the baseplate.
Making the Cut
Place the saw’s baseplate against the edge of the board. Align the blade with your marked cut line. Start the saw and let it reach full speed before gently pushing it forward. Guide the saw along the edge, keeping the baseplate flush against the board and the blade aligned with your cut line. Work at a steady pace, letting the saw do the work. If it stalls, turn it off and assess the situation before you proceed. Remember to maintain control of the saw at all times.
- Align the Blade: Align the blade with the marked line.
- Start the Saw: Let it reach full speed.
- Guide the Saw: Push it forward at a steady pace.
- Maintain Control: Keep the saw stable and avoid forcing it.
Addressing Common Challenges
Even with the best preparation, problems can happen. This section will look into problems such as kickback. Kickback occurs when the wood pinches the blade, causing the saw to jump back toward the operator. It’s important to understand the causes and preventive measures to ensure safety. Also, it’s worth thinking about the type of wood and how this influences the quality of the cut. By being prepared for problems you can manage them and make a perfect cut.
- Kickback: Understand the causes and how to prevent it.
- Blade Binding: Identify and avoid blade binding.
- Wood Type: Consider how different woods behave during cutting.
- Cut Accuracy: Strategies for achieving precise cuts.
Choosing the Right Blade for Ripping Boards
The type of blade you use is key to cutting success. There are different blades for different tasks. The teeth on the blade determine how clean and fast your cut will be. Using the right type of blade is crucial for safety and achieving the desired outcome. For those working with different materials, this section gives you important information. Choosing the correct blade is a must.
Ripping Blades Explained
Ripping blades are different from general-purpose or crosscut blades. They have fewer teeth that are designed to quickly cut along the grain of the wood. This design reduces resistance and prevents binding. Ripping blades are optimized for speed and efficiency when cutting with the grain. The tooth count, angle, and shape are specifically designed for ripping. These types of blades are ideal for quick, clean cuts when you are working with the grain.
- Tooth Count: Ripping blades have fewer teeth for fast cutting.
- Tooth Angle: The angle of the teeth is designed for ripping.
- Tooth Shape: The shape of the teeth impacts cutting efficiency.
- Material Compatibility: Choose a blade that matches your wood type.
Blade Materials and Features
Blades are made from different materials, each having its advantages. Carbide-tipped blades are a great choice. They are more durable and last longer than steel blades. They can cut through hardwoods and softwoods. Knowing these materials and their features helps you choose a blade to meet your specific needs. Selecting the proper blade material ensures the best results and maximizes blade lifespan.
- Carbide-Tipped Blades: Durable and long-lasting.
- High-Speed Steel (HSS): More affordable, but less durable.
- Blade Coating: Coatings improve performance and reduce friction.
- Kerf Width: Consider the kerf width for accuracy.
Blade Maintenance and Care
Regular maintenance will extend the life of your blades and improve cut quality. Keep your blades clean and free from resin buildup. After each use, clean the blade with a specialized blade cleaner. Periodically, inspect your blades for damage such as chips or bends. Store your blades in a safe, dry place to prevent rust. Replace your blades when they show wear. Properly maintaining your saw blades is essential for both safety and cutting performance.
- Cleaning: Clean blades after each use.
- Inspection: Check for damage regularly.
- Storage: Store in a dry, safe place.
- Replacement: Replace blades when worn.
Advanced Techniques and Tips
Once you are comfortable with the basics, you can try some advanced methods and tips. This section will explore a couple of methods. They are useful for making precise cuts. With experience, these methods will help you become a more experienced woodworker. Explore these techniques and increase your woodworking skills and proficiency.
Using a Straight Edge and Guide
A straight edge will provide more accuracy for the cuts. It provides a stable guide for your saw. The straight edge can be anything from a factory-edged board to a commercially available guide. It is easy to use: clamp it to the board, and run the baseplate of your saw along the edge. The use of a straight edge guarantees straighter, more accurate cuts. This method is especially helpful when ripping long boards or when accuracy is critical. By using a straight edge, you’ll enhance your precision.
- Choosing Your Guide: Choose a straight and sturdy guide.
- Clamping the Guide: Secure the guide to the board.
- Saw Placement: Position the saw base against the guide.
- Cutting Accuracy: Achieve straighter, more accurate cuts.
Addressing Warped Boards
Sometimes you may have to work with boards that aren’t perfectly straight. Warped boards will introduce challenges to the cutting process. You can use clamps to straighten the board as you cut. Ensure the warp is minimal, so you don’t end up in an unsafe situation. Taking your time, and making multiple passes can improve the cut. By properly addressing warp, you can ensure a safer and more precise cut.
- Clamping: Use clamps to hold the board flat.
- Multiple Passes: Make multiple shallow cuts.
- Adjusting the Guide: Adjust the guide to compensate.
- Checking the Cut: Monitor the cut as you go.
Frequently Asked Questions
Question: What’s the most common mistake when ripping boards?
Answer: A very common mistake is not using a guide or straight edge, which can lead to cuts that are not straight and accurate.
Question: How do I know if my blade is dull?
Answer: A dull blade will cause more resistance, creating tear-out in the wood, making it harder to cut and causing the saw to work harder. The cut will also be less precise.
Question: What is kickback and how do I avoid it?
Answer: Kickback occurs when the wood pinches the blade. To avoid it, ensure the wood is properly supported, the blade is sharp, and you’re feeding the wood at a consistent pace.
Question: What safety gear is most important?
Answer: Safety glasses and hearing protection are the most important, as they protect your eyes and ears from debris and noise.
Question: Can I rip boards with a regular saw blade?
Answer: It’s best to use a ripping blade, as regular blades are not designed for cutting with the grain and can cause kickback.
Final Thoughts
Mastering how to rip boards with a circular saw is a valuable skill for any woodworker, and by following the methods presented in this post, you’re well on your way. Starting with the right safety gear and tools is key, combined with precise measurements and clear markings. Remember to always prioritize your safety. Start by carefully setting up your saw, make the cuts precisely, and understand blade types and how to maintain them. The advanced techniques offer ways to improve your cuts and manage difficult projects. With practice, patience, and attention to detail, you will become very proficient at safely and precisely ripping boards. Now, grab your tools, and get started – your next project is waiting!

I’m John F. Nicholas, the founder, lead writer, and drill enthusiast behind 101drill.com. With years of hands-on experience in power tools and DIY projects, I created this platform to share practical knowledge, expert tips, and real-world insights to help others master the art of drilling.