
So, you have a project that requires milling a flat surface, cutting a slot, or creating a precise edge on a piece of aluminum. The problem? You don’t have a expensive milling machine sitting in your workshop. What you do have is a trusty drill press.
The burning question is: Can you mill aluminum with a drill press?
The short answer is yes, but with significant caveats. A drill press is designed for vertical drilling forces, not the side-to-side forces generated by milling. However, for light-duty work, small projects, and with the right techniques, it is possible to achieve good results.
This guide will walk you through the process, tools, and critical safety measures for how to mill aluminum with a drill press.
Understanding the Limitations: Drill Press vs. Mill
First, it’s crucial to understand what you’re working with.
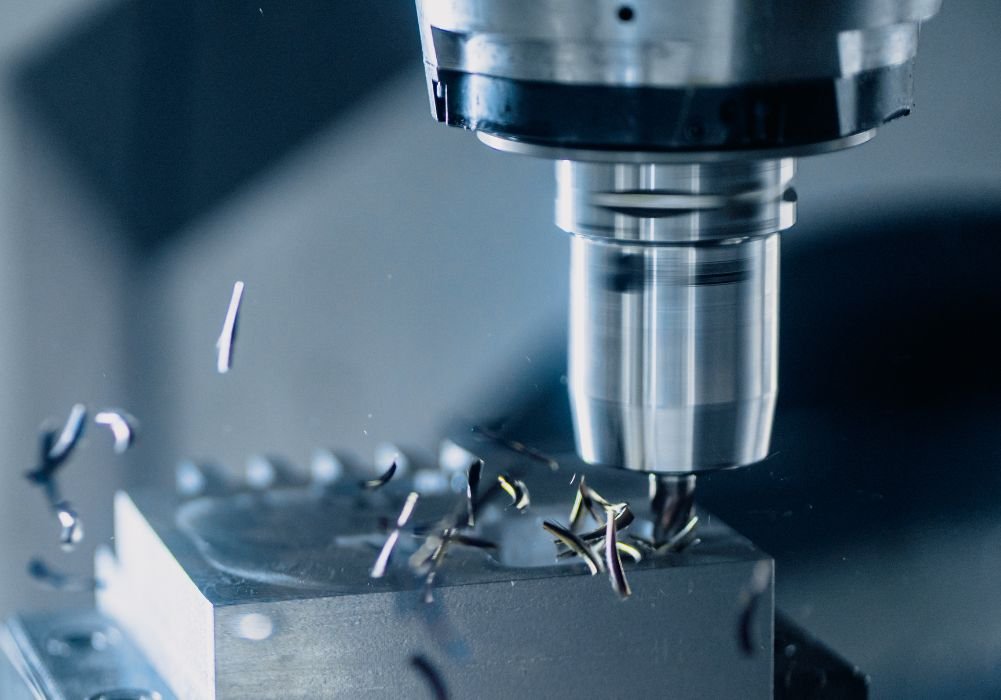
A Mill is rigid, with a robust spindle and table designed to handle lateral forces. The quill (the part holding the tool) does not move during a cut; the table does.
A Drill Press is designed for vertical, axial force. Its quill is supported by a single column, making it susceptible to deflection and wear from side loads. The spindle and bearings are also not built for continuous side pressure.
What this means for you: You will be “hogging” material, not taking deep, precise cuts like a mill. Attempting to do so will damage your workpiece, break tools, and potentially ruin your drill press.
Essential Tools and Setup for Milling Aluminum
Gathering the right tools is 90% of the battle.
1. The Right Cutter: End Mills
You cannot use a standard drill bit. You need end mills. For a drill press, we recommend:
2-Flute End Mills: These are ideal for aluminum as they provide excellent chip clearance.
Carbide or High-Speed Steel (HSS): HSS works fine for aluminum and is more forgiving. Carbide is harder and stays sharper longer but is more brittle.
Small Diameters: Start with 1/4″ or smaller shank end mills to minimize stress on the machine.
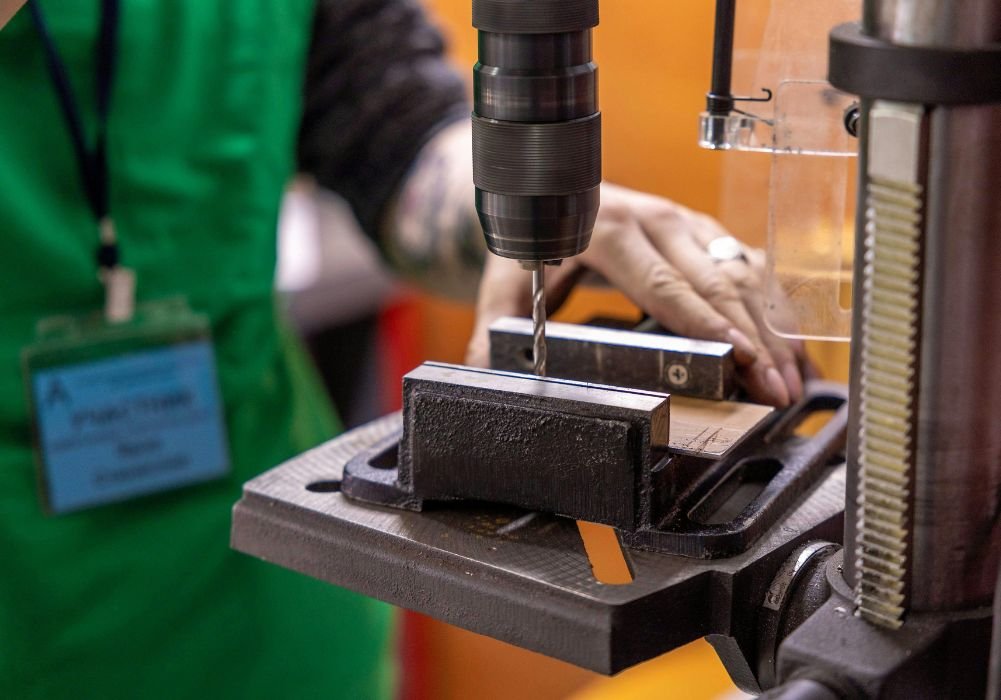
2. Workholding: The Non-Negotiable
Your workpiece must be locked down securely. Any movement will ruin the cut and is extremely dangerous.
Use a Cross Slide Vise (Milling Vise). This is the single best investment for this task. It bolts to the drill press table and allows you to move the workpiece precisely in the X and Y axes.
Clamp the vise firmly to the table. Use T-slots if your table has them, or heavy-duty clamps.
3. The Critical Adapter: A Chuck Collet
The Jacobs chuck on your drill press is not designed to hold end mills. It can slip or loosen under side load.
You need a Collet Chuck or an R8 Collet Holder that fits your drill press’s Morse Taper. This provides a secure, concentric grip on the end mill’s shank.
4. Other Must-Haves:
Cutting Fluid or Lubricant: Use a dedicated cutting fluid (like WD-40 is a popular and effective choice for aluminum) or a light machine oil. This reduces heat, prevents the aluminum from “welding” to the cutter (chip welding), and extends tool life.
Safety Gear: Safety glasses are mandatory. Consider a face shield and hearing protection.
Clamps and parallels for securing your workpiece in the vise.
Step-by-Step Guide to Milling Aluminum on a Drill
Press
Warning: This process puts unusual stress on your drill press. Proceed with caution and at your own risk.
Step 1: Secure Everything
Bolt your cross-slide vise to the drill press table.
Place your aluminum workpiece in the vise, using parallels underneath if needed to raise it, and tighten it securely.
Insert the end mill into the collet and tighten it into the drill press spindle.
Step 2: Set Your Speed and Depth
Speed: Aluminum likes high speeds. Run your drill press at its highest RPM. This helps achieve a cleaner cut and reduces the chance of chip welding.
Depth of Cut: This is where patience is key. Take very light passes. For a 1/4″ end mill, a depth of 0.010″ to 0.020″ per pass is a safe starting point. Never try to take a cut deeper than the flutes of your end mill.
Step 3: The “Milling” Technique
This is the most important technique to prevent damage.
Lower the spinning end mill until it just touches the workpiece.
Lock the quill in place using the depth stop lock. You will not be using the feed lever to cut.
With the spindle running at full speed, slightly loosen the quill lock and use your hand to apply a very slight downward pressure, just enough to keep the cutter engaged.
Use the cross-slide vise handles to move the workpiece laterally under the cutter. You are moving the workpiece, not the drill press quill. This mimics the action of a real mill and protects the quill from excessive side load.
Move at a steady, slow feed rate. You should see thin, curled chips, not dust.
Step 4: Use Cutting Fluid Liberally
Apply your lubricant (e.g., WD-40) directly to the cutting area throughout the entire process.
Step 5: Clear Chips Frequently
Stop often to brush away chips. Built-up chips can recut, marring the surface finish and creating heat.
Crucial Safety Warnings
NEVER Use a Chuck to Hold an End Mill: It will slip, potentially ruining your workpiece and causing an accident.
Beware of Climb Milling vs. Conventional Milling: On a rigid machine, climb milling (feeding the workpiece in the same direction as the cutter’s rotation) is preferred. On a flexible drill press, it can grab and pull the workpiece violently. Stick to Conventional Milling: feed the workpiece against the direction of the cutter’s rotation.
Small Cuts Only: The number one cause of failure is impatience. Taking too deep a cut is the fastest way to break an end mill.
Listen to Your Machine: If it starts bogging down, squealing, or making unhappy noises, stop immediately. You are pushing it too hard.
Conclusion: Is It Worth It?
Milling aluminum on a drill press is a functional workaround for the determined hobbyist or machinist on a tight budget. It opens up possibilities for modifying parts, creating brackets, and other small-scale fabrication.
However, it is slow, imprecise compared to a real mill, and hard on your drill press. For a one-off project or a few light cuts, it’s a viable technique. If you find yourself needing to mill frequently, investing in a benchtop milling machine is the correct and safer long-term solution.
By following this guide—prioritizing safety, using the right tools, and embracing patience—you can successfully learn how to mill aluminum with a drill press and bring your projects to life.

I’m John F. Nicholas, the founder, lead writer, and drill enthusiast behind 101drill.com. With years of hands-on experience in power tools and DIY projects, I created this platform to share practical knowledge, expert tips, and real-world insights to help others master the art of drilling.