
When your drill press belt begins slipping, squealing, or cracking, it’s time for a replacement. But before ordering a new one, you must know its exact size. Measuring the drill press belt might sound simple — until you realize it’s stretched, worn, or even broken.
A small measurement error can result in poor tension, reduced torque, or even machine damage.
The problem is that many owners assume all belts fit universally. Unfortunately, every model, motor, and pulley ratio has its own size requirement. Measuring it incorrectly means the replacement won’t maintain the correct spindle speed or grip.
Learning how to measure drill press belt size accurately ensures your machine runs quietly and efficiently. Whether you have a vintage Craftsman or a modern Jet model, knowing how to measure the belt correctly will restore power transmission and extend bearing life.
Understanding Drill Press Belt Types

Before measuring, you need to understand which type of belt your drill press uses. Most machines rely on V-belts, serpentine belts, or link belts, and each requires a slightly different measurement approach.
V-belts are the most common, featuring a wedge-shaped cross-section that fits into pulleys. They come in standard profiles like A, B, or 4L, which define both width and angle.
Serpentine belts (flat multi-rib designs) are often found on modern variable-speed presses. These belts handle smooth transitions and run quieter but demand precise sizing.
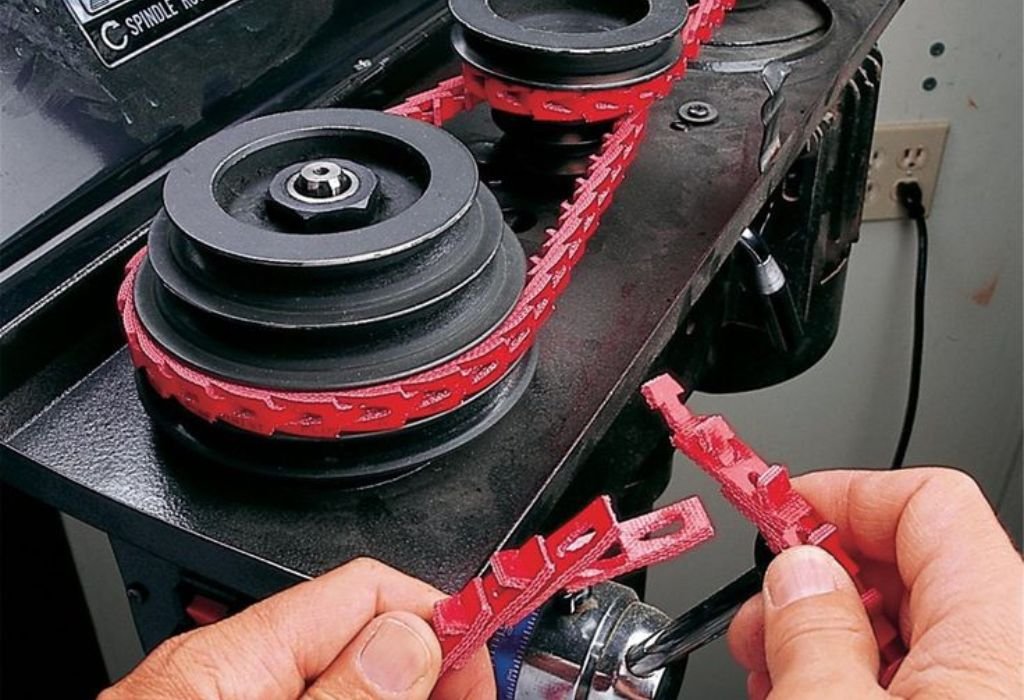
Link belts are adjustable, made of interlocking polyurethane sections that can be shortened or extended as needed — ideal when the original size is unknown.
Identifying the correct belt type ensures accurate replacement measurements and prevents pulley misalignment. To confirm your type, inspect the belt’s profile or refer to the manufacturer’s manual.
For comparison charts and profiles, visit Grainger’s belt identification guide.
How do I identify my drill press belt type?
Check the cross-section shape — V, flat, or ribbed — and compare it with manufacturer standards.
Are all V-belts the same size?
No, each profile (A, B, 4L, etc.) has specific width and depth measurements.
What if the belt is too loose or tight?
Loose belts slip; tight belts strain bearings and motor shafts.
Can link belts replace standard V-belts?
Yes, they’re adjustable and reduce vibration effectively.
Does belt type affect performance?
Absolutely — the wrong profile can cause slipping or overheating.
Tools and Materials You’ll Need
Measuring a drill press belt accurately requires a few simple tools. You don’t need advanced equipment — just basic items for precision.
Gather the following:
- Flexible measuring tape or cloth tape
- String or cord (if the belt is broken)
- Marker or chalk
- Straightedge or ruler
- Pen and notepad for recording dimensions
A belt size chart (available on most manufacturer websites) also helps you cross-reference measurements.
For worn or broken belts, a flexible tape is best. Metal tapes can kink or misread curves. If the belt has snapped, use a string around the pulleys to mimic its path, then measure the string’s total length.
Keep your measurements consistent — always measure along the inner or outer circumference, not both.
You can find accurate conversion and measurement tools from McMaster-Carr, which lists every major belt profile.
Can I measure with a regular ruler?
It’s possible for short belts, but flexible tapes give better accuracy.
Do I need to remove the belt to measure it?
Yes, always remove it to avoid tension distortion.
Can I reuse a stretched belt for measurement?
No, measure directly around pulleys if the belt has stretched.
Why use a string for broken belts?
It follows the exact pulley path, giving a realistic measurement.
How do I know if my tools are accurate?
Check tape calibration markings and avoid bent rulers or old cloth tapes.
Step-by-Step Guide to Measuring the Belt
Follow these steps carefully to determine your belt’s size accurately.
- Disconnect the power. Always unplug your drill press for safety.
- Remove the belt cover. Lift or unscrew the top cover to access pulleys.
- Mark the belt position. Note its route across motor and spindle pulleys.
- Remove the belt. Pull it free from the motor pulley first, then from the spindle pulley.
- Lay it flat on a table. Avoid twisting while measuring.
- Measure the outside length (O.L.) — place the tape along the belt’s outer edge.
- Measure the inside length (I.L.) for comparison — along the inner curve.
- Record the width and thickness. Use calipers or a ruler to measure cross-section.
- Match measurements to belt standards. Use a size chart for profile type.
If the belt is missing, wrap a string around both pulleys following the same path and mark where it overlaps. Measure that string’s total length — that’s your approximate belt size.
For additional visual guidance, The Spruce Crafts provides diagrams on pulley alignment and belt routing.
Do I measure the inside or outside length?
Measure both if possible, but manufacturers list sizes by outside length.
Why measure width and thickness too?
They determine the belt profile, which affects pulley fit and tension.
How accurate should my measurement be?
Within 1/8 inch is ideal for small belts.
What if I can’t remove the belt?
Measure around the pulleys using string instead.
Can I round up the measurement?
No, always match the exact length or use an adjustable link belt.
Determining Belt Profile and Cross-Section
After measuring length, identifying the belt profile ensures the new one fits perfectly into pulley grooves.
V-belts have different cross-sections:
- 3L or 4L belts: Light-duty, for small benchtop presses.
- A or B belts: Industrial, for larger machines with high torque.
Measure the top width and height (thickness). For example, a 4L belt is ½ inch wide and 5/16 inch thick.
Place the belt on a flat surface and measure its widest point. Compare with charts from Gates Corporation, which lists all standard profiles.
Matching the wrong profile, even with correct length, leads to slippage and premature wear. Always confirm both length and cross-section before purchase.
What’s the difference between A and 4L belts?
They’re similar in width but differ in depth and industrial tolerance.
Why does belt angle matter?
It ensures full contact in the pulley for maximum torque transfer.
Can a wider belt increase performance?
No, it may not seat properly, reducing efficiency.
Are metric and imperial belts interchangeable?
No, always use the same measurement system as your machine.
Where can I find my current belt’s code?
It’s often printed on the outer surface or listed in the manual.
Common Mistakes When Measuring Drill Press Belts
Even experienced machinists make measurement errors that result in poor fits or wasted purchases.
Mistake 1: Measuring under tension — Belts stretch slightly when installed, so remove all tension first.
Mistake 2: Ignoring profile shape — Two belts with the same length but different profiles won’t align correctly.
Mistake 3: Estimating by model number — Not all machines maintain standard parts over years of production.
Mistake 4: Forgetting pulley wear — Worn pulleys affect fit and can make a correct-size belt feel loose.
Mistake 5: Using old, stretched belts as reference — Always measure the pulley path instead of the worn belt.
Refer to Popular Mechanics for expert maintenance tips to extend belt life.
Why shouldn’t I measure a stretched belt?
It gives a longer reading than the correct replacement.
How often should I replace my drill press belt?
Typically every 3–5 years depending on usage.
Does pulley wear affect measurements?
Yes, grooves widen over time, altering tension.
Can I buy a slightly shorter belt?
Yes, a minor reduction (¼ inch) compensates for belt stretch.
How to prevent belt slippage?
Keep pulleys clean and maintain proper tension.
Selecting and Installing the Replacement Belt
Once you’ve measured and identified your belt profile, purchasing and installing it correctly is the final step.
Buy from reputable sources that list full dimensions and material ratings. Avoid generic “one-size” belts.
Before installation, clean pulley grooves with a dry brush. Any dust or oil reduces friction and causes slipping.
Position the belt over the motor pulley first, then slide it onto the spindle pulley. Rotate the pulleys by hand to help the belt seat evenly.
Adjust tension by loosening the motor mount bolts and sliding the motor backward or forward. The belt should deflect about ½ inch at the midpoint with moderate pressure.
After installing, run the drill press at low speed for 30 seconds. Listen for noise or vibration — signs of misalignment or poor fit.
More on tensioning standards can be found via Gates Engineering’s tension calculator.
How tight should the new belt be?
It should deflect about ½ inch when pressed at the center.
Can I use oil on the belt?
No, oil reduces friction and causes slipping.
Why is my new belt squealing?
It’s either too loose or seated incorrectly on the pulley.
Do I need to replace both belts on a dual-drive press?
Yes, to maintain balanced tension across pulleys.
Can belts from different brands mix?
Avoid mixing — each brand’s profiles may differ slightly.
Conclusion
Knowing how to measure drill press belt size accurately saves you from costly mistakes and machine downtime. A correctly sized belt ensures smooth power transfer, consistent torque, and quiet operation — all essential for precision drilling.
By understanding belt types, using proper tools, and following careful measurement techniques, you eliminate guesswork. Always note both length and profile, double-check pulley alignment, and choose high-quality materials for replacements.
Whether your drill press sits on a home bench or in an industrial shop, proper belt maintenance guarantees years of dependable service. Clean pulleys regularly, avoid over-tightening, and replace worn belts before they fail completely.
Precision machinery depends on precision maintenance. So the next time your press belt starts slipping or fraying, take a few extra minutes to measure carefully — the accuracy you gain will pay off with every perfect hole you drill.

I’m John F. Nicholas, the founder, lead writer, and drill enthusiast behind 101drill.com. With years of hands-on experience in power tools and DIY projects, I created this platform to share practical knowledge, expert tips, and real-world insights to help others master the art of drilling.