
A perfectly straight hole can make or break a woodworking or metal project. Anyone who’s tried drilling by hand knows the frustration — bits wander, holes angle slightly, and repeat accuracy becomes impossible. That’s why a drill press is every craftsman’s dream tool.
But what if you could build one yourself? Creating a DIY drill press isn’t just about saving money; it’s about building precision with your own hands. You control the materials, the dimensions, and the features. More importantly, you gain a deeper understanding of how each part affects accuracy.
In this guide, you’ll learn how to make a drill press DIY for perfect precision, using basic materials, a handheld drill, and clever design principles. You’ll discover how to build a stable base, design an adjustable column, and ensure the spindle runs true without expensive machining.
Whether you’re a hobbyist in a small garage or a full-time craftsman, this DIY project brings professional-grade precision to your bench.
By the end, you’ll not only have a working drill press but also a deeper appreciation for mechanical balance, stability, and accuracy — the very qualities that make great craftsmanship possible.
Materials and Tools You’ll Need
Before building your drill press, gather strong, stable materials. The goal is rigidity — any flex introduces error into your drilling.
You’ll need:
- Plywood or hardwood for the base and table
- Steel pipe or square tubing for the column
- Metal or aluminum bracket for the drill mount
- Bolts, washers, and nuts for assembly
- Hinges or linear guides for movement
- Measuring tape, square, and level
- Power drill and bits
- Optional: compression springs or counterweights for smooth vertical motion
If possible, reuse materials from an old stand or shelving frame. Just ensure everything aligns and locks tightly.
Having precise measuring tools like calipers or digital angle finders makes a huge difference. Tiny deviations at the top multiply at the bit tip.
For high-quality DIY supplies, check Grainger or McMaster-Carr — both provide industrial-grade parts suitable for workshop builds.
Can I make a drill press using only wood?
Yes, hardwood can work if it’s thick and well-braced.
What type of drill should I use?
A corded drill is best for consistent torque and speed control.
Do I need welding for this project?
No, bolts and brackets are enough if aligned correctly.
What’s the most important material for accuracy?
The column — it must be rigid and perfectly vertical.
Can I use recycled materials?
Absolutely, as long as they’re flat, square, and stable.
Building the Base and Frame
The foundation of your DIY drill press determines its accuracy. A sturdy base prevents wobbling and absorbs vibration during drilling.
Start with a 1-inch-thick hardwood or plywood board cut to at least 18×18 inches. This provides enough surface area for mounting and balance. Reinforce the underside with cross-braces or a secondary layer glued and screwed firmly.
Next, attach vertical supports for the column. Use steel brackets or 2×2 wooden blocks to anchor the column securely. Double-check squareness with a carpenter’s square. Even a slight angle throws off your drilling alignment.
Add rubber feet or anti-vibration pads under the base. They reduce noise and keep the press steady on hard floors.
For example, The Spruce Crafts recommends balancing heavy tools on cushioned bases to minimize micro-vibrations that affect precision.
How thick should the base be?
At least 1 inch; thicker provides better stability.
Can I use MDF instead of plywood?
Plywood is preferred — MDF may flex under weight.
Why is squareness important?
It ensures the drill bit travels perfectly perpendicular to the table.
Do I need rubber feet?
Yes, they absorb vibration and prevent movement.
How can I check base stability?
Push lightly from each side — the base should not rock or shift.
Creating the Vertical Column
The column guides the drill vertically. Any play or bending here directly affects precision.
Use steel pipe or square tubing about 2 inches thick. Cut it to a comfortable height — typically 24–30 inches for bench-top use.
Mount the column to the base using metal brackets or flanges. Tighten all bolts firmly. Check alignment with a level in two directions: front-to-back and side-to-side.
If using wood, laminate multiple layers for strength. Avoid single dowels; they flex under pressure.
To improve adjustability, some builders add linear rails or drawer slides alongside the column for guided movement. This reduces wobble while maintaining vertical motion.
More design variations are shared on Instructables, where makers show creative ways to reinforce lightweight columns.
Why use metal instead of wood for the column?
Metal resists bending and maintains long-term precision.
How do I check if the column is vertical?
Use a spirit level or plumb line against the column.
Can I make the column adjustable in height?
Yes, telescoping pipe sections or threaded rods allow adjustments.
What’s the ideal height for a bench drill press?
The chuck should sit about chest level when lowered.
Should the column be detachable?
Yes, if you plan to move or store the drill press frequently.
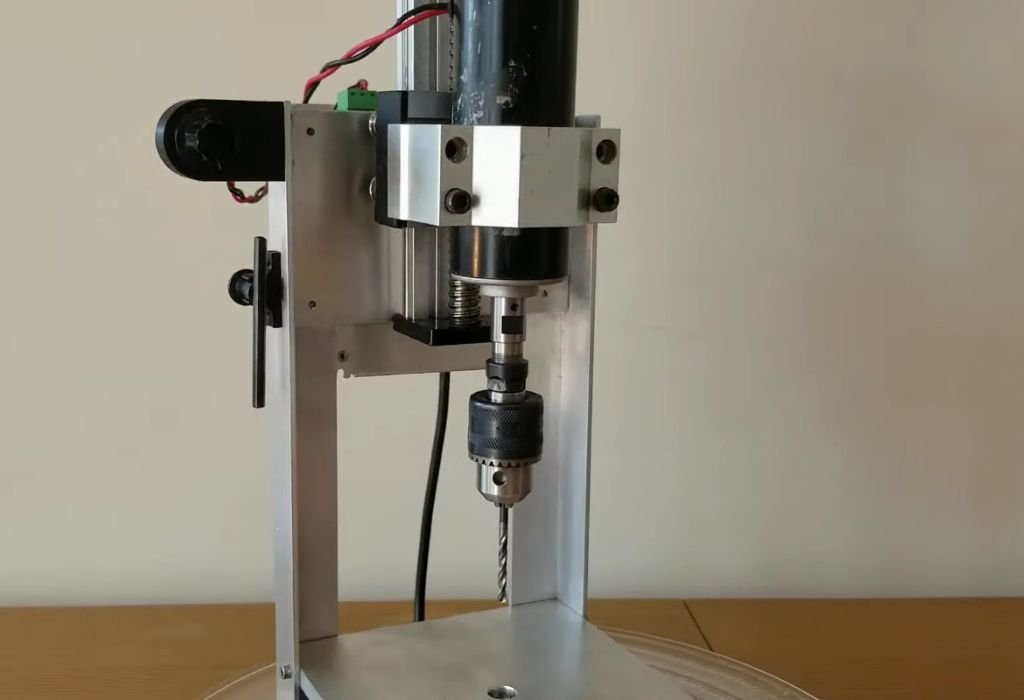
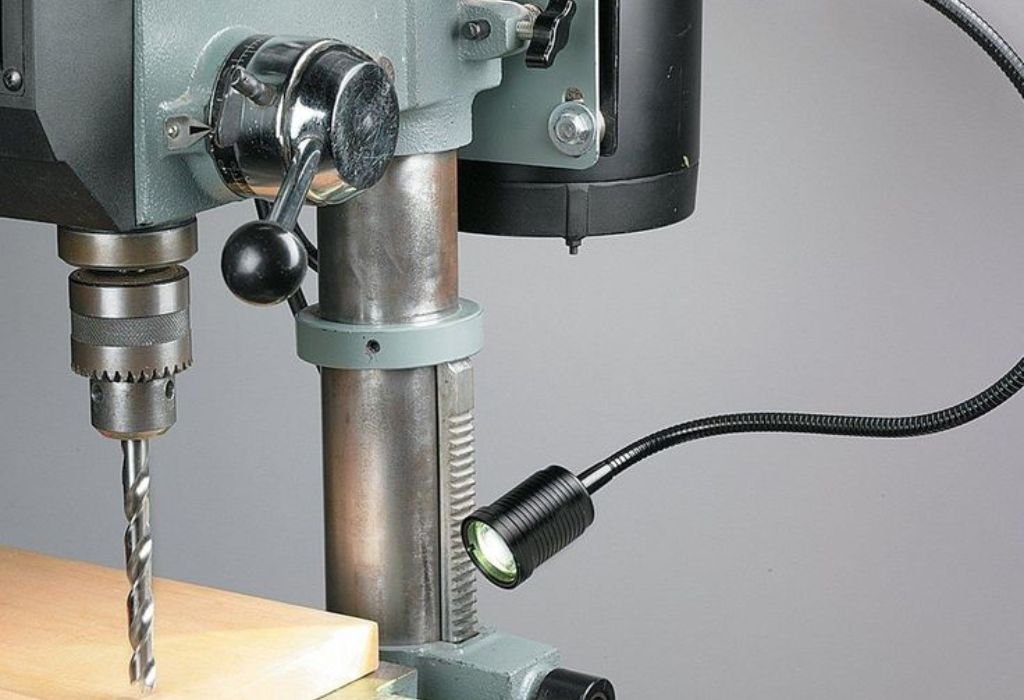
Designing the Drill Mount and Head Assembly
The drill mount is where your handheld drill becomes a precision tool. Its alignment with the column determines straightness.
Use a metal bracket or clamp that wraps snugly around the drill body. Secure it to a sliding carriage that moves up and down the column.
Hinges, drawer slides, or linear bearings can act as the motion guide. Keep the movement smooth but without side play. Any looseness causes bit wobble and angled holes.
Attach a handle or lever arm to control downward motion. For balance, use a small spring or counterweight behind the column — similar to professional presses.
Drill a few test holes in scrap wood to check alignment before tightening everything permanently. Adjust until the bit runs perfectly perpendicular to the table surface.
You can explore examples of DIY drill press heads at Popular Mechanics.
Can I use hose clamps for the drill mount?
Yes, for light duty — but solid metal brackets are better.
How do I prevent side movement in the carriage?
Add guide rails or tighten slides to eliminate slack.
What type of handle works best?
A long lever gives better control with less effort.
Do I need a return spring?
Yes, it ensures smooth upward motion and prevents dropping.
How can I ensure the drill stays square?
Drill test holes, measure with a square, and adjust until perfect.
Making the Adjustable Table
The table supports your workpiece, so its flatness and alignment are crucial.
Cut a ¾-inch piece of plywood or MDF to about 12×12 inches. Mount it to the column using a metal clamp or adjustable bracket. It should slide up and down smoothly while locking firmly in place.
Add a slot or hole in the center for drill bit clearance. For flexibility, consider installing T-tracks for clamps and fences.
Ensure the table is perfectly perpendicular to the drill bit. Adjust by loosening and rotating slightly before locking down.
Adding a replaceable sacrificial board on top protects your table from damage and tear-out.
For precision setups, refer to Wood Magazine’s drill press table guide.
What’s the best material for the table?
Hardwood or quality plywood — both are flat and stable.
Should the table tilt?
Optional — a tilting table allows angled holes for advanced projects.
Why use a sacrificial board?
It prevents drill bits from marring the main table surface.
Can I add a fence or clamp system?
Yes, it improves repeat accuracy when drilling multiple holes.
How do I align the table to the bit?
Use a square and make micro-adjustments until perfectly perpendicular.
Fine-Tuning and Alignment for Precision
Once assembled, your DIY drill press needs calibration for perfect accuracy.
Start by aligning the drill bit with the column. Lower the drill slowly — it should follow a straight vertical path without drifting. Adjust brackets or slides if needed.
Next, check table alignment using a machinist’s square. The bit should contact the table evenly when fully lowered. If not, adjust the column base or shim under the table bracket.
Run the drill at low speed and observe wobble at the bit tip. Minor vibration is normal, but excessive runout indicates misalignment.
Tighten all bolts and lubricate moving joints lightly with machine oil.
You can compare your results with Kaka Industrial’s alignment checklist, which outlines professional calibration standards.
How do I measure runout?
Use a dial indicator against the bit — minimal movement means perfect alignment.
Why does my drill wobble?
The carriage may be loose or the bit bent.
Can I reduce vibration?
Add rubber washers and check pulley or bit balance.
Is it okay if alignment isn’t 100% perfect?
Slight deviation is fine for woodwork, but metal drilling needs precision.
How often should I recheck alignment?
Every few months or after any major adjustment.
Safety Tips and Maintenance
Even a homemade drill press can be dangerous if neglected. Follow these practices to stay safe.
Always secure the workpiece with clamps. Loose material can spin violently if caught by the bit.
Wear safety glasses and avoid loose clothing or hair near moving parts. Keep your hands clear of the spinning bit.
Inspect bolts, slides, and mounts regularly. Tighten anything that loosens with vibration.
Clean the press after every use. Sawdust and metal filings build friction and wear down parts.
Lubricate guide rails lightly and keep belts or pulleys dry to prevent slipping.
For general shop safety, review OSHA’s machine-tool guidelines.
Do I need guards on a DIY drill press?
Yes, protective covers prevent accidental contact with the bit.
Can I use oil on wooden parts?
Use dry lubricants like graphite to avoid swelling.
Why does my drill press squeal?
Likely caused by dry bearings or loose pulleys.
How often should I lubricate moving parts?
Every 10–15 hours of use.
Can I use my DIY drill press for metal?
Yes, but ensure rigidity and use slower speeds with proper bits.
Conclusion
Building your own drill press isn’t just a budget-friendly project — it’s a lesson in mechanical precision. By carefully aligning each component, reinforcing every joint, and tuning movement, you can achieve near-professional accuracy using everyday materials.
The key to how to make a drill press DIY for perfect precision lies in stability and alignment. The base must be solid, the column true, and the head perfectly vertical. A few hours spent fine-tuning these details will reward you with smooth, accurate drilling for years.
Beyond functionality, this project gives you something money can’t buy — understanding. Every adjustment, every test hole, teaches you how precision machinery works.
Whether you’re crafting furniture, repairing equipment, or experimenting with engineering, your DIY drill press becomes more than a tool — it’s proof that patience and precision can turn simple materials into professional performance.
Build it right, align it carefully, and your handmade press will deliver flawless holes, project after project.

I’m John F. Nicholas, the founder, lead writer, and drill enthusiast behind 101drill.com. With years of hands-on experience in power tools and DIY projects, I created this platform to share practical knowledge, expert tips, and real-world insights to help others master the art of drilling.