
A drill press is one of the most versatile tools in any workshop, but even the best machines need maintenance from time to time.
Over months of use, the chuck — the part that holds the drill bit — can loosen, wear out, or seize onto the spindle. When that happens, accuracy drops and frustration rises.
Many hobbyists and professionals face the same issue: the chuck won’t budge no matter how much force is applied. The question then becomes, how to remove drill press chuck from spindle safely without damaging the arbor or bearings.
Removing a drill press chuck may look complicated, but it’s straightforward once you understand how it’s attached.
Some chucks use a taper fit, others a threaded mount, and a few have locking screws hidden inside. Knowing the difference determines whether you’ll need wedges, mallets, or just a steady pull.
Understanding Chuck and Spindle Connection Types
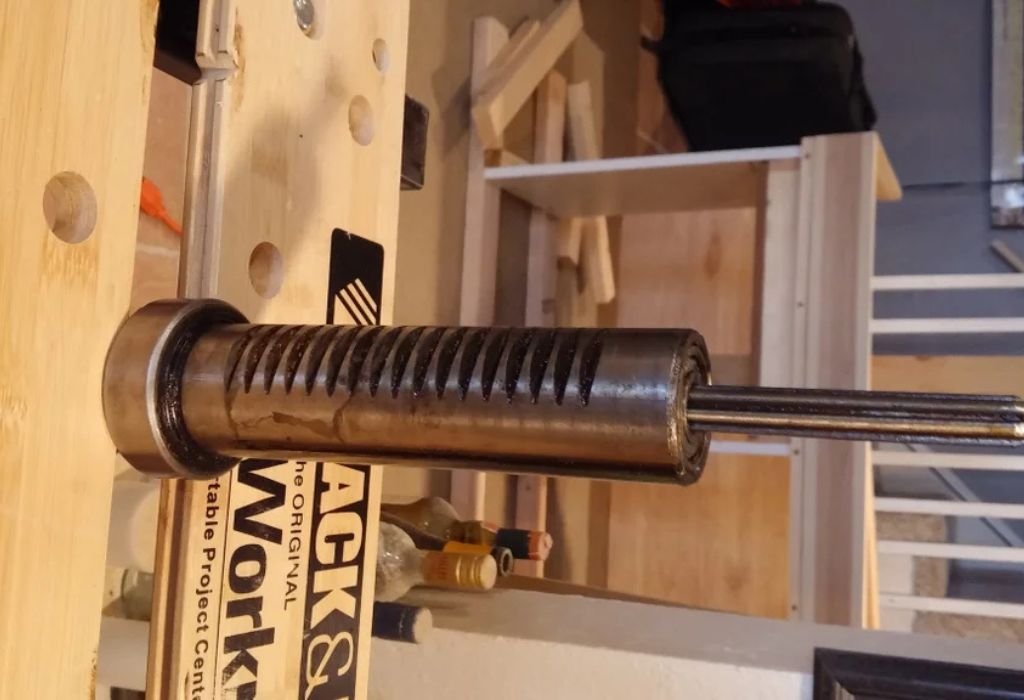
Before removing the chuck, it’s essential to know how it’s mounted to the spindle. Most drill presses use either a Morse taper, Jacobs taper, or threaded connection.
A Morse taper relies on friction between two matching conical surfaces. When inserted, the spindle’s male taper grips tightly inside the chuck’s female taper. This design is common in floor and industrial presses because it maintains concentric alignment under heavy loads.
A Jacobs taper works similarly but is smaller and found mostly on benchtop models. Over time, heat, vibration, and dust can cause it to seize, requiring careful removal techniques.
Some older or budget models feature threaded chucks that screw onto the spindle nose. Others use a retaining screw inside the jaws to prevent loosening during reverse operation.
Knowing which connection you have prevents damage and ensures you use the right method. To identify your type, open the chuck jaws fully and inspect inside — if you see a screw head, it’s threaded; if not, it’s taper-mounted.
For reference, Grainger’s maintenance guide offers diagrams showing each style.
How can I tell what type of chuck my drill press uses?
Open the jaws and inspect the interior — if you see a screw, it’s threaded; if smooth, it’s a taper fit.
Is a Morse taper and Jacobs taper the same?
No, they’re similar in shape but differ in size and application.
Which type is easier to remove?
Threaded chucks are simpler, while taper types require more precision and care.
Why do some chucks get stuck over time?
Dust, oxidation, and vibration cause the tapers to seize together.
Can I use oil to loosen a stuck chuck?
Yes, a few drops of penetrating oil help release friction in stubborn joints.
Tools You’ll Need for Safe Removal
Preparation makes removal faster and safer. Gather the following tools before you start:
- Drill press wedges (or chuck removal wedges)
- Rubber or wooden mallet
- Soft cloth or towel
- Allen wrench (for internal screw models)
- Penetrating oil (like WD-40 or PB Blaster)
- V-block or support pad to steady the chuck
Start by unplugging the drill press and lowering the spindle completely. Clean the area to remove chips and dust that can scratch the taper surfaces.
If you’re working on a Morse or Jacobs taper, insert the correct-sized drift wedge between the chuck and spindle. A gentle tap with a mallet releases the chuck with minimal effort. For threaded chucks, open the jaws fully and use an Allen wrench to remove the center retaining screw (note the left-hand thread).
Once loosened, grip the chuck firmly and twist counterclockwise. Never use pliers or metal jaws — they can deform the chuck body. Instead, use a strap wrench or rubber-padded vise for control.
Check the official OSHA machine-tool safety guidelines for proper handling procedures during mechanical maintenance.
What are drill press wedges?
They are tapered steel tools used to separate a chuck from its spindle safely.
Can I use a hammer instead of a mallet?
Avoid steel hammers — they can damage the arbor. Use a soft mallet.
Why is penetrating oil recommended?
It seeps between metal surfaces, reducing friction and corrosion.
Is it necessary to remove the spindle first?
Usually not; most chucks release directly from the mounted spindle.
Can I hold the chuck in a vise during removal?
Yes, but pad the vise jaws to avoid scratches or distortion.
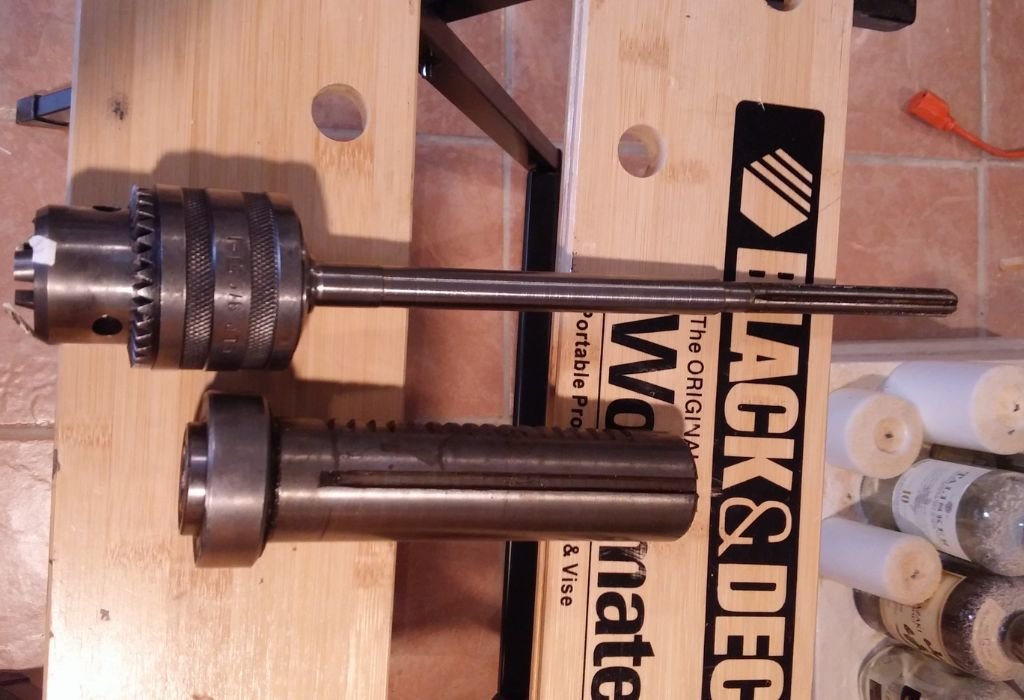
Step-by-Step Method to Remove a Taper-Mounted Chuck
Taper-mounted chucks are held by friction, not threads, which makes removal delicate but predictable. Follow these steps carefully:
- Disconnect power and lower the spindle fully to its lowest position.
- Place a soft cloth or pad on the drill-press table to protect falling parts.
- Locate the taper joint between the chuck and spindle arbor.
- Insert the two wedge tools opposite each other in the gap.
- Tap lightly with a rubber mallet until the chuck drops free.
If it’s still tight, apply a drop of penetrating oil and let it sit for 15–20 minutes before trying again. Avoid twisting with force — this can damage the taper.
Once removed, clean both surfaces using a fine rag and denatured alcohol. Any dirt or burr left behind will affect future alignment.
For visual demonstration, VintageMachinery.org provides diagrams of taper fits and wedge positions for reference.
Why use two wedges instead of one?
It distributes force evenly, preventing misalignment or gouging.
What if the chuck doesn’t drop after several taps?
Apply penetrating oil and give it time before repeating the process.
Is it okay to use heat to loosen the taper?
No, heat may expand metal unevenly and ruin accuracy.
Should the spindle be locked while tapping?
Yes, locking prevents upward shock that can damage bearings.
How do I avoid scratching the spindle?
Place thin cardboard between wedge and metal surface for protection.
Removing a Threaded Chuck Safely
Threaded chucks are more common in smaller drill presses. They rely on screw threads to hold the chuck to the spindle nose or arbor.
To remove one, first unplug the machine. Open the chuck jaws fully to expose the retaining screw deep inside. Use an Allen wrench or screwdriver to loosen it — remember, this screw is often reverse-threaded, meaning it loosens clockwise.
Once removed, wrap the chuck with a towel and grip it firmly. Turn the chuck counterclockwise to unscrew it from the spindle. If it’s tight, use a rubber-strap wrench for leverage.
Avoid clamping directly on the chuck body with metal tools; it can distort the jaws or crush the sleeve. If the chuck still won’t move, apply a few drops of oil where it meets the spindle, then gently tap the side with a mallet while turning.
Threaded connections are durable but prone to cross-threading if reinstalled carelessly. Always clean threads before mounting again.
See Bob Vila’s DIY maintenance tips for keeping threaded joints debris-free.
How do I know if my chuck uses a reverse screw?
If the drill press can run in reverse, it likely has a reverse-threaded screw.
Why does my chuck spin but not come off?
The retaining screw may still be in place; check deep inside the jaws.
Can I use WD-40 to loosen the threads?
Yes, but let it soak for at least 10 minutes.
What if the threads strip during removal?
Stop immediately; damaged threads need repair or replacement.
Do I need to clean the threads before reassembly?
Absolutely — debris can prevent proper seating and alignment.
Cleaning and Reinstalling the Chuck
Once the chuck is off, cleaning becomes the next vital step before reinstalling it. A dirty taper or thread reduces accuracy and increases the risk of slippage.
Use a lint-free cloth and alcohol or degreaser to wipe both the spindle and chuck surfaces. Remove all oil, rust, or residue. Inspect for burrs using a magnifying glass; small nicks can cause the chuck to seat crookedly.
If minor rust is visible, polish lightly using 600-grit sandpaper or a Scotch-Brite pad. Avoid aggressive sanding that alters dimensions.
For taper chucks, reinsert the arbor into the chuck firmly by hand, then tap lightly with a rubber mallet to seat it. For threaded types, screw the chuck onto the spindle by hand first, then snug it gently — no excessive torque required.
Before use, run the drill press at low speed for a minute to verify smooth rotation and zero wobble. If vibration persists, remove and clean again.
Detailed alignment tips are available from The Spruce Crafts guide.
Should I grease the taper before reinstalling?
No, tapers must be clean and dry for proper friction fit.
How tight should I seat the chuck?
Firmly enough to hold, but avoid heavy hammer blows.
Can I use thread-locker on threaded chucks?
Yes, a small amount prevents vibration loosening but allows removal later.
Why does my chuck wobble after reinstalling?
It may not be seated fully or there’s debris on the mating surfaces.
How can I test if alignment is correct?
Run a test bit at low speed and watch for lateral movement.
When to Replace the Chuck Instead of Removing It
Sometimes removal reveals a deeper issue: worn jaws, cracked sleeves, or excessive play. In such cases, replacing the chuck is the smarter option.
If the jaws no longer grip bits evenly or slip under pressure, internal threads may be stripped. Excessive runout beyond 0.005 inches also indicates wear.
Modern keyless chucks provide faster bit changes and often fit existing arbors. Ensure the new chuck matches your spindle taper or thread type before purchasing.
Installing a new chuck is simple: clean the spindle, align the tapers or threads, and seat gently. Test for concentric rotation before tightening the bit.
Refer to Harbor Freight’s chuck compatibility chart to find matching parts for your model.
How do I know when a chuck is too worn to keep?
If bits slip frequently or jaws show uneven wear, it’s time to replace it.
Can I upgrade to a keyless chuck?
Yes, if your spindle taper or thread matches.
Why does my new chuck not seat correctly?
The arbor may be dirty or mismatched in size.
Are replacement chucks universal?
No, always match taper size and thread specifications.
Does replacing a chuck improve accuracy?
Yes, a new precision-ground chuck can reduce runout significantly.
Safety Tips and Maintenance Advice
Safe handling prevents injury and prolongs tool life. Always unplug the drill press before maintenance and wear safety glasses to guard against falling parts.
Support the chuck underneath with a towel or pad when using wedges — never let it drop onto the table bare. Sudden impact can crack the jaws or deform the taper.
Lubricate spindle bearings annually to maintain smooth rotation. Avoid over-tightening bits; hand snug is enough. Excessive force can wear jaws faster.
Keep the chuck interior clean. Dust, oil, and metal chips build up over time, causing bits to slip. Regular cleaning extends both chuck and bit life.
Lastly, maintain proper alignment between the spindle and table. Misalignment not only affects accuracy but increases mechanical stress during removal and installation.
For advanced preventive care, consult Kaka Industrial’s maintenance blog.
Is it safe to remove the chuck alone?
Yes, if the machine is unplugged and properly supported.
Can I damage bearings by tapping the spindle?
Excessive force can, so always use light, controlled taps.
How often should I clean the chuck?
After every few uses, especially when drilling metal.
Should I lubricate the jaws?
A light oil film prevents rust but avoid over-lubrication.
Why does my chuck rust quickly?
Humidity and lack of oil protection accelerate corrosion.
Conclusion
Learning how to remove drill press chuck from spindle is a vital maintenance skill for every machinist and DIY enthusiast. A clean, well-seated chuck ensures accuracy, safety, and long-term machine reliability.
By understanding your chuck type — taper or threaded — and following the correct removal technique, you can avoid costly damage to precision parts. Use wedges for taper fits, an Allen wrench for threaded screws, and always protect surfaces with soft materials.
Cleaning both spindle and chuck before reinstalling guarantees perfect alignment and smooth operation. Regular inspection prevents runout, vibration, and early wear.
If your chuck shows signs of fatigue, upgrading to a new one can dramatically improve drilling accuracy. Modern designs offer quick bit changes, tighter grip, and reduced maintenance needs.
Take your time during removal; never rush the process. With the right tools, steady hands, and patience, even a stubborn chuck can come off cleanly.
Precision machinery rewards careful operators. Keep your tools clean, lubricated, and properly aligned — and your drill press will return the favor with years of flawless performance.

I’m John F. Nicholas, the founder, lead writer, and drill enthusiast behind 101drill.com. With years of hands-on experience in power tools and DIY projects, I created this platform to share practical knowledge, expert tips, and real-world insights to help others master the art of drilling.