
Drilling holes in metal jewelry looks like a simple task until the moment the drill bit slips and scratches the surface of an expensive pendant. Jewelry pieces are small, delicate and often made from soft metals that react differently under pressure and friction.
These challenges become even more serious when you want a clean hole for attaching jump rings or hanging chains.
Many beginners attempt to drill jewelry using regular drill bits or high rpm settings, but jewelry metals respond poorly to fast cutting.
High speed generates heat that leads to cracking, discoloration or bending of the piece. When drilling small items, control and precision matter much more than power and speed.
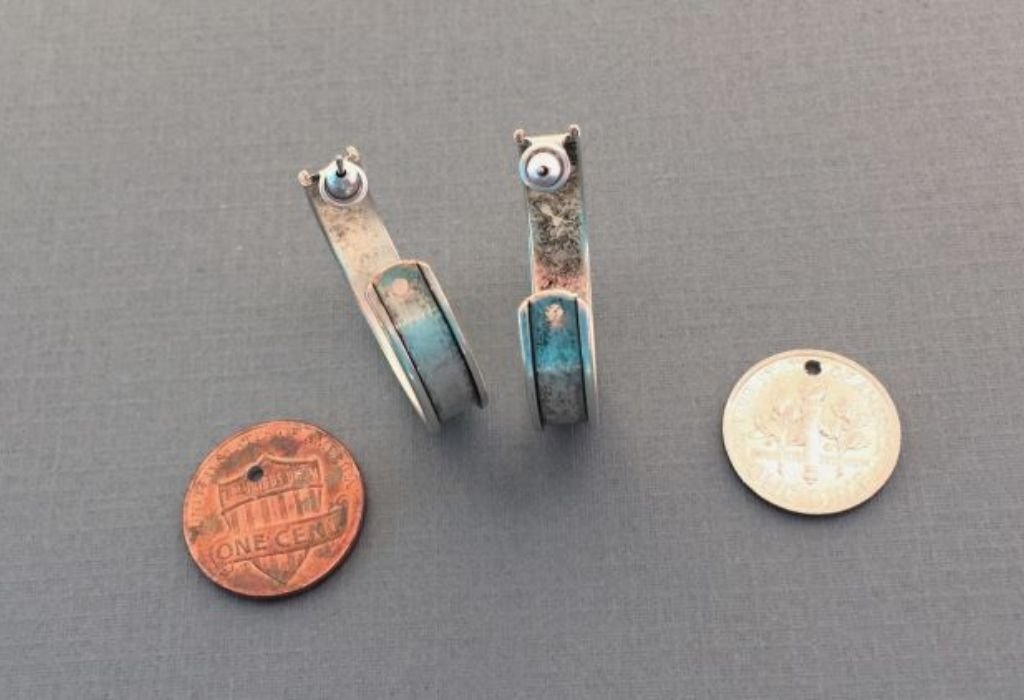
Jewelry makers drill holes to attach ear wires, add pendants, create charms or make design elements.
Each hole must be clean and polished because jewelry is meant to be worn close to the skin. Poorly drilled holes can scratch the wearer, weaken the metal or reduce the value of the finished piece.
Before drilling, you must understand how different metals behave. Soft metals like copper and silver drill quickly but dent easily, while hard metals like stainless steel jewelry resist drilling and require cooling. Knowing the metal type helps prevent breakage and ensures a smooth drilling process.
Surface preparation is essential for drilling jewelry successfully. A small scratch or skipped step can ruin a polished surface, especially on mirrored or shiny finishes. Proper support, secure clamping and correct marking dramatically reduce drilling mistakes.
This guide will walk you through every step of drilling holes in metal jewelry with a professional finish.
You will learn about the correct tools, drilling angles, lubrication techniques and finishing methods. By following each section carefully, you will be able to drill holes cleanly without damaging your jewelry pieces.
Why Drilling Metal Jewelry Requires Special Care
Metal jewelry pieces are much smaller than typical metalwork items, which means they require far more precision when drilling. A small error in angle or pressure can damage the entire piece. This makes jewelry drilling more delicate than drilling plates or sheets.
Jewelry metals often have polished surfaces that scratch easily. Even a light slip of the drill bit can leave a permanent mark that ruins the appearance. Protecting the finish is just as important as drilling the hole.
Heat sensitivity is another major issue. Jewelry metals are often thin and heat up rapidly under drilling friction. Excess heat can discolor the metal, warp thin pieces or cause micro cracks.
Because jewelry pieces are small, they tend to move or slide when drilling pressure is applied. Securing the piece properly prevents unwanted movement and ensures a straight cut. Movement leads to crooked holes or broken drill bits.
Jewelry hardware such as pendants and earrings often have curved surfaces. Drilling through curved metal requires controlled pressure and steadiness to prevent slipping. Working with curved shapes increases the difficulty significantly.
Jewelry often contains mixed materials. Some pieces combine metal with gemstones, beads or enamel, which require extreme caution. Drilling near delicate components increases the risk of accidental damage.
Precision in jewelry drilling influences how the final piece functions. A poorly aligned hole can misposition a jump ring or cause an earring to hang incorrectly. Clean drilling ensures proper alignment and balance.
Tools Needed for Drilling Holes in Metal Jewelry
Micro drill bits are essential for jewelry making. These bits are much smaller than standard bits and are designed specifically for fine detail work. Their sharpness and small diameter help produce clean holes.
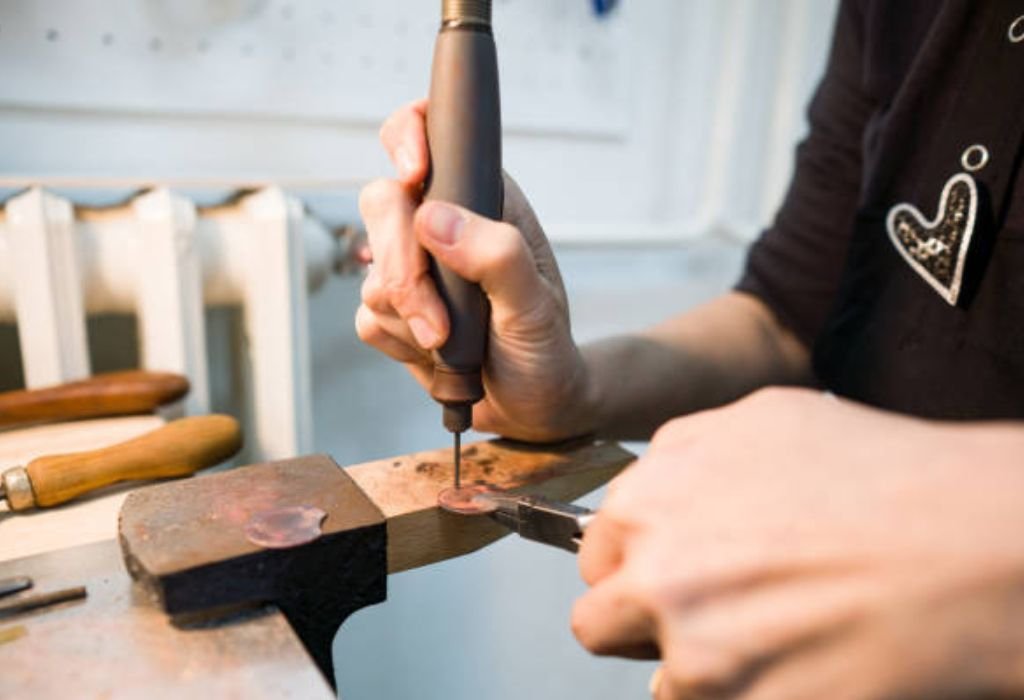
A pin vise is one of the most important tools for jewelry drilling. It allows you to drill holes manually at slow speed. Manual drilling reduces heat and prevents slipping on small surfaces.
Rotary tools such as a Dremel also work well for jewelry drilling. When used at low rpm, they provide controlled power for drilling harder metals. Rotary tools offer versatility for both drilling and finishing.
A bench block is necessary to support the jewelry piece during drilling. It provides a solid flat surface that prevents bending or distortion. Bench blocks help maintain drilling accuracy.
Cutting oil is essential for reducing heat and friction. Small jewelry bits are delicate and can break easily without lubrication. Cooling and lubrication keep the bit sharp and protect the metal surface.
Tape or clamps are helpful for holding jewelry securely. Jewelers often use masking tape to prevent scratches and stabilize small pieces. Clamping the jewelry reduces slippage and ensures steady drilling.
Safety gear is also necessary. Protective glasses keep metal shavings away from your eyes. Even small jewelry pieces can produce sharp burrs that require caution.
Choosing the Right Drill Bit for Jewelry Metals
Micro high speed steel bits are the most common choice for drilling jewelry. These bits are sharp and affordable, making them suitable for soft metals like copper and silver. They provide smooth cutting when used with slow rpm.
Diamond bits are ideal for cutting through hard metals or textured surfaces. Diamond coated bits remove material gently and reduce the chance of cracking. These bits work well on stainless steel jewelry and thick pieces.
Carbide bits are extremely strong and precise. They are perfect for drilling holes in tough metals or repeatedly drilling many pieces. Carbide bits maintain their sharp edge much longer than standard bits.
Choosing the right bit size is critical. Jewelry holes are typically small, ranging from 0.8 mm to 2 mm depending on the attachment. Using a pilot bit first helps maintain precision.
Soft metals require different bits than hard metals. Silver, copper and brass cut easily with HSS bits, while stainless steel jewelry needs carbide or diamond bits. Matching the bit to the material ensures better results.
Durability is also important when drilling jewelry. Small bits can break if too much pressure is applied. Using high quality micro bits reduces bit breakage and helps maintain consistent hole sizes.
Bit flexibility also matters when working with curved or uneven surfaces. Bits that cut aggressively can slip, while gentle cutting bits provide more control. Choosing the right bit improves safety and finish quality.
Preparing Metal Jewelry Before Drilling
Cleaning the jewelry piece is the first step. Dust, oils and polish residues interfere with drilling accuracy. A clean surface also prevents slipping and scratching.
Marking the drill point ensures proper hole placement. Jewelers often use a fine marker or scribe to create a tiny dot on the metal. This provides a visual guide for precise drilling.
Using a center punch or nail is helpful for creating a tiny indentation. The indentation keeps the drill bit from skidding across the surface. This step is essential when working with smooth polished jewelry.
Securing small jewelry pieces is extremely important. Jewelry tends to wiggle, shift or rotate under pressure. Clamping or taping the piece prevents movement and maintains alignment.
Protecting the surface helps avoid scratches. Masking tape or a thin cloth can be placed on the bench block. This prevents scuffing during the drilling process.
Adding lubrication helps reduce heat, especially when drilling harder metals. Cutting oil or water can be used depending on the metal type. Lubrication extends the life of the drill bit and prevents overheating.
Preparation ensures that the drilling process goes smoothly. Without these steps, the risk of damage, slipping or misaligned holes increases. Proper preparation is crucial for jewelry work.
Step by Step: How to Drill Holes in Metal Jewelry
Start by drilling a tiny pilot hole. The pilot hole creates a controlled starting point for the main bit. It reduces the chance of skidding or slipping.
Hold the drill or pin vise steady and aligned with the marked point. Alignment ensures the hole stays straight through the metal. A crooked hole weakens the jewelry structure.
Use slow rpm when drilling jewelry. Fast rpm generates heat quickly and can discolor or warp soft metals. Slow speed gives you more control over delicate materials.
Apply lubrication to keep the bit cool. Even small bits generate heat and friction during drilling. Lubrication protects the metal and reduces bit breakage.
Clear debris gently while drilling. Jewelry metals produce fine shavings that can clog the bit. Clearing debris improves cutting efficiency and prevents overheating.
Check your progress frequently. Jewelry drilling requires a careful approach to avoid drilling too deep. Small adjustments prevent mistakes during the process.
How to Drill Holes in Thin Jewelry Sheets
Thin metal jewelry requires stable backing support. Soft thin sheets can bend or warp when drilled without proper support. A bench block or wooden backing helps keep the metal flat.
Using tape on both sides of the sheet prevents scratching and offers extra stability. Masking tape also reduces vibration while drilling. This makes drilling smoother and safer.
Preventing bending is important for thin metals. Applying too much pressure may distort the piece. Gentle steady pressure is ideal for thin jewelry.
Avoid bit grabbing by using micro bits with sharp split points. Split point bits start cutting immediately and reduce slipping. This improves accuracy and prevents surface damage.
Step bits are useful for enlarging holes on thin sheets. They remove material gradually and prevent tearing of soft metals. Slow speed improves the smoothness of each step.
Finish by smoothing the edge using a fine needle file. Thin sheets often have sharp burrs after drilling. Smoothing ensures the hole is safe to touch and ready for assembly.
Drilling Holes in Thick Jewelry Pieces
Thick jewelry pieces need deeper center punch marks. A deeper punch keeps the drill bit stable and prevents wandering. This is essential for thick pendants or charms.
Using carbide bits is best for thick metals. These bits cut through dense material efficiently and with minimal heat. Carbide bits maintain clean edges in thicker jewelry.
Slow feed pressure prevents cracking or discoloration. Thick pieces generate more heat because of the increased drilling surface. Controlled pressure reduces friction and improves drilling quality.
Avoid overheating by pausing during drilling. Allow both the bit and metal to cool naturally. Cooling intervals protect the metal finish and extend bit life.
Polish the edges of the hole using a round file or diamond burr. Thick metal often produces more burrs that need smoothing. Polishing prepares the hole for jump rings.
Managing burrs is essential for professional jewelry results. Burrs snag clothing and irritate skin. Removing them improves both safety and appearance.
Using a Rotary Tool for Jewelry Drilling
Rotary tools like Dremel are popular in jewelry making. They allow precision and control when drilling small metals. With the correct settings, they cut smoothly and efficiently.
Speed settings must remain low to prevent overheating. High speed melts soft metals and burns finishes. Low speed maintains control and prevents tool chatter.
Stabilizing attachments help improve accuracy. A drill stand or flex shaft attachment keeps the bit steady. These accessories increase drilling precision.
Cooling intervals are necessary when drilling with a rotary tool. The tool generates heat quickly at the bit tip. Taking pauses maintains clean surfaces.
Micro bit care is important because these bits are delicate. Storing them safely and avoiding side pressure extends their life. Proper handling reduces breakage.
Controlled pressure ensures clean drilling. Forcing the tool causes skipping or scratching. Light pressure produces smooth and accurate holes.
Using a Pin Vise for High Precision Jewelry Holes
A pin vise provides the highest precision because it is manually operated. There is no motor vibration or sudden speed change. This makes it perfect for delicate jewelry.
Pressure control is easier with manual tools. You can feel the resistance of the metal as you drill. This helps prevent cracking or bending.
Pin vises are useful in tight spaces such as inside detailed patterns. Their slim design allows access to places power drills cannot reach. This makes them essential for complex jewelry designs.
Some metals require manual drilling for best results. Soft metals like gold-filled or thin silver respond well to slow hand pressure. Power tools may distort these delicate materials.
Avoid breakage by keeping the bit straight. Side pressure is the biggest cause of bit failure with pin vises. Keeping the tool vertical prevents bending.
Pin vise drilling takes longer but offers unmatched finesse. Jewelers prefer it for final detailing and precise hole placement. The precision improves the beauty of the piece.
How to Avoid Scratches and Surface Damage
Using masking tape over the drilling area protects the surface. Tape reduces slipping and prevents the drill from scratching polished finishes. This method is common in professional jewelry studios.
Soft cloth padding can be used under the jewelry piece. This protects mirror polished surfaces from scuffs during drilling. Cloth padding also reduces noise.
Bench block padding prevents tool marks. A thin leather sheet or silicone pad works well. This padding protects both the jewelry and the bench block.
Avoid slipping by securing both the drill and jewelry piece. Stability ensures smooth drilling strokes. Slipping causes deep scratches that are difficult to remove.
Gentle pressure is crucial when drilling jewelry. Jewelry cannot handle aggressive pressure like thicker metal plates. Light controlled drilling protects the finish.
Post drilling polishing improves appearance. Using a polishing pad or compound removes fine scratches from the drilling area. This final step brings back the original shine.
How to Prevent Overheating and Bit Breakage
Micro bits heat up quickly because of their small diameter. Overheating makes them brittle and prone to breaking. Keeping them cool improves performance and safety.
Low rpm is essential for jewelry drilling. Fast speed generates too much heat and causes surface burns. Low speed maintains cutting accuracy.
Frequent pauses help cool the piece. Jewelry metals are thin and heat easily. Allowing the metal to rest prevents warping or discoloration.
Proper lubrication cools and protects the bit. A small drop of cutting oil reduces friction dramatically. Lubrication extends the life of delicate micro bits.
Avoid side pressure at all times. Side pressure bends micro bits and causes immediate breakage. Keeping the drill straight prevents damage.
Check bit condition regularly. Worn bits cut poorly and overheat quickly. Replacing or sharpening bits improves drilling quality.
Finishing and Polishing Drilled Jewelry Holes
Deburring is the first finishing step. Burrs create sharp edges that can scratch skin or clothing. A clean deburring ensures safety.
Needle files are ideal for smoothing tiny holes. They reach into small openings and refine the shape. Filing improves the hole’s roundness.
Sanding discs attached to rotary tools help polish edges. Low speed sanding produces smooth surfaces. This prevents irritation when the jewelry is worn.
Polishing pads remove oxidation and improve shine. Jewelry metals often dull slightly during drilling. Polishing restores their luster.
Cleaning the hole removes dust and metal residue. Residue can interfere with attaching jump rings or chains. Clean holes make assembly smoother.
Proper finishing enhances the beauty of jewelry. A smooth finished hole blends seamlessly with the design. This improves both aesthetic and functional quality.
Best Jewelry Metals for Drilling
Sterling silver is soft and easy to drill. It requires slow speed and steady pressure. Silver produces smooth holes with minimal effort.
Gold and gold-filled metals are delicate. They require very slow manual pressure to avoid cracking. Using a pin vise is often the best method.
Brass is a popular jewelry metal that drills cleanly. It is harder than copper but still manageable with HSS bits. Brass produces neat holes with proper lubrication.
Copper is soft and drills very quickly. It bends easily under pressure, so support is important. Gentle drilling ensures clean edges.
Stainless steel jewelry is harder to drill. It needs carbide or diamond bits and very slow rpm. Proper cooling prevents discoloration.
Aluminum jewelry sheets drill quickly but produce fine burrs. These burrs must be removed for safety. Aluminum is ideal for lightweight jewelry projects.
Recommended Tools and Brands for Jewelry Drilling
Best micro drill bits include Dremel, Drillpro and Gyros. These brands produce sharp high quality micro bits. They cut cleanly and last longer under jewelry use.
Best rotary tools include Dremel 3000 and Dremel Lite. They offer precision speed control for delicate drilling. Their accessories are useful for finishing and polishing.
Best clamps include universal mini clamps for jewelry. These clamps secure small pieces without leaving marks. Stability improves drilling accuracy.
Best bench blocks include steel and rubber sided blocks. Rubber prevents sliding while steel provides a firm base. Multi side blocks are versatile for jewelry work.
Best lubricants include sewing machine oil and specialized cutting oils. These oils reduce friction and prevent heat buildup. Small drops are enough for jewelry drilling.
Best finishing tools include needle files, polishing pads and micro sanding discs. These tools refine drilled holes and restore shine. Finishing tools complete the jewelry making process.
Troubleshooting Drilling Issues in Metal Jewelry
If the drill bit breaks, reduce pressure and slow down speed. Bit breakage happens when the bit bends or overheats. Slow careful drilling prevents this issue.
If scratches appear, use masking tape next time. Tape protects polished surfaces from bit slips. Polishing compounds help remove minor scratches.
If burrs remain, deburr using a fine needle file. Jewelry pieces often create tiny burrs that must be smoothed. Proper deburring improves appearance and comfort.
If the hole is off center, improve marking accuracy. A smaller initial mark or deeper punch helps guide the bit. Precise marking is essential for symmetry.
If the metal cracks, reduce drilling force. Cracking happens when pressure is too high or the metal is too thin. Gentle drilling prevents structural damage.
If the surface discolors, use lower rpm. Discoloration indicates overheating. Cooling intervals restore proper drilling temperature.
Jewelry Drilling FAQ for Clean and Accurate Holes
What drill bit should I use for drilling metal jewelry?
Use micro high speed steel bits for soft metals like silver and copper. Use carbide or diamond bits for harder metals like stainless steel. These bits provide clean cuts with minimal pressure.
Why does my drill bit slip on the jewelry surface?
The metal surface is smooth and causes the bit to wander. Use a center punch or nail to make a tiny indentation before drilling. This helps the bit stay centered.
Do I need lubrication when drilling jewelry metal?
Yes, lubrication prevents heat buildup and protects both the bit and the metal. A small drop of cutting oil greatly improves drilling smoothness. It also reduces the risk of bit breakage.
Why is my jewelry piece getting scratched during drilling?
Scratches occur when the piece moves or when the drill slips. Use masking tape or cloth padding to protect the surface. Clamping the piece securely also prevents accidental scratches.
How slow should I drill metal jewelry?
Use very low rpm when drilling jewelry metals. Slow drilling prevents overheating and reduces cracking or discoloration. Slow speed also gives more control over delicate surfaces.
Why do my micro drill bits keep breaking?
Micro bits break due to side pressure, fast rpm or too much force. Keep the drill straight and use gentle pressure. Lubrication also helps protect small bits.
Can I drill jewelry using a hand drill or rotary tool?
Yes, both tools work when used at low speed and with proper control. A rotary tool is ideal for precision, while a hand drill requires slower and steadier movement. A pin vise provides the most control for delicate pieces.
How can I drill a hole in curved jewelry pieces?
Use light pressure and start with a deeper center punch mark. Curved surfaces require extra stability to prevent slipping. Slower drilling improves accuracy on curved surfaces.
How do I prevent metal discoloration while drilling?
Discoloration happens from overheating. Use lubrication and take cooling breaks during drilling. Slow rpm prevents heat buildup and protects the finish.
Do I need to polish the hole after drilling?
Yes, polishing removes burrs and sharp edges. Use needle files, sanding discs or polishing pads to smooth the edges. This ensures comfort and prevents scratches on the wearer.
Conclusion
Drilling holes in metal jewelry requires patience, precision and the right tools. When you drill slowly, use lubrication and support the jewelry properly, the results are clean and professional. A well drilled hole enhances both the appearance and functionality of the final piece.
Jewelry metals respond differently to pressure and speed. Soft metals drill quickly, while harder metals need slow controlled drilling. Matching your technique to the metal type ensures better results.
By following each step in this guide, you can drill holes confidently without damaging your jewelry. Proper marking, bit selection and finishing produce flawless designs. With practice, you will consistently create clean holes suitable for any jewelry project.

I’m John F. Nicholas, the founder, lead writer, and drill enthusiast behind 101drill.com. With years of hands-on experience in power tools and DIY projects, I created this platform to share practical knowledge, expert tips, and real-world insights to help others master the art of drilling.