
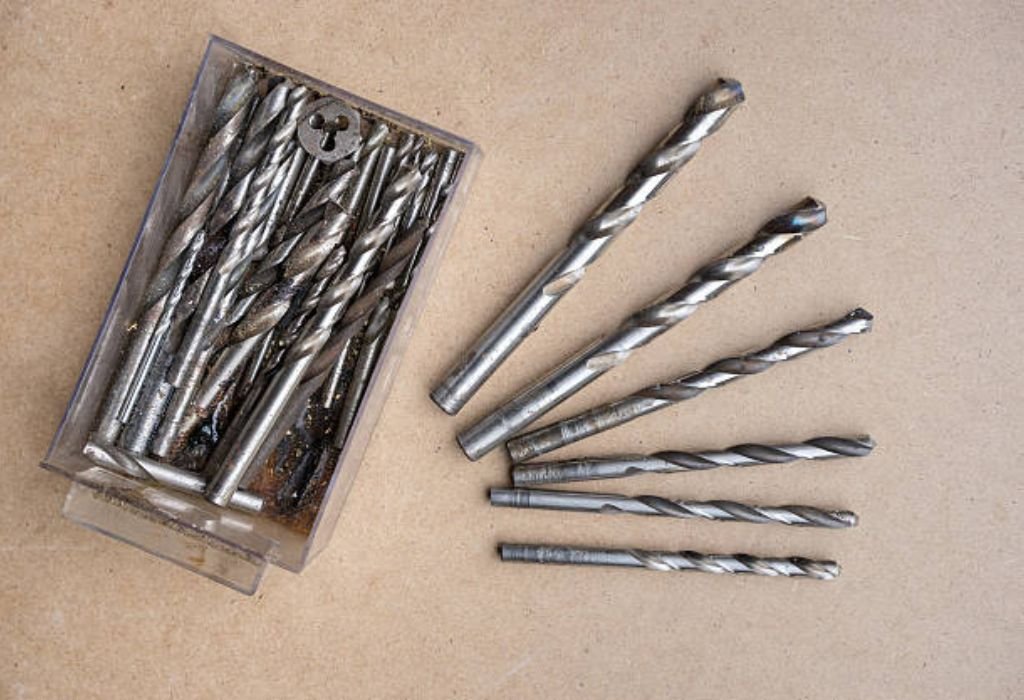
You open your toolbox, ready to hang a mirror or fix a wall shelf. Inside lies a handful of drill bits—some shiny, some dull, and one that looks rugged with a thick tip.
You pause, wondering if that’s the masonry drill bit you need for the concrete wall. One wrong choice could crack the plaster or damage your drill, yet they all look confusingly similar.
This moment of hesitation is familiar to almost every DIYer and even seasoned professionals. Drill bits may look alike, but each one has a unique job.
Masonry bits, in particular, are designed to pierce through the toughest surfaces—brick, stone, and concrete—without losing strength or precision. The secret lies in their carbide-tipped ends and spiral flutes that expel dust as they grind through rock-hard material.
According to Pro Trade Tools, nearly 60 percent of home users accidentally use the wrong drill bit type when working on walls, leading to cracked surfaces and worn-out tools.
That’s why learning to identify a masonry drill bit is more than convenience—it’s a necessity for clean, safe, and efficient drilling.
In this guide, you’ll discover how to recognize a masonry drill bit instantly using its shape, tip, color, and even sound.
We’ll also explore the most common mistakes, expert storage tips, and simple tests to confirm your bit type. By the end, you’ll never doubt which bit belongs in your hammer drill again.
Understanding What a Masonry Drill Bit Is
Drilling into concrete, brick, or stone demands more than strength; it requires precision and the right tool. A masonry drill bit is specifically built for penetrating hard, abrasive surfaces without dulling too quickly.
Unlike wood or metal bits, masonry bits have a robust design that resists heat, vibration, and friction while delivering clean holes in dense material.
These bits are mainly used with hammer drills or rotary hammers that combine rotation and pounding force.
The hammering motion helps the carbide tip break down the surface while the rotation removes dust from the hole. This dual action makes it possible to drill through brick, tile, or concrete efficiently.
A regular drill bit would struggle on such materials. When used on masonry, a metal bit’s tip will quickly burn or chip, producing smoke and friction marks. That’s why identifying a masonry bit correctly saves both time and money.
Another key reason to understand your bit is safety. Using the wrong bit on a hammer drill can cause slippage, overheating, or cracking. Each bit type—masonry, wood, or metal—is designed for a specific resistance level. Recognizing these differences ensures your project runs smoothly and safely.
Masonry drill bits are easily recognizable once you know their structure. Their thick body, slightly dull tip, and rough flutes distinguish them from other types. Knowing these cues will help you avoid guesswork the next time you pick a bit from your toolbox.
Visual Clues – What a Masonry Drill Bit Looks Like
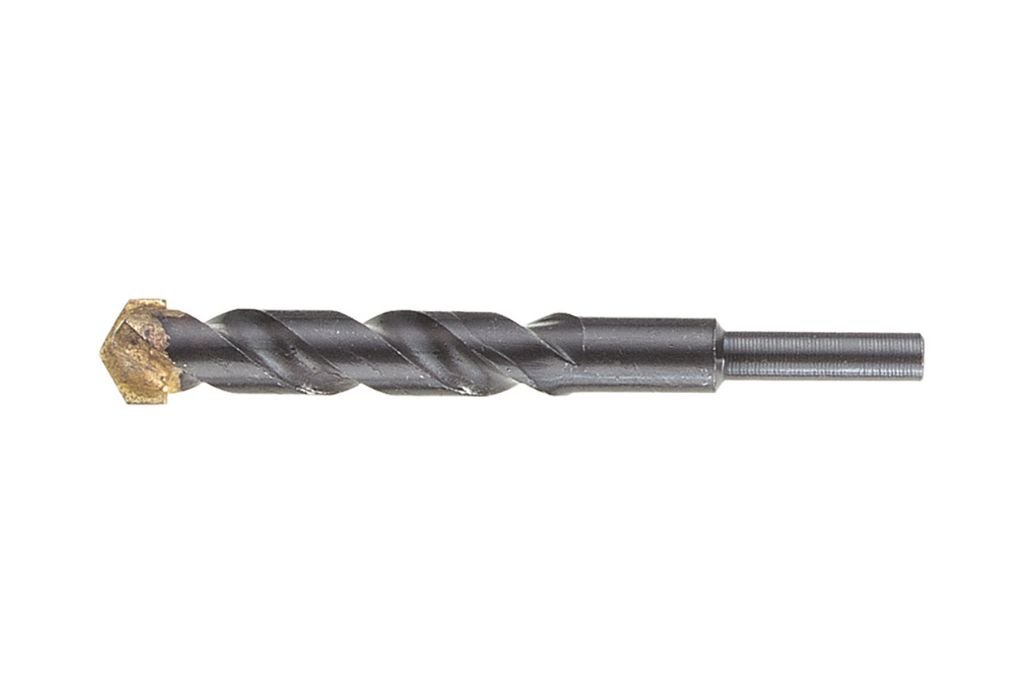
The easiest way to identify a masonry drill bit is to look closely at its tip. Masonry bits feature a carbide tip, usually silver or gray, that is soldered onto the steel shaft. This carbide edge is the secret behind its ability to crush rock and concrete. Instead of being sharp, the tip is blunt and often shaped like an arrow or a spade.
If you compare it with a wood or metal bit, the difference is obvious. Wood bits are sharply pointed, while metal bits have clean cutting edges. Masonry bits, on the other hand, look rugged and slightly uneven. That ruggedness allows them to pulverize stone without slipping.
The flutes—the spiral grooves along the bit—are another clue. Masonry bits usually have wide, deep flutes to help expel dust and debris efficiently. These grooves look rougher than those on other bits, which are designed for smooth chip removal.
Color also plays a small role. Many masonry bits have a dark or dull finish, while wood and metal bits often have polished steel or titanium coatings. Some brands color-code their bits, marking masonry ones in gray, black, or bronze.
Lastly, inspect the body for markings. You might find stamps like “CARBIDE,” “MASONRY,” or “SDS.” Such engravings are reliable indicators. Once you recognize these visual clues, identifying a masonry drill bit becomes second nature.
How to Identify Masonry Drill Bit by Tip and Edge
The tip tells the entire story. Masonry bits are always carbide-tipped, and that tip is slightly wider than the shaft. This design ensures efficient crushing of hard materials. The cutting edges feel dull to the touch, unlike sharp wood bits meant for clean slicing.
Run your finger gently along the tip. You’ll notice it feels blunt and solid. That’s intentional—masonry bits don’t cut; they grind. The wider tip pulverizes the surface while the flutes carry away debris.
If the bit has a solder joint between the tip and shaft, that’s another strong clue. The carbide piece is welded on using a visible silver joint, which you won’t find on regular bits.
Over time, a used masonry bit may show discoloration or small chips on the carbide edge. This wear pattern is typical for bits used on brick or stone. Don’t confuse these signs with damage; they simply show that the bit has done its job.
In contrast, a metal bit has razor-sharp edges that catch light, and wood bits often have a central spur for precision. Masonry bits lack both features, so when you see a bit that looks thick, dull, and rugged, you’re likely holding one meant for concrete.
Testing the Drill Bit – Practical Identification Methods
Visual checks are helpful, but sometimes you want proof. Simple tests can confirm whether a bit is designed for masonry. One quick method is the tap test. Lightly tap the tip against a piece of brick or concrete. A masonry bit will make a crisp metallic “click” without denting, while a regular bit will blunt or mark.
Another test is the scratch test. Try scratching the surface of a ceramic tile. A masonry bit will leave a visible mark due to its carbide hardness. Avoid applying heavy pressure during this test to prevent breaking the tip.
You can also test it by drilling gently into scrap brick or block. If the bit digs in smoothly with small dust particles emerging, it’s a masonry bit. If it overheats or makes screeching sounds, it’s not.
A vibration test is another clue. When you drill with a masonry bit on a hammer drill, you’ll feel rhythmic pulses instead of continuous resistance. This pulsing indicates the bit’s design is engaging correctly with hard material.
Never force a metal or wood bit onto concrete. You’ll likely overheat the motor, burn the tip, and waste both tool and material. Quick identification through these practical tests ensures precision and prevents expensive mistakes.
Comparing Masonry Drill Bits vs Wood and Metal Bits
To identify a masonry bit confidently, it helps to compare it directly with other types. Wood drill bits have sharp, pointed tips that pierce the surface immediately. They usually feature spurs on the sides to create clean holes with minimal splintering. In contrast, masonry bits lack any sharp point and instead have a dull carbide insert.
Metal drill bits—often made of high-speed steel—are sharper than masonry bits but smoother in appearance. Their flutes are tighter and designed for removing thin metal shavings, not stone dust. When you use a masonry bit on wood, it tears fibers roughly, and when you use a metal bit on concrete, it simply skids.
Hardness is another major difference. Carbide, used in masonry bits, ranks around 9 on the Mohs hardness scale, while high-speed steel is closer to 7. This extra hardness gives masonry bits superior wear resistance.
The body design also reveals clues. Masonry bits often have thicker shanks for better impact absorption. Some, like SDS or SDS-Plus bits, include locking grooves for hammer drills, which wood and metal bits never have.
In summary, if the bit looks dull, thick, and strong with a brazed carbide tip, it’s meant for masonry. If it’s shiny, pointed, or slender, it’s built for wood or metal. Recognizing these contrasts ensures you choose the right tool every time.
Popular Types of Masonry Drill Bits and Their Uses
There isn’t just one kind of masonry bit. Each type serves a specific purpose depending on material hardness and drill compatibility. The standard masonry bit is the most common, perfect for brick, mortar, and lightweight block walls. It has a simple carbide tip and fits any standard drill.
Then there’s the SDS (Slotted Drive System) bit, popular with professionals. These bits have grooved shanks that lock securely into SDS drills, providing superior impact transfer and faster drilling. They are ideal for heavy concrete work.
The SDS-Plus and SDS-Max versions handle even tougher tasks, like reinforced concrete. Their thicker shanks and longer flutes remove dust quickly, reducing friction and preventing overheating.
A carbide-tipped multi-material bit is another category. It can handle light masonry, tile, and even wood, making it perfect for household use. However, its performance on pure concrete is limited compared to dedicated masonry bits.
For delicate materials like tile or stone, diamond-grit or spear-tipped bits are used. They cut with precision and prevent cracking.
Knowing which bit type you have helps you identify its intended use. The heavier and more rugged it feels, the more likely it’s made for masonry.
Common Mistakes When Identifying Masonry Drill Bits
Many people rely solely on appearance and end up misidentifying their bits. A frequent mistake is assuming that any dull or dark-colored bit is for masonry. In reality, titanium-coated metal bits can also appear dark. Always check the tip structure before deciding.
Another error is ignoring labeling. Manufacturers often stamp “CARBIDE” or “MASONRY” directly on the shank. Over time, these marks fade, but using a magnifying glass can help reveal them again.
Some users confuse multi-purpose bits with true masonry bits. While multi-purpose designs can handle concrete, they are slower and less durable for heavy drilling. If the tip looks narrow or lacks soldering, it’s likely not full masonry.
People also overlook wear patterns. A bit used heavily on concrete may lose its carbide edges, making it look like a metal bit. Always inspect for the silver joint where the tip meets the shaft—that’s the key sign of masonry design.
Lastly, using the wrong bit out of assumption can cause damage. Always compare it with a known masonry bit before starting. Taking a minute to confirm is far better than replacing a burned-out drill or cracked tile later.
Expert Tips for Storing and Labeling Drill Bits
Once you’ve identified your masonry bits, storing them properly saves confusion later. Start by separating bits by type—masonry, wood, metal, and specialty. Use small organizers or labeled cases with dividers for quick access.
Label each compartment with material names. You can also attach colored stickers on the shank: red for metal, blue for wood, and gray for masonry. This color-coding speeds up your workflow.
Keep a reference chart near your toolbox showing each bit type and its typical tip shape. Many professionals print laminated visual guides and tape them inside their workshop drawers.
Avoid tossing bits together loosely. Masonry bits can chip softer ones when mixed. Clean them after use to remove concrete dust, which can corrode metal surfaces.
Finally, check your bits periodically. Replace worn or chipped carbide tips to ensure clean drilling. Proper labeling and maintenance mean you’ll always grab the correct bit instantly, even during a busy project.
FAQs – Masonry Drill Bit Identification
How do I know if my drill bit can drill concrete?
If it has a blunt carbide tip wider than the shaft and feels heavy, it’s suitable for concrete. When tested, it creates fine dust rather than shavings.
Are masonry drill bits magnetic?
The steel body may respond slightly to magnets, but the carbide tip itself is not magnetic. This property doesn’t affect performance.
Can I use a masonry drill bit on metal?
It’s not recommended. Masonry bits grind rather than cut, which makes them ineffective on metal surfaces and may damage both bit and material.
What does an SDS marking mean?
SDS indicates a Slotted Drive System designed for hammer drills. It provides better torque transfer and faster drilling in hard concrete.
How do I tell if my bit is worn out?
Look for chipped carbide tips, reduced diameter, or dull edges. A worn bit will take longer to drill and create excess vibration or smoke.
Conclusion
Identifying a masonry drill bit might seem confusing at first, but once you know what to look for, it becomes effortless. The combination of a blunt carbide tip, thicker body, and deep flutes makes masonry bits distinct from wood or metal ones.
Using the right drill bit ensures cleaner holes, longer tool life, and improved safety. Keep your bits organized, labeled, and maintained to save time and avoid costly errors. Whether you’re mounting shelves, fixing tiles, or drilling into concrete walls, you’ll now recognize exactly which bit to pick.
So next time you open your toolbox and see a row of mixed bits, you won’t hesitate—you’ll instantly spot the masonry drill bit ready for action.

I’m John F. Nicholas, the founder, lead writer, and drill enthusiast behind 101drill.com. With years of hands-on experience in power tools and DIY projects, I created this platform to share practical knowledge, expert tips, and real-world insights to help others master the art of drilling.