
Installing a deadbolt on a metal door can feel intimidating, especially when you imagine the drill fighting against the hard surface and the noise echoing through the material.
Many people start drilling only to feel the drill bit slip or skid across the metal and immediately lose confidence. This moment makes the task seem far more complicated than it actually is.
Most homeowners are used to drilling into wood, where the bit easily bites into the surface. Metal behaves differently, resisting the drill unless you prepare properly and use the correct tools designed for tough materials.
Without the right technique, the bit overheats, the hole becomes uneven, and the door risks damage.
The fear of ruining an expensive metal door makes people hesitant to start drilling at all. They worry about creating a crooked deadbolt hole or misaligning the latch. These concerns are completely normal and common among beginners.
Once you understand the correct method, drilling a deadbolt hole becomes a predictable and manageable job. The process requires patience, careful marking, lubrication, and slow drilling speed. These steps ensure a clean and accurate hole every time.
The good news is that metal doors are built with thin skins and internal reinforcements that can be drilled safely with the right equipment. You only need to follow a structured procedure and allow the tool to work at its own pace. This prevents damage and ensures professional results.
This guide explains everything you need to know about drilling a deadbolt hole in a metal door. From the tools you need to step by step drilling instructions, you will gain the confidence to complete the installation smoothly and safely.
Understanding the Structure of a Metal Door
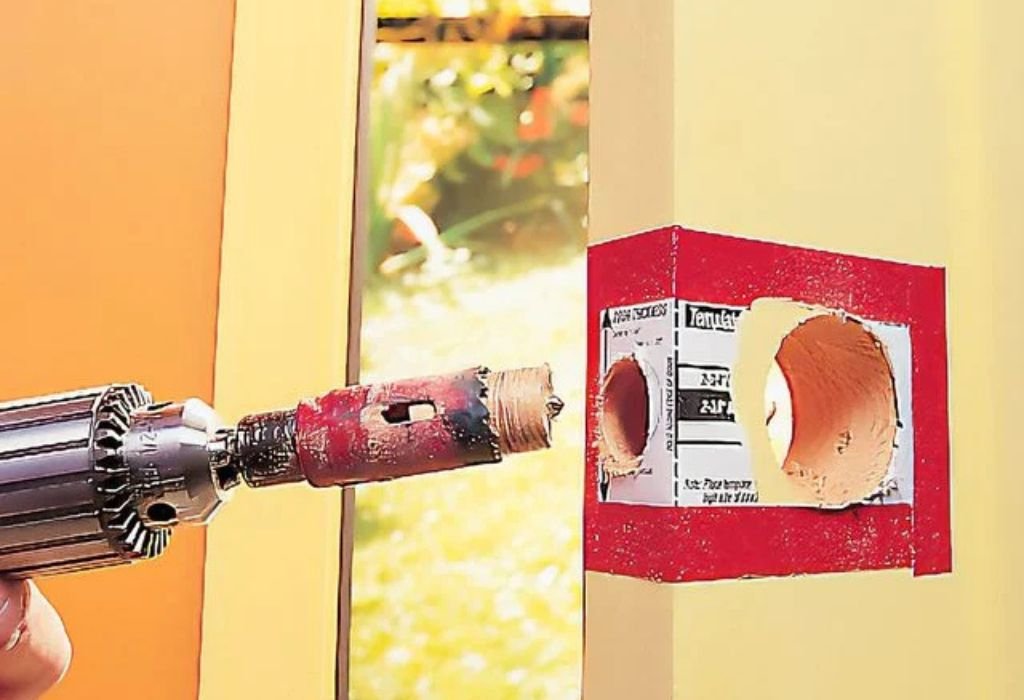
A metal door is usually made from thin steel skins wrapped around a solid or insulated core. These skins are durable enough to withstand weather and daily use while remaining thin enough to drill through. This structure makes drilling possible with the proper technique.
Inside the door, you may find reinforcements made from wood or metal around the lock area. These reinforcements help support the deadbolt hardware and keep the door strong. Knowing this helps you understand why drilling feels different at certain points.
Outer steel layers are smooth and slippery, which makes drill bits slide if not marked correctly. A center punch prevents this issue. Creating a small indentation ensures accuracy.
Metal doors often include foam or honeycomb material inside. These materials cut easily once the steel skin is penetrated. This makes the interior drilling stage much easier.
Some metal doors have an additional reinforcement plate where locks are installed. This plate improves security and durability. You will feel increased resistance when drilling through it.
Understanding the internal composition helps you prepare for each layer. Expecting varying resistance prevents surprises. This knowledge makes drilling smoother and more controlled.
Tools Needed to Drill a Deadbolt Hole in a Metal Door
A hole saw designed for metal is essential for cutting the main deadbolt hole. Bi metal hole saws provide the strength needed for cutting steel skins. They produce clean circular openings when used properly.
You will also need a pilot drill bit attached to the center of the hole saw. The pilot bit guides the saw and keeps it from wandering. Without it, you cannot start the cut accurately.
A center punch and hammer are necessary for marking the drilling location. Creating a dent allows the pilot bit to engage. This step prevents slipping during drilling.
Cutting oil is required to cool the bit and reduce friction. Metal drilling generates significant heat. Oil keeps your tools sharp and protects the door surface.
A door lock installation template helps mark the correct height and spacing. Templates ensure perfect alignment between the main hole and the latch hole. This prevents misalignment issues.
A strong drill capable of low speed and high torque is also needed. Corded drills work best because they maintain steady power. This ensures smooth cutting through metal.
Marking and Preparing the Door for Drilling
Start by choosing the correct height for your deadbolt. Standard deadbolt height is usually above the main handle. Mark this spot with a pencil or marker.
Place the lock installation template on the door. Make sure it sits flat and aligned with the door edge. The template ensures both holes line up correctly.
Use the center punch to create a small indentation at the center of the deadbolt location. Tap it firmly with a hammer. This provides a starting point for the drill.
Check both sides of the door to ensure the mark is correctly aligned. Drilling from only one side may cause a rough exit hole. Precision at this stage prevents errors.
Clean the surface to remove dust, rust, or debris. A clean surface improves drill performance. It also helps the pilot bit stay seated.
Apply a small amount of cutting oil to the marked spot. Oil helps reduce friction when the drilling begins. This makes the initial cut smoother.
Drilling the Pilot Hole Through the Metal Skin
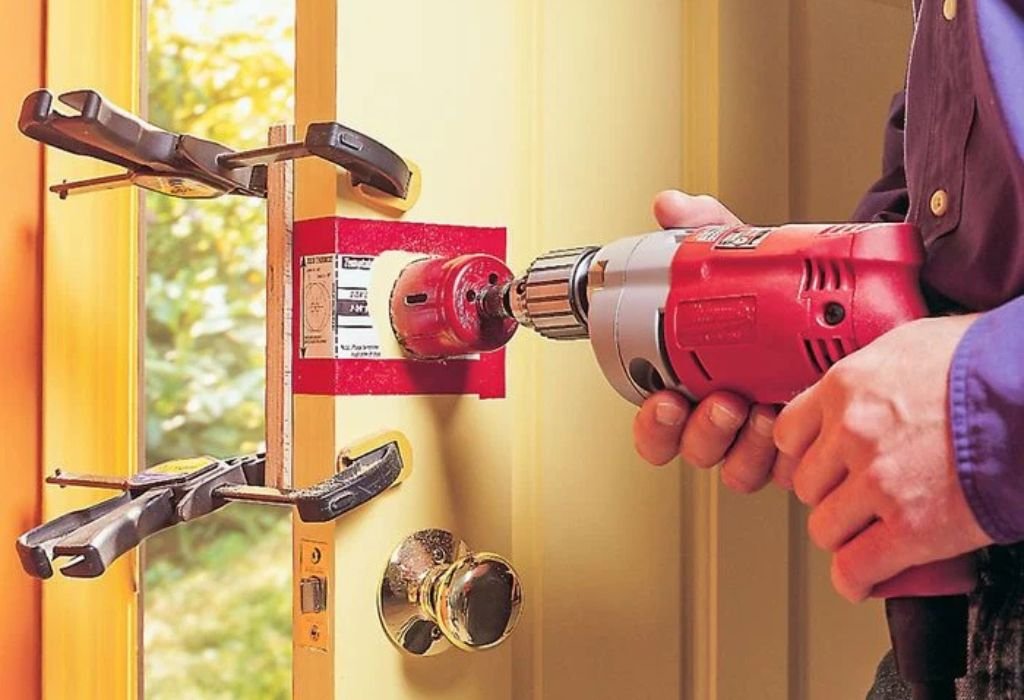
Attach the pilot bit and hole saw assembly to your drill. Ensure it is tight and secure. A loose arbor can cause wobbling.
Start drilling at the lowest speed. This slow speed allows the pilot bit to bite into the metal. Do not rush this stage.
Allow the pilot bit to create a clear guide hole. Once it penetrates the first metal layer, maintain slow and steady pressure. Let the drill do the work without forcing it.
Apply cutting oil frequently during drilling. The metal skin will generate heat quickly. Oil prevents overheating and keeps the cut clean.
As the drill progresses, you will feel the bit enter the door’s interior. Resistance becomes lower, making drilling easier. Continue at the same pace.
Do not push hard while drilling through metal. Excessive pressure can bend the bit or damage the door. Gentle pressure produces the best results.
Cutting the Main Deadbolt Hole With a Hole Saw
Once the pilot hole is complete, the hole saw begins cutting the main circle. Keep the drill speed low to prevent overheating. Slow cutting preserves the saw’s teeth.
Hold the drill firmly with both hands. The hole saw may grab the metal as it cuts. A secure grip prevents sudden movements.
Apply cutting oil regularly as the saw teeth move through the metal. Oil reduces friction and keeps the teeth sharp. This ensures a smooth and clean cut.
Listen for changes in sound as the saw penetrates deeper. Each layer of metal and reinforcement creates a different resistance level. Adjust pressure as needed.
Avoid pushing too hard during the cut. Let the saw teeth grind through the metal naturally. Forcing the saw causes stalling or uneven cutting.
Once the outer steel skin is complete, drilling through the internal material becomes easier. Continue cutting slowly until the saw exits fully. The final hole should be perfectly round.
Drilling the Latch Hole on the Door Edge
Use the template to mark the latch position on the door edge. This alignment ensures the latch fits perfectly. The latch hole is just as important as the main deadbolt hole.
Punch a guide mark using the center punch. This prevents slipping during drilling. The small dent makes starting easier.
Use a smaller metal bit to drill a pilot hole into the door edge. Keep the drill steady and straight. Proper alignment ensures smooth latch operation.
Switch to the correct size hole saw or spade bit for the latch. Drill slowly while applying cutting oil. Metal doors require patience at this stage.
Ensure the latch hole is deep enough for the bolt mechanism. Check fit by inserting the latch into the opening. Adjust the hole if necessary.
Clean the hole edges using a metal file. Smoothing the edges ensures the latch sits flush. A clean fit improves lock performance.
Smoothing and Deburring the Holes After Drilling
After drilling, sharp metal edges remain around the hole. These burrs can interfere with the lock installation. Removing them ensures proper alignment.
Use a round metal file to smooth the inside edges of the hole. Work gently around the entire circumference. This helps remove rough spots.
A flat file can be used on the outer surface. Keep pressure light to avoid scratching the door. Smooth edges provide a better finish.
Vacuum any metal shavings from the door and surrounding area. Loose shavings are sharp and can cause injury. Cleaning them prevents damage to the lock hardware.
Check the fit of the deadbolt body inside the hole. It should slide smoothly without resistance. If not, file the hole slightly wider.
Apply a small amount of rust preventing oil to exposed metal edges. This protects the steel from moisture. Preventing rust ensures long term durability.
Installing the Deadbolt Hardware Into the Drilled Hole
Begin by inserting the latch into the edge hole. Make sure it sits flush with the door surface. Tighten the screws securely.
Insert the main deadbolt body through the front of the door. Align it with the internal mechanism of the latch. The parts should connect smoothly.
Attach the interior and exterior lock plates. Ensure they line up perfectly before tightening the screws. Misalignment affects lock performance.
Tighten the screws evenly on both sides. Uneven tightening can twist the lock. Balanced pressure keeps everything straight.
Check the operation of the deadbolt. It should extend and retract smoothly. Jamming indicates misalignment.
Once the lock works correctly, tighten all screws firmly. A secure installation improves security. The deadbolt is now ready for use.
Common Questions About Drilling Deadbolt Holes in Metal Doors
Do I need a special hole saw for metal doors?
Yes, a bi metal hole saw is required. It is strong enough for steel. Standard hole saws will fail.
Why does my pilot bit skid across the door surface?
The metal skin is slippery. Use a center punch to create a dent. This prevents wandering.
Can I drill a deadbolt hole with a regular drill?
Yes, but it must be strong. Low speed and high torque are important. Corded drills work best.
Why is cutting oil necessary?
Oil controls heat. It protects the bit. It ensures smoother cutting.
Can I drill from only one side of the door?
Yes, but drilling from both sides gives cleaner edges. Some doors require dual side drilling. Templates ensure accuracy.
Why does my hole saw get stuck?
You may be pushing too hard. Reduce pressure and add oil. Let the saw teeth do the cutting.
Should I drill the latch hole first or the main hole?
Drill the main deadbolt hole first. The latch hole depends on its alignment. Follow the template.
Can drilling damage the metal door?
Improper technique can cause dents. Slow speed prevents problems. Using correct tools avoids damage.
Do I need to deburr the hole?
Yes, burrs interfere with lock installation. Smooth edges improve fit. It also prevents injury.
How long does the drilling process take?
Most doors take about 15 to 30 minutes. Thick reinforcements take longer. Proper preparation speeds things up.
Conclusion
Drilling a deadbolt hole in a metal door may seem challenging at first, but with the proper approach, it becomes a straightforward and predictable task.
Understanding the thin steel layers and internal reinforcements helps you prepare for the different cutting stages you will encounter. Patience and technique matter far more than brute force when working with metal.
Using the correct tools such as bi metal hole saws, pilot bits, and cutting oil ensures smooth and efficient drilling. These tools are designed to handle the resistance of metal doors and produce clean, accurate holes. Proper marking and careful drilling prevent mistakes that could affect lock alignment.
The key to success is drilling slowly, applying steady pressure, and keeping the bit cool. Following each step in the correct order protects both the door and your equipment from damage.
Cleaning and deburring the hole afterward ensures a perfect fit for the deadbolt hardware.
With the right preparation, anyone can install a deadbolt in a metal door confidently. The process becomes easy to manage once you know what to expect at each stage. You gain improved home security and the satisfaction of completing the installation correctly.

I’m John F. Nicholas, the founder, lead writer, and drill enthusiast behind 101drill.com. With years of hands-on experience in power tools and DIY projects, I created this platform to share practical knowledge, expert tips, and real-world insights to help others master the art of drilling.