
Cutting a hole in a glass bottle sounds simple until the first one cracks unexpectedly. Many people try random tricks they saw online and end up with shattered pieces on the floor. What starts as a creative idea quickly becomes a frustrating and messy experience.
The biggest problem is that most beginners do not understand how delicate glass really is. A bottle cannot handle sudden pressure or uneven heating the way other materials can. One small mistake is enough to send a crack across the entire surface.
Some people get nervous after the first failure and stop trying altogether. They believe cutting glass needs expensive tools or professional equipment. In reality the process becomes safe when the right steps are followed patiently.
There are also stories of success where the bottle separates cleanly without any force. The person uses simple household items and takes time to heat and cool the glass slowly. The result looks smooth and perfect as if it came from a workshop.
This guide is designed for anyone who wants that successful outcome without using a drill. You will learn safe methods that rely on scoring heat and controlled temperature changes. Each step is explained clearly so you know exactly what to do before starting.
Understanding Why Glass Bottles Crack Easily
Glass bottles are designed to hold pressure which makes the surface rigid and sensitive. When uneven force is applied the glass cannot flex the way plastic does. This is why cutting without the right method causes sudden cracking.
The curved shape of a bottle increases internal stress during heat changes. If one area heats faster than the rest it expands and creates tension. This imbalance leads to star fractures that spread before anyone notices.
People often try random tricks without understanding how glass reacts. Pushing sharp objects or tapping the surface causes weak points. Once a crack begins the damage cannot be reversed and the bottle is ruined.
Learning how glass behaves helps you choose safer cutting techniques. Slow heating and controlled cooling reduce pressure inside the glass. Understanding this makes the process smooth and predictable.
Tools and Materials You Need for Safe Cutting
Cutting a glass bottle without a drill requires simple household items. You will need cotton string rubbing alcohol and a lighter or candle. These tools help apply heat around the bottle evenly without direct force.
Protective gloves and eye protection should always be used. Even small chips can fly unexpectedly when the bottle separates. Safety prevents injury and keeps the process controlled.
Cold water is required to create sudden temperature change. The contrast between heat and cold helps the glass break cleanly at the scored area. Having a bucket ready makes the process easier.
Sandpaper or a sanding block helps smooth the edges after cutting. Polishing prevents sharp spots that could cause injury. Finishing the surface makes the bottle safe for decorative use.
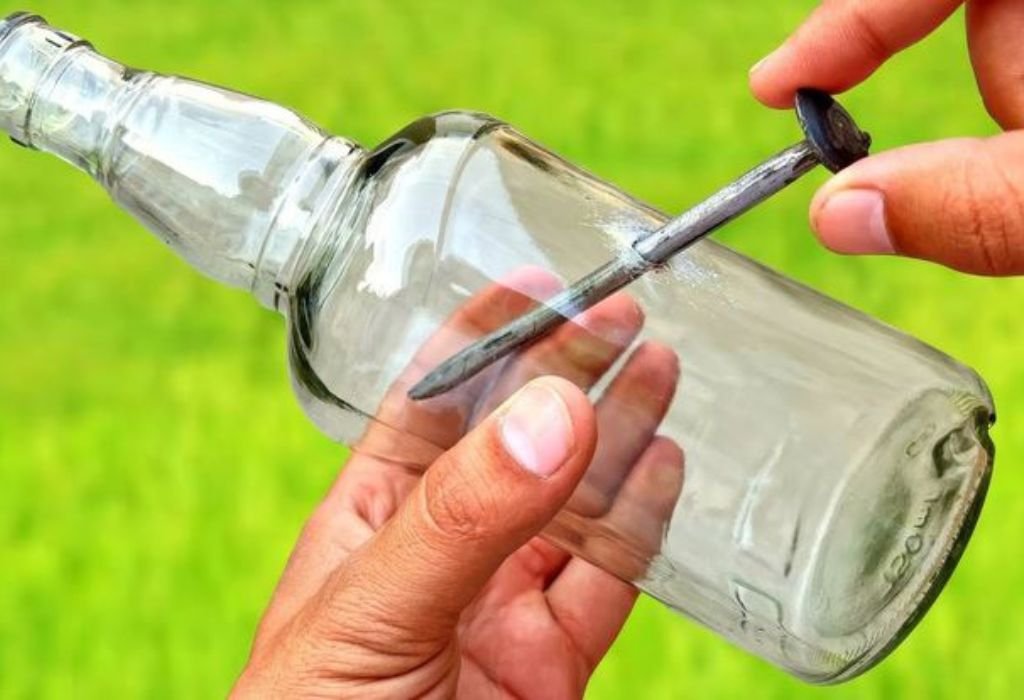
Scoring the Glass Surface Before Cutting
Scoring creates a weak guided line that helps the bottle break cleanly. A glass cutter or carbide scoring tool can be used for best results. The goal is to scratch not slice the glass surface.
Rotating the bottle slowly keeps the score line even. An uneven score causes the break to deviate from the intended path. Using a stable surface improves accuracy and control.
Do not score the same line more than once. Repeated scoring creates chips that weaken the glass unpredictably. One steady motion makes the cleanest result.
Applying light pressure helps avoid deep scratches. A deep cut makes the glass more likely to shatter instead of separate. Smooth scoring is the most important step of the process.
Can I score a bottle using a knife instead of a glass cutter?
No knives are not sharp or consistent enough to create a clean score line. Glass cutters are designed for controlled surface marking.
How do I keep the score line straight on a round bottle?
Use a rubber band as a guide and rotate the bottle slowly. This keeps the marking level and prevents uneven pressure.
Should I wet the bottle before scoring?
No scoring must be done on a dry surface to avoid slipping. Moisture reduces grip and increases risk of accidental scratches.
Can I score more than one line to create shapes?
It is possible but increases cracking risk. Beginners should stick to single circular cuts for safety.
What if the score line looks uneven after marking?
Start over with a new bottle because uneven lines break unpredictably. A clean line ensures a cleaner separation later.
Heat and String Method for Cutting a Hole
The string method uses controlled heat to separate the glass at the score line. Cotton string is soaked in rubbing alcohol and wrapped tightly around the bottle. This creates even heating around the surface.
Once the string is lit the heat expands the glass along the scored line. Rotating the bottle helps distribute heat without burning one area. The flame should burn out naturally before cooling begins.
After heating the bottle is submerged into cold water. The sudden temperature shift causes the glass to separate cleanly. Cracking happens exactly where the score line was created.
Never force the bottle if it does not break immediately. Repeating the heat and cool cycle makes the process safer. Patience prevents shattering and wasted bottles.
Using thin cotton string works better than thick rope. Thicker material distributes heat unevenly and burns longer. The best result comes from steady short heating cycles.
Using Thermal Expansion to Create a Hole Without Tools
Thermal expansion allows glass to break using temperature changes only. Pouring boiling water along the score line heats the surface slowly. Rotating the bottle ensures full coverage and even heating.
After heating cold water is poured over the same area. The contrast causes the glass to expand and contract rapidly. This helps the glass separate without force or tools.
Repeating the process two or three times improves success. Sudden temperature change must be controlled to avoid full bottle cracking. Slow transitions give better results than rushing.
Bottle thickness affects how quickly it reacts. Thicker bottles need more cycles because they retain heat longer. Thin bottles break faster and require gentle handling.
Can I use a hair dryer instead of hot water?
A hair dryer does not produce enough concentrated heat. Boiling water or steam works more effectively.
Is it safe to use freezing water for cooling?
Extremely cold temperatures may shatter the bottle unexpectedly. Use regular cold tap water for controlled separation.
Will this method work on colored glass bottles?
Yes but colored glass may react slightly slower. The process remains the same with careful heating cycles.
Can I heat only one side of the bottle?
No uneven heating increases cracking risk. Always rotate for balanced temperature distribution.
Why did the bottle crack across the middle instead of the hole area?
The score line may have been uneven or too shallow. A clean score is required for controlled breaking.
Creating an Opening Using a Glass Cutter and Tapping Method
The tapping method works by weakening the scored internal line. Light tapping along the inside edge helps the glass release gradually. This prevents sudden shattering and keeps the opening controlled.
Using a metal tool gently taps around the score point. Each tap vibrates the internal structure until separation begins. Patience is required to avoid breaking the bottle completely.
Slow rotation keeps pressure even around the bottle. Focusing on one area creates weak points and unpredictable cracking. Consistency is more important than force.
Never tap with sharp objects because they create chips. Rounded tools such as the back of a screwdriver are safer. Sharp tools increase the risk of deep fractures.
If the bottle does not separate stop and try heating instead. Combining tapping with thermal expansion improves results. This prevents unnecessary force and wasted material.
Water Submersion Method for Controlled Separation
Submerging the bottle in water reduces stress during breaking. Water supports the glass and prevents small pieces from flying. This makes the process safer and cleaner.
Scoring must be completed before placing the bottle underwater. Light tapping along the line helps create gradual separation. The water absorbs shock and reduces surface tension.
Cutting underwater prevents overheating during thermal expansion. Steam inside the water breaks the glass gently. This method is ideal for beginners who want more control.
Deep containers work better than shallow bowls. The bottle must be fully submerged during tapping. This maintains consistent pressure around the score line.
Can I heat the bottle while it is underwater?
No heating must be done before submersion. Hot glass placed underwater creates the separation safely.
Why did the bottle not break underwater?
The score line may have been too light. A deeper but controlled score helps the method work effectively.
Can I cut large shaped holes using this method?
No underwater cutting is best for circular openings. Complex shapes require advanced glass cutting tools.
Is submersion safe for thick wine bottles?
Yes but thicker glass needs more tapping cycles. Patience prevents cracking through the entire bottle.
Should I remove the label before submerging?
Labels do not affect the cutting but may peel off. Removing them helps with handling and visibility.
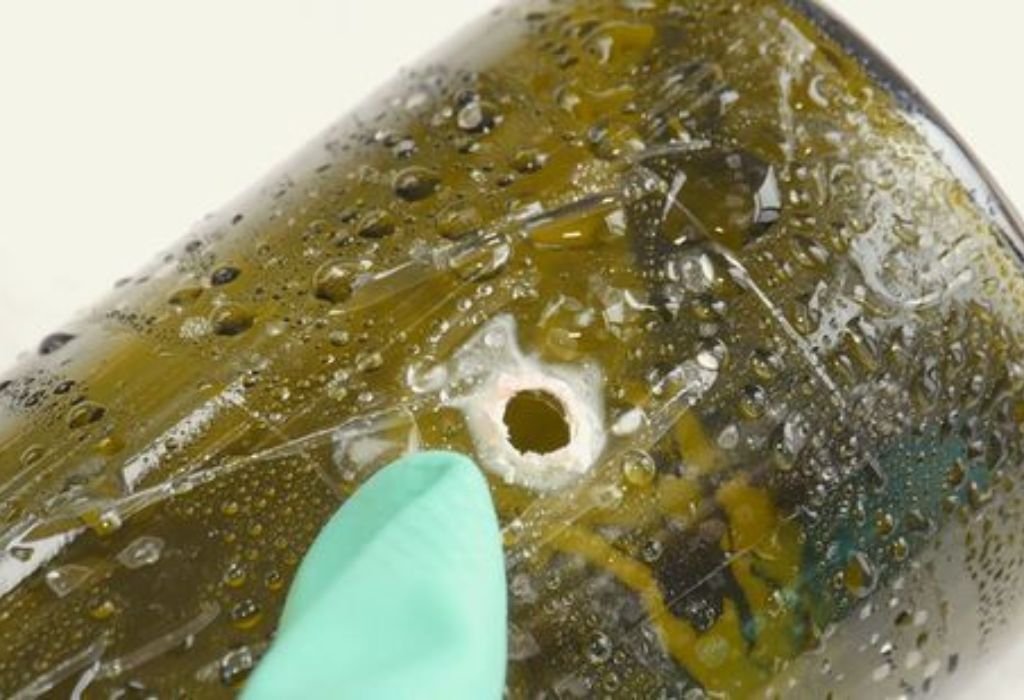
Smoothing and Finishing the Cut Edges Safely
After creating the opening the edges remain sharp. Rubbing with fine grit sandpaper smooths the surface gently. Wet sanding reduces dust and improves polishing.
Diamond sanding pads provide better results for thick bottles. They remove roughness without removing too much material. Polishing also improves appearance for decorative projects.
You can continue sanding until the edge feels smooth to the touch. Testing with a cloth helps detect sharp spots. Any remaining roughness should be removed before use.
Cleaning the bottle removes glass dust and particles. Rinse thoroughly before adding decorations or lights. Safety comes first especially when handling exposed edges.
Common Mistakes to Avoid While Cutting Glass Bottles
Using force is the fastest way to break a bottle unintentionally. Glass must separate naturally without pushing or twisting. Patience always gives better results.
Overheating one side causes uneven expansion. Heat should be applied slowly and evenly around the score line. Rapid heating increases cracking risk across the entire bottle.
Skipping the scoring step leads to unpredictable breaks. Scoring creates a controlled weak point for clean separation. Without it the bottle may shatter randomly.
Why did the bottle crack before separating?
The heating was too fast or uneven. Slower cycles prevent sudden internal pressure changes.
Can I cut a hole without scoring first?
It is possible but highly unpredictable. Scoring ensures the break follows a guided path.
Why did only part of the bottle break off?
The score line may not have been complete. Full rotation is required before heating or tapping.
Can I use cold water immediately after heating?
Yes but only with controlled temperature change. Extreme shock makes the bottle shatter dangerously.
Why are the edges still rough after sanding?
Coarse sandpaper may not be enough. Switching to finer grit improves the finish dramatically.
Safety Tips When Working With Glass Bottles
Wearing protective eyewear prevents injury from tiny shards. Even smooth breaks can release invisible glass particles. Eye safety is essential for every attempt.
Gloves help maintain grip and prevent cuts. Handling glass with bare hands increases risk especially when wet. Thick fabric or rubber gloves work best.
Work in an open space with good ventilation. Burning string or alcohol creates fumes that should not be inhaled. Outdoor areas are safer and easier to clean.
Dispose of broken glass properly using a sturdy container. Never throw pieces loosely into regular trash. Safety continues even after the project is finished.
Conclusion
Cutting a hole in a glass bottle without drilling is completely possible with patience and the right methods.
Understanding how glass reacts to heat and pressure makes the process safer and more predictable. Scoring the surface creates a controlled path that prevents random cracking during separation.
Using simple techniques like heat string and thermal expansion helps the bottle break cleanly. Cooling cycles and gentle tapping allow the opening to form without force or tools. Smoothing the edges ensures the bottle is safe to handle for any creative project.
Avoiding common mistakes such as overheating skipping scoring and using pressure reduces failure and frustration.
Safety equipment and slow controlled steps make the experience easier for beginners. With the correct approach anyone can create clean openings for lights planters or crafts using recycled bottles.

I’m John F. Nicholas, the founder, lead writer, and drill enthusiast behind 101drill.com. With years of hands-on experience in power tools and DIY projects, I created this platform to share practical knowledge, expert tips, and real-world insights to help others master the art of drilling.