
A clear glass bottle sat on a workbench while someone imagined turning it into a unique lamp for their living room. The only missing part was a clean hole to run a wire through, but every attempt with ordinary tools ended in cracks and frustration.
Learning how to drill a hole in glass with a Dremel became the moment when a risky idea turned into a confident and exciting project.
Glass looks solid and strong, yet it reacts differently when pressure is applied to a small point instead of spreading evenly across the surface.
Most beginners push too hard or drill too fast, causing the glass to chip before the hole even begins to form. With the right technique, patience, and cooling, drilling becomes a controlled and safe process instead of a risky guess.
Whether someone wants to customize jars for home décor, install cable through a window panel, or create handmade crafts, the steps remain the same. A Dremel offers gentle speed control that makes it safer than using a standard drill on delicate materials.
This guide explains every detail clearly so anyone can drill a clean and smooth hole without damaging the glass.
Understanding How Glass Behaves While Drilling
Glass is a brittle material made of fused silica that fractures when sudden stress concentrates at one point instead of spreading across the surface.
This is why even a small amount of extra pressure or a slight drilling slip can create cracks instantly. Understanding how glass reacts helps prevent failure before the drilling even begins.
Unlike wood or metal, glass does not bend or compress because it lacks internal flexibility. Instead of cutting through layers, a Dremel slowly grinds the surface to form an opening.
This grinding method requires low speed, gentle pressure, and continuous cooling to keep the glass stable.
Glass also contains tiny internal flaws that are not visible to the human eye but react strongly to heat and vibration.
When the drilling area gets too hot, these weak points expand and create sudden fractures. Keeping the surface cool reduces stress and makes drilling safer and smoother.
Tools and Materials Needed for Drilling Glass With a Dremel
A Dremel rotary tool with variable speed control is essential because it allows slow grinding instead of fast cutting.
Fixed-speed tools can create heat too quickly, which raises the risk of cracks and surface damage. A flexible shaft attachment can also improve control when handling smaller or curved objects.
Diamond-tipped drill bits are the best option because they grind glass gently without applying sharp force.
Regular metal or twist bits cannot be used since they are designed to cut, not sand away the surface. You may need multiple bit sizes depending on how large you want the hole to be.
Water is the most important cooling source during drilling because it prevents heat from building up at the contact point.
You can spray water, place a wet sponge under the drilling area, or create a clay dam to hold water in place. Safety equipment should also include gloves, goggles, and a mask to avoid fine glass dust.
Choosing the Right Dremel Bits for Glass Drilling
Diamond core bits are ideal for making clean, round holes because they remove glass evenly around the edge.
They work best when you begin at a slight angle to prevent slipping and then level the bit once a small groove forms. These bits come in different sizes, allowing gradual enlargement without stressing the material.
Diamond-coated burr bits are useful for smoothing edges or widening the hole after the first cut. Their rounded tips help refine the shape without causing chips along the surface. Using burr bits at low speed maintains control and prevents damage to the glass.
Avoid carbide or high-speed steel bits because they apply cutting pressure instead of grinding. Glass cannot tolerate this force and may crack immediately on contact. Choosing the right bit is one of the most important factors in successfully drilling glass.
How to Prepare the Glass Surface Before Drilling
Preparing the glass surface properly reduces slipping and prevents sudden cracks. Start by cleaning the surface with alcohol or soapy water to remove dirt and oils that reduce traction. Dry the glass completely before applying tape to avoid sliding when drilling begins.
Place masking tape over the drilling spot to give the bit more grip and stop it from wandering. The tape provides a stable starting surface and is especially helpful on smooth or rounded glass. For bottles, you can overlap two strips of tape to create a more level area.
Support the glass securely so pressure is not placed on weak edges or corners. A towel, rubber mat, or foam pad keeps the piece steady and absorbs vibrations during drilling. Never hold glass by hand while drilling because movement increases the risk of breakage.
Safety Precautions You Must Follow Before Drilling
Safety is the most important part of drilling glass because one wrong move can cause serious injury.
Always wear safety goggles to protect your eyes from tiny shards that can fly when the glass surface chips. Gloves and a dust mask also help prevent cuts and irritation from fine particles.
Make sure the glass is supported on a flat, padded surface so vibration does not travel through weak points.
Never drill near edges or corners because those areas are more likely to crack under pressure. Keep children and pets away from the workspace to avoid distractions during drilling.
Do not rush the process or apply force to speed up the drilling. Glass responds best to time, patience, and gentle pressure from the Dremel. If you notice heating, cracking sounds, or slipping, stop immediately and reassess your setup.
Step by Step Method to Drill a Hole in Glass With a Dremel
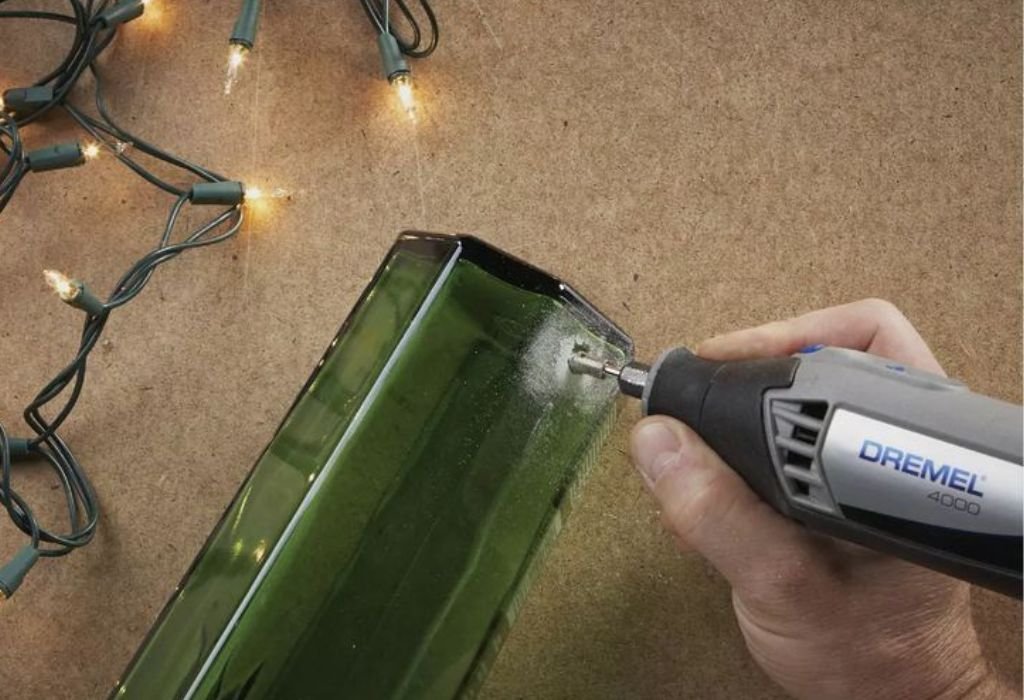
Begin by marking the drilling spot and covering it with masking tape to help the bit stay in place. Hold the Dremel at a slight angle and start the drill slowly until a small groove forms. Once the bit catches the surface, gradually bring it upright to continue drilling smoothly.
Use the lowest speed setting possible because higher speeds create friction and heat too quickly. Apply only the weight of the tool and let the bit grind gently without forcing it downward. Keep the area wet at all times to prevent sudden temperature changes that can crack the glass.
As the bit breaks through, reduce pressure even further to avoid chipping around the edges. Do not push during the final moments because the glass is most vulnerable when the surface is almost penetrated.
After the hole is complete, lift the tool straight up instead of dragging it across the surface.
Cooling Techniques to Prevent Cracks While Drilling
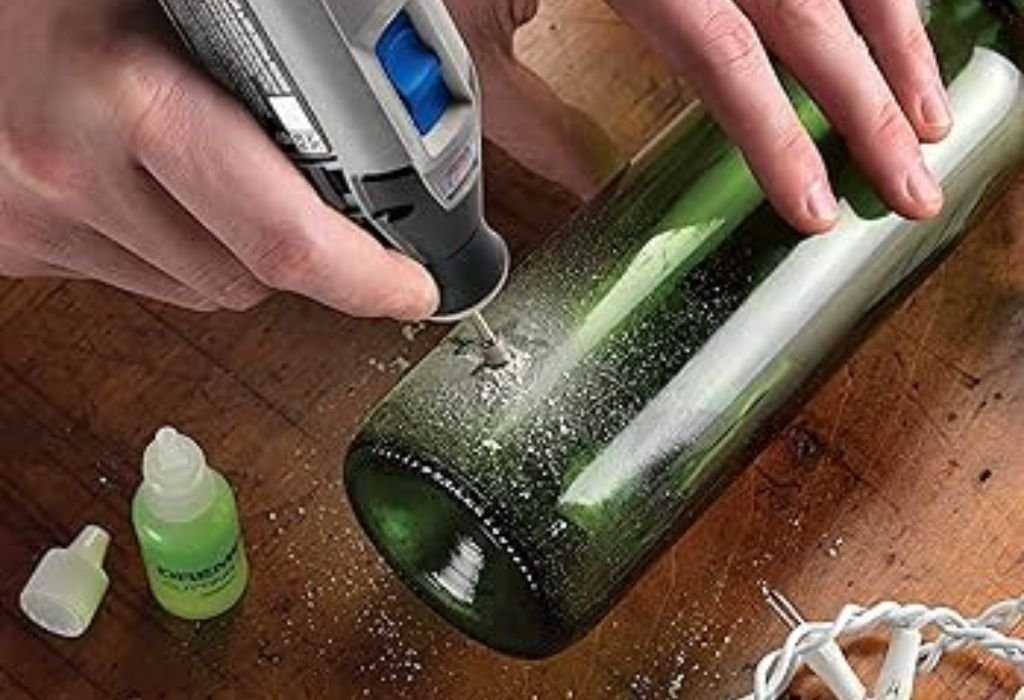
Cooling is the key to preventing heat build-up and reducing stress in the glass. The simplest method is dripping water directly over the drill point throughout the process. You can also place a wet sponge underneath the glass so moisture reaches the drilling area from below.
Creating a small dam with modeling clay around the drilling spot allows water to pool without running off. This keeps the bit submerged and minimizes friction as the Dremel grinds through the surface. A spray bottle can also maintain consistent cooling without stopping the drill.
Never drill glass while it is dry because heat builds quickly and causes instant cracking. Avoid using oil or lubricant because they do not cool effectively like water. Continuous cooling helps maintain stability and produces a cleaner, smoother hole.
How to Increase Hole Size Safely With a Dremel
If you need a larger opening, never switch immediately to a big bit because the stress may break the glass. Start with a small pilot hole and increase the size gradually using larger diamond bits. This controlled expansion keeps pressure distributed evenly around the glass.
Use diamond burr bits to smooth or widen the hole instead of trying to force a core bit through quickly. Move the bit in gentle circular motions to avoid catching the edge and causing chips. Always maintain water flow during this step because reshaping creates extra heat.
Do not rush widening because the glass becomes weaker as more material is removed. Take breaks between steps to cool the area and check for hairline fractures. If you notice any small cracks, stop immediately and do not continue drilling.
Common Mistakes and How to Avoid Glass Breakage
The most common mistake is applying too much pressure, which causes sudden cracking. Let the Dremel do the work instead of pushing, even if progress feels slow. Patience always creates better results than force when working with glass.
Another frequent error is drilling at high speed, which generates heat in seconds. Keeping the tool at a low setting prevents friction and reduces surface stress. Beginners often think faster rotation means cleaner work, but with glass it leads to failure.
Skipping cooling is also a major cause of breakage because temperature changes weaken the surface. If the glass becomes warm to the touch, stop immediately and allow it to cool. Proper cooling ensures a smooth, clean hole and protects the material from internal stress.
Troubleshooting Cracks, Chips, and Slips While Drilling
Small chips around the hole usually happen when the drilling speed is too high or pressure increases near the end.
Reduce speed and apply only light contact during the final breakthrough to keep the surface stable. If chipping occurs, switch to a diamond burr bit to smooth the edges gently.
Cracks that appear suddenly are often caused by heat build-up from drilling without enough water. Stop immediately, cool the glass, and never continue drilling through a damaged area. If the crack spreads, it is safer to replace the piece instead of attempting repairs.
Slipping happens when the bit cannot grip the surface at the start of drilling on smooth glass. Using masking tape or starting at a slight angle helps the bit create a shallow groove. Once the groove forms, the drill can be positioned upright for steady progress.
Cleaning and Finishing the Drilled Glass Hole
After drilling, rinse the glass under clean water to remove fine dust and loose fragments. Avoid wiping the surface while dry because small particles can scratch the glass. Pat the area gently with a soft cloth once the surface is fully washed.
Use a diamond burr bit to smooth any rough edges around the hole for a clean and polished finish. Move slowly around the inside of the opening while keeping the surface wet to prevent heat. This step improves safety and gives the glass a more professional appearance.
Allow the glass to dry completely before using or assembling it into any project. Inspect the hole closely for chips or hairline fractures that may require light smoothing. Proper finishing makes the final result both attractive and structurally safe.
When Not to Drill Glass and Best Alternatives
Avoid drilling tempered or safety glass because it is designed to shatter into small pieces when damaged. Tempered glass cannot be drilled safely once manufactured, and attempting it will always result in breakage. Only factory processes can create holes in this type of glass.
Do not drill antique or high value glass unless you are prepared for the risk of failure. Older pieces may contain internal stress or hidden flaws that react unpredictably. If unsure, consult a professional glassworker before attempting modifications.
Consider alternative methods such as using glass with pre-cut holes or choosing acrylic panels instead. Acrylic is easier to drill and safer for beginners while still offering a clear and polished appearance. Selecting the right material can save time and prevent unnecessary damage.
Care and Maintenance of Dremel Bits for Long Life
Rinse diamond bits under clean water after use to remove glass dust that can clog the surface. Gently scrub with a soft brush if needed to keep the abrasive coating exposed. Allow the bits to dry fully before storing them to prevent corrosion.
Avoid applying heavy pressure during drilling because it wears down the diamond coating faster. Let the bit grind naturally at a low speed to extend its lifespan and maintain performance. Using proper cooling also reduces friction and protects the tool.
Store bits in a dry container away from moisture and debris to prevent damage. Keep different sizes organized so they are easy to identify for future projects. Good maintenance ensures consistent results and reduces the need for frequent replacement.
Common Questions About Drilling Glass With a Dremel
Can a regular drill be used instead of a Dremel for glass?
A regular drill is harder to control and increases the risk of cracks, while a Dremel provides slower and safer grinding.
Do I need special bits for drilling glass?
Yes, only diamond-tipped bits are suitable because they grind the surface instead of cutting through it.
What speed should I use on the Dremel?
Always use the lowest speed setting to prevent friction and heat build-up during drilling.
Can I drill glass without using water?
No, drilling dry glass causes rapid heating and will almost always lead to cracks.
How do I stop the drill bit from slipping?
Apply masking tape over the drilling spot and begin at a slight angle until a groove forms.
Why did my glass crack near the end of drilling?
Pressure is highest at breakthrough, so reduce speed and lighten contact during the final stage.
Can I widen a hole after drilling it?
Yes, use diamond burr bits and work slowly while keeping the surface wet to avoid chipping.
Is it safe to drill curved glass like bottles?
Yes, as long as the glass is supported securely and tape is used to stabilize the drilling point.
How do I know if the glass is tempered?
Tempered glass often has a small stamp or label and will show a dotted pattern when viewed through polarized lenses.
What should I do if small chips appear around the hole?
Switch to a fine burr bit and smooth the edges gently while maintaining water flow.
Conclusion
Drilling a hole in glass with a Dremel becomes a safe and manageable process when the right tools and techniques are used. Working slowly, applying minimal pressure, and keeping the surface cool are the most important steps for preventing cracks.
With proper preparation and patience, even beginners can create clean and smooth holes for crafts, home projects, and custom designs.
Choosing diamond bits, supporting the glass correctly, and avoiding high-risk materials like tempered glass greatly increases success.
Knowing how to troubleshoot common issues and finish the hole properly ensures a professional-looking result. With the information provided in this guide, anyone can drill glass confidently and achieve beautiful and functional outcomes.

I’m John F. Nicholas, the founder, lead writer, and drill enthusiast behind 101drill.com. With years of hands-on experience in power tools and DIY projects, I created this platform to share practical knowledge, expert tips, and real-world insights to help others master the art of drilling.