
The first time someone tries to drill into glass it usually feels like balancing between confidence and fear. One wrong move can turn a simple project into a pile of sharp fragments. That moment of hesitation is what makes learning the right method so important.
Imagine holding a smooth glass surface while the drill begins to spin slowly. The vibration feels small but the material reacts differently than wood or metal. Every second becomes a test of patience rather than strength.
Most people believe cracked glass happens because they are not skilled enough. In reality the failure comes from heat pressure and speed working against the surface. Once these factors are controlled the process becomes simple and predictable.
Home projects like making a lamp bottle fountain or custom window panel often require drilling glass safely. Knowing the right tools and techniques opens possibilities instead of limiting them. With careful preparation even beginners can achieve clean professional results.
This guide explains how to drill glass without cracking it using step by step methods anyone can follow. By understanding how glass behaves under stress the process becomes easier and safer. With the right approach drilling glass becomes a controlled skill instead of a risky guess.
Understanding Why Glass Cracks While Drilling
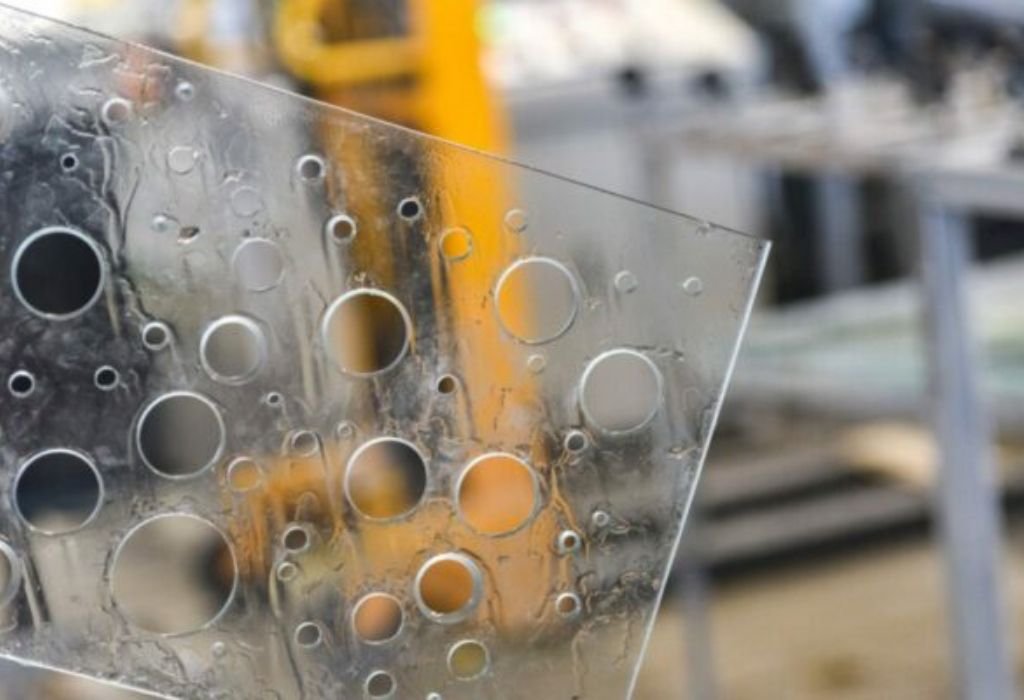
Glass is a hard but brittle material that reacts differently to pressure compared to wood or metal. When drilling vibration and heat create internal stress that can lead to cracks. Understanding this behavior is the first step to drilling safely without damage.
Different types of glass also have different breaking points depending on how they are manufactured. Tempered and laminated glass react differently under drilling pressure. Regular household glass is the most fragile and requires gentle handling.
Cracks usually begin from sudden temperature changes or uneven force. If the drill spins too fast heat builds up and weakens the surface. This combination causes micro fractures that spread quickly across the glass.
The surface tension of glass keeps it strong until external force disrupts that balance. Even small mistakes in pressure control can cause the entire piece to shatter. Drilling must always be slow and consistent.
Most beginners think more pressure will drill faster but the opposite is true. Slow pacing allows the bit to cut gradually without stressing the material. Patience is the key to drilling through glass safely.
Before drilling it is important to identify the type of glass. Some safety glass cannot be drilled once manufactured. If unsure always check with the manufacturer.
Choosing the Right Drill Bits for Glass
Standard metal drill bits are not suitable for drilling glass because they cause chipping. The correct choice is a carbide or diamond tipped drill bit designed for smooth cutting. These bits grind instead of pierce which prevents cracking.
Carbide bits are cheaper and suitable for occasional small drilling tasks. Diamond core bits are more durable and ideal for larger or deeper holes. Choosing the right bit greatly reduces the risk of damage.
The bit size should match the hole requirement without forcing the material. Starting with a smaller pilot hole provides better control and accuracy. Gradually increasing the size prevents sudden pressure stress.
A sharp drill bit always performs better than a worn one. Dull bits create friction and heat which leads to cracks more easily. Replacing old bits is a simple safety step.
Rotary tools like a Dremel also support small diamond bits. These are useful for thin glass and small precise holes. Always check tool compatibility before starting.
Can I use a regular drill for glass?
Yes you can use a standard drill as long as the speed is low and the correct bit is used.
Do diamond bits work on all types of glass?
Diamond bits work on most glass types but should not be used on tempered glass.
How long does a diamond drill bit last?
It depends on cooling and usage but high quality bits can last through several projects.
Should I lubricate the drill bit while drilling glass?
Yes lubrication reduces heat and prevents cracking so water is commonly used.
Can I drill stained glass at home?
Yes but extra care and low pressure are required because stained glass is fragile.
Preparing the Glass Surface for Drilling
Preparing the surface ensures stability and reduces stress during drilling. The glass must be cleaned to remove dust oil and debris. Any particles can cause scratching or cracking.
A layer of masking tape provides grip for the drill bit. It prevents slipping and spreads pressure more evenly. The tape also reduces chipping around the hole.
For curved surfaces like bottles additional stabilization is required. Sandbags or foam can help prevent rolling. Secure positioning reduces sudden movement.
Lubrication keeps the temperature low while drilling. Water is the safest and easiest cooling option. A small clay dam can hold water around the drill area.
Marking the hole correctly ensures drilling begins in the right place. A permanent marker or taped guideline helps with precision. Do not force the drill to adjust the position after starting.
Always inspect the glass for cracks before drilling. Weak points expand under pressure and can break suddenly. If cracks are present drilling should not be attempted.
Marking the Hole Position Accurately
Marking the hole correctly prevents misalignment and reduces stress. Using masking tape creates a textured surface that prevents slipping. The drill bit can grip more easily and start smoothly.
A center punch should never be used on glass because impact causes cracking. Instead gently guiding the bit at an angle helps establish the starting point. Gradually straightening ensures controlled drilling.
For circular or curved glass marking becomes more difficult. Templates or guides help maintain accuracy. Specialized drilling stands offer more control for beginners.
Laser marked guides are available for precise alignment. These tools assist with repeated drilling tasks. They are optional but helpful for professionals.
Measuring the placement twice is better than correcting later. Once drilling starts the position cannot be changed safely. Planning leads to cleaner results.
A soft pencil or removable marker can be used if tape is unavailable. Always ensure markings do not smudge. Visibility supports accuracy from start to finish.
Securing the Glass Safely Before Drilling
Glass must be supported properly to prevent vibration. A flat padded surface like a towel or rubber mat works well. Padding absorbs pressure and reduces stress concentration.
For small objects a vise should never clamp directly on the glass. Foam or rubber padding must be placed between the jaws. Clamping too tightly creates stress points.
Placing the glass on a backing surface prevents blowout. Wood or plastic underneath supports the drill exit. Supporting both sides ensures a smoother hole.
Two hand control helps maintain steady pressure. One hand stabilizes the drill while the other maintains positioning. Sudden movement increases cracking risk.
Avoid drilling near the edges of the glass when possible. The edges are weaker and chip more easily. Leave space between the hole and the perimeter.
Securing curved glass requires customized support. Rolled towels or sandbags help hold shape. Stability is essential before drilling begins.
Drilling Technique to Avoid Cracks
Drilling glass requires slow and steady technique instead of pressure. The drill speed should always remain low to reduce heat and friction. Starting with gentle contact allows the bit to grind gradually into the surface.
The drill should be held straight but without forcing downward. Letting the bit do the work prevents sudden stress on the glass. Any pushing motion increases the chance of creating cracks.
Beginning at a slight angle helps the bit establish its starting groove. Once the bit gains grip the drill can be slowly straightened for a clean entry. This prevents the bit from skating across the smooth surface.
Stopping frequently is important during drilling to release heat. Allowing the bit to cool prevents thermal stress buildup inside the glass. Overheating is one of the fastest causes of sudden breakage.
Never try to speed up the hole by applying more force. Glass reacts negatively to uneven pressure and vibration during drilling. Patience always produces smoother and safer results.
If the hole is large a step drilling approach works best. Starting with a smaller bit and increasing sizes gradually reduces stress. This method keeps the material stable throughout the process.
Cooling Methods While Drilling Glass
Cooling prevents heat buildup that causes glass to crack unexpectedly. Water is the simplest and most effective coolant during drilling. Keeping a continuous flow helps maintain temperature control.
A clay or putty dam can be formed around the drilling spot. This creates a small pool that keeps the bit submerged while cutting. Constant moisture prevents friction from rising too quickly.
For vertical or curved surfaces a spray bottle works well. Light misting keeps both the glass and drill bit cool. Avoid allowing the surface to dry out during the process.
Some users prefer using a wet sponge pressed gently behind the drilling area. This supports the exit point while providing cooling. It also reduces chipping when the bit breaks through.
Never use oil-based lubricants because they leave residue on the glass. Water is safer cleaner and easier to manage on delicate material. Cooling should always remain consistent from start to finish.
If drilling takes more than a few seconds pause to let the bit cool. Short rests protect both the drill bit and the glass surface. Controlled pacing improves safety and results.
Can I drill glass without using water?
No drilling dry increases heat and almost always leads to cracking.
Is ice water recommended for cooling glass?
No extreme temperature change can shock the glass and cause breakage.
How often should I stop while drilling?
Stopping every few seconds is enough to keep the temperature stable.
Can I use a fan instead of water for cooling?
No airflow does not remove heat fast enough to protect the glass.
Does cooling make the drilling slower?
Cooling does not slow the process and actually prevents damage.
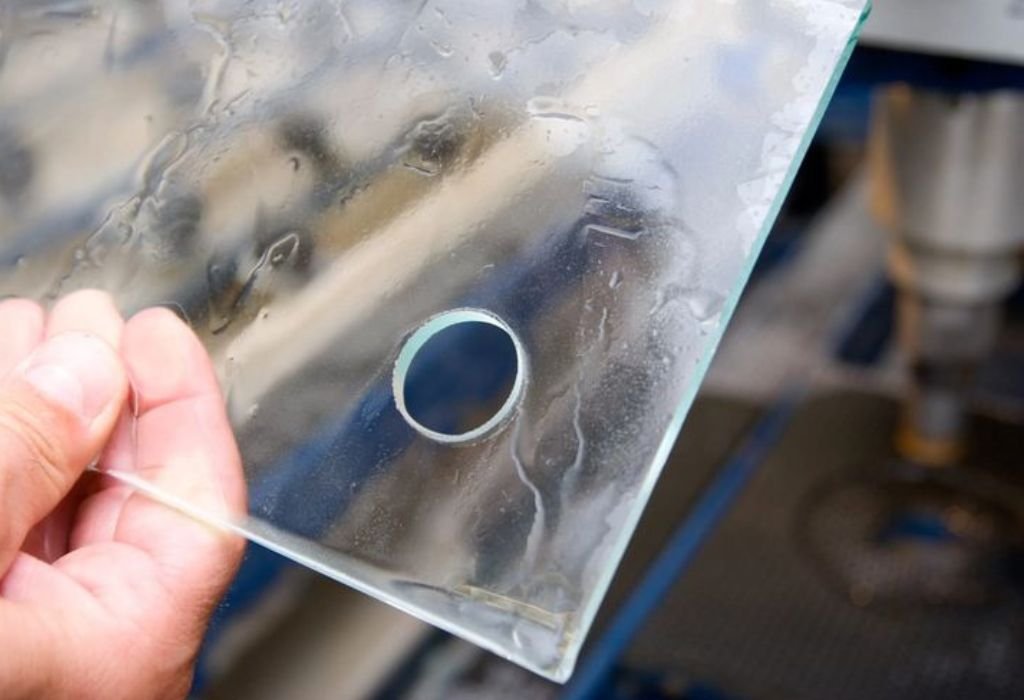
Finishing and Smoothing the Drilled Hole
Once the hole is complete the edges may feel rough or uneven. Smoothing prevents sharpness that can cause injury or cracking later. Diamond sanding bits are ideal for refining the inside surface.
Rotary tools can gently polish the edges at low speed. Light pressure prevents removing too much material at once. Slow circular motion creates a smoother finish.
Water should still be used during sanding to prevent heat buildup. Wet sanding keeps dust down and protects the glass surface. Dry sanding increases friction and weakens the drilled area.
If the hole is large a diamond file can help shape the edges. Working gradually ensures the glass remains stable while being refined. Never rush smoothing because glass responds to vibration.
Checking the edges with a fingertip helps detect rough spots. Any sharpness should be removed before installing hardware. Smooth edges improve safety and durability.
Cleaning the drilled area removes leftover debris and residue. Warm water and mild soap are enough to restore clarity. Allow the glass to dry completely before using it.
Common Mistakes and How to Avoid Them
One common mistake is drilling too fast which generates excessive heat. High speed creates micro fractures that spread rapidly. Low speed drilling is always safer for fragile materials.
Another mistake is starting the hole without stabilization. Skipping masking tape causes the bit to slip across the surface. Proper preparation ensures controlled drilling from the beginning.
Many beginners apply force instead of letting the drill work. Pressure leads to stress that glass cannot tolerate. Gentle steady progress prevents sudden cracking.
Drilling too close to the edge is also a frequent error. Edges are weaker and more likely to chip or break under stress. Leaving enough distance improves safety significantly.
Using the wrong drill bit causes chipping and fracture lines. Metal bits are not designed for grinding through glass. Only diamond or carbide bits should be used.
Skipping cooling is one of the fastest ways to destroy the glass. Without water friction increases and heat builds up. Consistent cooling protects both the material and the drill bit.
Why does glass crack at the end of drilling?
Because pressure increases when the bit breaks through without support.
What happens if I use high speed on glass?
High speed creates heat and vibration which leads to sudden cracking.
Can I fix a crack that starts while drilling?
No once a crack forms it will continue spreading through the glass.
Why is my drill bit slipping on the surface?
The bit slips because the surface is smooth and needs masking tape.
Is it safe to drill glass without taping it?
No taping reduces slipping and provides better drilling control.
Safety Tips When Drilling Different Types of Glass
Not all types of glass should be drilled under any condition. Tempered glass is manufactured to shatter when damaged. It cannot be drilled once it has been tempered.
Laminated glass behaves differently because of its plastic layer. It may be drilled but requires more time and precision. Cutting through both layers demands extra cooling.
Stained and decorative glass is more fragile than regular glass. Variations in thickness create uneven stress points. Very low pressure is required during drilling.
Glass mirrors have a reflective coating on one side. Drilling should be done from the glass side not the backing. Damaging the coating can ruin the mirror surface.
Always wear protective gear when drilling glass. Safety glasses prevent injury from small chips or fragments. Gloves help protect hands from sharp edges.
Working in a stable and clean workspace improves safety. Removing clutter prevents accidental bumps during drilling. Controlled surroundings reduce unexpected movement.
Conclusion
Drilling glass without cracking it is completely possible when the right methods are followed. Using the correct drill bit slow speed and consistent cooling prevents stress from building up. Preparation technique and patience are more important than force or speed.
Securing the glass properly and marking the hole accurately ensures safer drilling. Avoiding common mistakes like drilling dry or using the wrong bit keeps the surface intact. Working slowly allows the material to adjust without sudden temperature changes.
Finishing the drilled hole with smoothing and cleaning improves safety and appearance. Understanding the behavior of different glass types helps decide whether drilling is safe. With careful steps and the correct approach drilling glass becomes a controlled process.
Anyone can successfully drill glass at home with practice and attention to detail. Planning the process before starting reduces uncertainty and prevents damage. Slow controlled drilling is always the safest and most effective method.

I’m John F. Nicholas, the founder, lead writer, and drill enthusiast behind 101drill.com. With years of hands-on experience in power tools and DIY projects, I created this platform to share practical knowledge, expert tips, and real-world insights to help others master the art of drilling.