
If you have ever walked along a beach and found a small piece of colorful sea glass, you know how magical it feels. The glass has been shaped by waves, sand and time, turning it into a soft, frosted gem.
Many people pick up these pieces with dreams of turning them into jewelry, ornaments or meaningful handmade gifts. But when the moment comes to drill a hole through the glass, most beginners feel nervous about breaking it.
Sea glass is beautiful but fragile, and drilling it requires patience, proper tools and the right technique. Many people remember the first time they attempted the process using the wrong bit or too much pressure.
The glass might have cracked instantly, leaving them disappointed and unsure about trying again. This fear is common, but with the correct method, drilling sea glass becomes surprisingly easy.
The secret to drilling sea glass lies in understanding how it behaves under pressure. Because the surface is hardened and smoothed by nature, it reacts differently to heat and vibration.
When you learn how to keep the glass cool, stable and supported, the risk of cracking becomes very low. Everything becomes a calm, slow process instead of a stressful, rushed task.
This guide will take you step by step through the entire process, from choosing the right tools to avoiding common mistakes. Whether you want to make pendants, earrings, wind chimes or decorative pieces, learning how to drill sea glass opens the door to endless creativity.
Once you finish reading, you will have the confidence to drill your own sea glass safely and beautifully.
What Sea Glass Is and Why It Requires Special Drilling Techniques
Sea glass forms when broken pieces of glass spend years tumbling in the ocean. The constant movement of waves and sand smooths their edges and creates a frosted finish. This natural shaping makes each piece unique.
Because sea glass is usually thin and already weathered, it cannot handle rough drilling methods. Hard pressure or high heat can easily crack it. This is why the drilling process must be gentle and controlled.
Sea glass often contains tiny stress lines from years of erosion. These invisible lines weaken the surface slightly. Drilling must avoid sudden force that might expand these lines.
The frosted surface also makes it tricky to grip without slipping. This requires proper stabilization and a wet drilling method. Wet drilling gives better control and protects the surface.
Different types of sea glass have different strengths. Some are thicker and more durable, while others are delicate and brittle. Understanding the type you have helps choose the right technique.
Color can also affect the hardness of sea glass. Darker colors sometimes indicate thicker original glass. Lighter colors may be softer and easier to break.
Temperature plays a big role in drilling. Sea glass heats up quickly, so cooling it constantly is essential. Keeping it cool prevents fractures.
These unique characteristics make sea glass a beautiful but delicate material. Using the correct drilling method ensures clean holes and preserves its charm.
Tools You Need to Drill a Hole in Sea Glass Safely
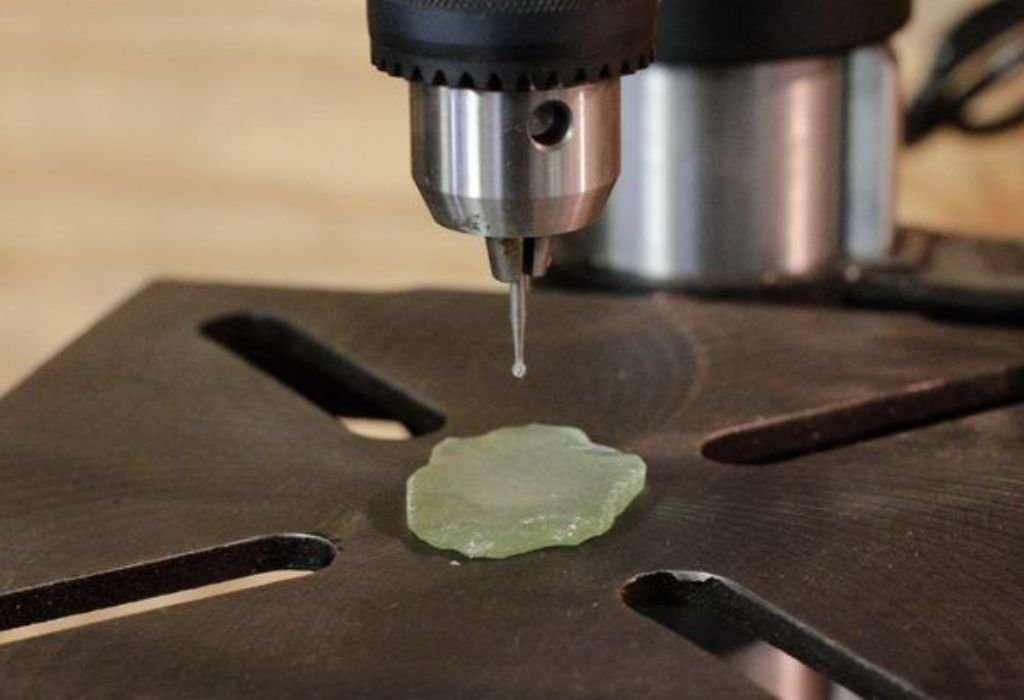
A rotary tool or small drill is essential for drilling sea glass. A flexible speed control helps maintain gentle drilling. Slower speeds reduce heat and cracks.
You will need diamond tipped drill bits, as regular bits cannot cut through glass. Diamond bits grind through the surface rather than breaking it. These are designed specifically for delicate drilling.
A shallow tray of water is necessary for wet drilling. The sea glass must stay partially submerged. Water reduces heat and friction during drilling.
A piece of wood or soft rubber mat supports the glass from below. This keeps it stable during drilling. Stability prevents sudden slips.
Masking tape can help create a guide point on the glass. It gives the drill bit something to grip. This reduces skidding.
Safety goggles protect your eyes from tiny particles. Even wet drilling can release small glass dust. Eye protection is always important.
Some people use clamps, but gentle hand support is often safer. Over tightening clamps can crack the glass. Hand support gives better sensitivity.
A polishing tool or small file will be needed after drilling. This smooths the edges of the hole. A smooth hole looks professional and prevents sharpness.
How to Prepare Sea Glass Before the Drilling Process
Begin by cleaning the sea glass thoroughly with warm water and mild soap. Removing sand and dirt helps the drill bit grip the surface. Clean glass also prevents scratches.
Inspect the glass carefully for cracks or weak spots. Drilling near cracks increases the chance of breakage. Choose a strong, even area for drilling.
Place a small piece of masking tape where you plan to drill. The tape gives the drill bit a starting point. It prevents slipping on the smooth glass.
Use a soft pencil to mark the exact center of your hole. Clear marking helps maintain precision. Precision results in cleaner drilling.
Prepare a shallow dish with water deep enough to submerge part of the glass. The glass should rest comfortably under the water. Water cools the bit and reduces stress.
Place a rubber pad or soft wood at the bottom of the dish. This protects the underside of the glass. It also keeps the drilling surface stable.
Make sure your drill is fitted with the correct diamond bit. A small bit is ideal for starting the hole. Starting small reduces cracking risk.
Position your tools within easy reach so you do not need to lift the glass during the process. Good preparation helps maintain consistency. Careful setup prevents accidents.
How to Set Up the Drilling Area for Best Control and Visibility
Choose a bright area where you can clearly see the drilling point. Good lighting helps you track the progress of the hole. Visibility reduces mistakes.
Place the water tray on a stable, flat surface. Movement can cause slipping or incorrect drilling angles. A steady platform improves accuracy.
Adjust your drill speed to a low or medium setting. High speeds can crack the glass quickly. Controlled speed protects the fragile material.
Wear your safety goggles before starting. Even wet drilling creates fine dust. Eye protection is always required.
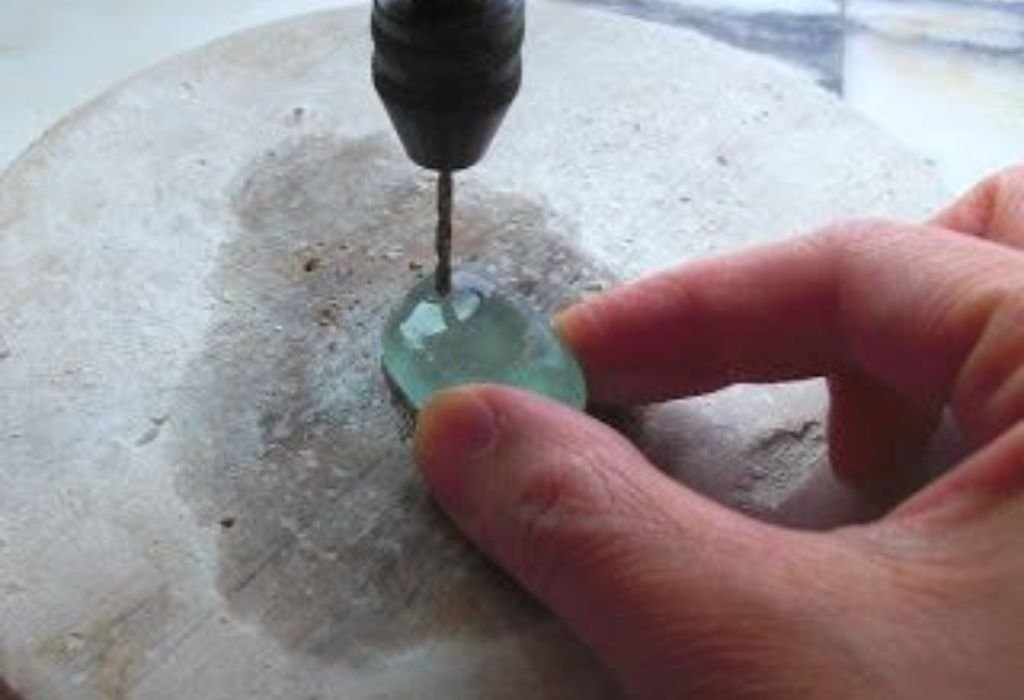
Hold the sea glass gently between your fingers under the water. Avoid squeezing too tightly, as this can cause cracks. Gentle control gives better sensitivity.
Make sure the drill bit enters the water before touching the glass. This prevents dry friction. Wet drilling keeps everything cool.
Place your wrist on the edge of the tray for stability. This anchors your hand and reduces shaking. Stable hands lead to straighter holes.
Have a towel nearby to dry your hands when needed. Wet fingers can reduce grip. Dry hands give better control when shifting positions.
Step by Step Guide to Drilling a Hole in Sea Glass Safely
Begin by placing the drill bit lightly on the marked point. Apply gentle pressure while drilling in a slow circular motion. The circular motion helps prevent slipping.
Allow the bit to grind into the glass slowly without forcing it downward. Forcing the bit can cause cracks. Let the diamond bit do the work.
Keep the sea glass fully submerged in the water at all times. Water cools the bit and glass. Cool surfaces resist cracking.
Drill for a couple of seconds, then lift the bit slightly to let water flush the hole. This clears debris and prevents clogging. Removing debris improves efficiency.
Continue with slow pressure and gentle movement until you see a small indent forming. This indent becomes your drilling guide. A guided spot prevents further slipping.
As the hole deepens, maintain steady speed and avoid sudden pressure changes. Sudden pressure can shock the glass. Smooth movement is essential.
Once the bit is halfway through, flip the glass over and drill from the opposite side. This prevents chipping at the exit point. Drilling from both sides creates a clean hole.
When the hole meets in the middle, lift the drill carefully and inspect your work. A clean hole should be smooth and centered. Rinse the glass to remove any residue.
How to Prevent Cracks While Drilling Sea Glass
Keeping the glass cool is the number one way to prevent cracking. Water absorbs heat and keeps the surface stable. Constant cooling protects the structure.
Using the right drill speed also helps reduce stress. Low or medium speeds are best for fragile materials. These speeds avoid sudden vibrations.
Avoid pressing too hard on the drill. Excess pressure sends shock through the glass. Light pressure allows the bit to grind smoothly.
Do not start drilling too close to the edge of the glass. Thin edges are more likely to crack. Drilling in the center reduces stress.
Make sure the bit stays perpendicular to the surface. Tilting the drill causes uneven pressure. Uneven pressure increases cracking risk.
Use new or well maintained diamond bits. Worn bits create friction and heat. Sharp bits cut cleanly with less resistance.
Take breaks during drilling if you notice the water getting warm. Warm water cannot cool the glass properly. Fresh cool water ensures better drilling.
Flip the glass and drill from both sides when possible. This reduces pressure at the exit point. Clean exits prevent chipping.
How to Smooth and Finish the Hole After Drilling
After the hole is complete, remove the sea glass from the water and dry it gently. Avoid rubbing too hard around the drilled area. Soft drying protects the edges.
Use a small diamond file or sanding needle to smooth the inside of the hole. Gentle circular motion removes roughness. Smooth holes look more professional.
If you have a rotary tool with a polishing tip, use it lightly to polish the edges. This creates a rounded finish. Rounded edges improve safety and appearance.
Inspect the hole carefully from both sides. Look for chips or sharp points. Sharp points can damage jewelry wire.
If needed, place the glass back into the water and file again. Wet filing reduces heat and friction. This prevents further cracking.
Rinse the sea glass to remove dust created during smoothing. Clean surfaces show the final finish clearly. Transparency reveals quality.
Check how smoothly wire or thread passes through the hole. Smooth passage means proper finishing. Rough edges need more filing.
Once fully polished, the sea glass is ready for your next project. The smooth finish enhances its beauty. Proper finishing creates a professional look.
Common Mistakes to Avoid When Drilling Sea Glass
Drilling too fast is one of the worst mistakes. High speed creates instant heat and cracks. Slow speed always works best.
Applying too much pressure causes stress in the glass. Pressure forces the glass to break under vibration. Gentle drilling prevents this.
Not using water leads to friction and heat build up. Dry drilling almost always causes cracks. Water is essential for cooling.
Using dull drill bits results in rough holes and uneven cuts. Dull bits require more pressure. More pressure increases risk.
Starting the hole on a curved or weak area makes drilling unstable. Curved surfaces shift under pressure. Flat surfaces work better.
Holding the glass too tightly squeezes pressure into the material. Finger pressure must be gentle. Relaxed grip improves accuracy.
Drilling too close to the edge often results in chips. The edges are thin and fragile. Center drilling is safer.
Skipping practice on scrap glass can lead to mistakes. Practicing builds confidence. Experience improves technique.
Safety Tips to Protect Your Eyes, Hands and Glass Surface
Always wear safety goggles to protect your eyes from small fragments. Even submerged drilling can release fine particles. Eye protection is essential for safety.
Wear gloves that help grip the glass without squeezing too hard. Grip control reduces slipping. Comfortable gloves improve stability.
Never drill near the edge of a table or unstable surface. Secure surfaces reduce accidents. A stable work area is necessary.
Keep the drill bit fully submerged in water. Water prevents dust from floating. It also helps control temperature.
Avoid leaning directly over the drill point. Stand slightly to the side. This position protects you from unexpected movement.
Check the drill bit frequently for alignment. Misaligned bits slip easily. Good alignment keeps drilling smooth.
Always drill with a slow and steady pace. Rushed drilling increases risk. Slow drilling improves accuracy.
Keep children and pets away from the workspace. Drilling tools require full focus. A distraction free environment ensures safety.
Creative Ways to Use Sea Glass After Drilling
You can create beautiful pendants by threading wire or jump rings through the hole. These pendants make meaningful gifts. Handmade jewelry adds personal value.
Sea glass earrings are another popular project. Matching pieces can form elegant pairs. Lightweight glass makes earrings comfortable.
Wind chimes made from drilled sea glass create soft, calming sounds. The light shining through different colors looks stunning. These pieces make lovely garden decorations.
You can also use drilled sea glass in keychains. The frosted texture adds a natural appeal. Keychains are practical and artistic.
Drilled sea glass looks beautiful in wall hangings. Different shapes and colors add visual interest. Hanging designs allow creativity.
Bracelets with sea glass charms feel unique and stylish. Each piece tells a story from the ocean. These bracelets stand out.
You can even use drilled sea glass in decorative lamps. Light passing through the glass creates a warm glow. Lamps with sea glass accents look artistic.
Whether for jewelry or home decor, drilled sea glass offers endless creative possibilities. Each piece becomes a unique work of art. Creativity shines through every project.
Beginner Questions About Drilling Sea Glass
Does sea glass break easily while drilling?
It can break if drilled too fast or without water.
What drill bit is best for sea glass?
Diamond tipped bits are the safest and most effective.
Can I drill sea glass with a regular drill bit?
No, regular bits will crack the glass.
Do I need to drill underwater?
Yes, water keeps the glass cool and prevents cracking.
How long does drilling sea glass take?
Usually a few minutes with slow, steady drilling.
Why does my drill bit slip on the glass?
Masking tape helps prevent slipping.
Should I drill from both sides of the glass?
Yes, this prevents chipping at the exit point.
How do I avoid cracking thin pieces of sea glass?
Use low pressure and constant cooling.
Can I use a Dremel to drill sea glass?
Yes, it works very well with diamond bits.
How do I make a smooth hole after drilling?
Use a diamond file or polishing tool.
Why did my glass crack even though I used water?
Too much pressure or speed can still crack it.
Is drilling sea glass safe for beginners?
Yes, if proper technique and safety steps are followed.
Can I drill very small pieces of sea glass?
Yes, but stabilize them gently with fingers.
Can I drill colored and clear sea glass the same way?
Yes, the method works for all colors.
Do I need protective gear for drilling sea glass?
Safety goggles and gloves are recommended.
Conclusion
Drilling a hole in sea glass may seem challenging at first, but with the right tools, proper cooling and a patient approach, anyone can learn to do it safely. The process becomes easier once you understand how fragile the glass is and how to control pressure and speed.
By using diamond bits, slow drilling and constant water cooling, you prevent cracks and ensure clean, smooth holes every time.
The beauty of sea glass is that every piece has a story shaped by nature. When you learn how to drill it correctly, you can transform these small treasures into jewelry, decorations or meaningful gifts.
The satisfaction of creating something by hand makes the process even more rewarding. With careful technique and proper safety steps, you will feel confident working with sea glass again and again.
Whether you are making pendants, wind chimes or craft pieces, drilling sea glass opens endless creative possibilities. Once you master the method, the only limit becomes your imagination. Your sea glass projects will look polished, durable and professionally finished.

I’m John F. Nicholas, the founder, lead writer, and drill enthusiast behind 101drill.com. With years of hands-on experience in power tools and DIY projects, I created this platform to share practical knowledge, expert tips, and real-world insights to help others master the art of drilling.