
Anyone who has ever built furniture or worked on a wood project knows how frustrating it is when a screw head sticks out. It not only looks unprofessional but can also catch on clothing or interfere with the finish.
The simple solution to this problem is a countersink hole — a small, angled recess that allows the screw head to sit flush or slightly below the wood surface.
Drilling a proper countersink hole requires the right tools, precision, and understanding of how wood behaves under pressure. It’s a small step that makes a huge difference in both the appearance and durability of your project.
Whether you’re assembling cabinets, decks, or wooden frames, mastering this technique is essential.
Many beginners assume that any drill bit can do the job, but that often leads to rough edges or uneven holes. The truth is, a clean countersink requires a special bit design that matches the screw head angle. Done correctly, it gives your work a professional, seamless finish every time.
In this comprehensive guide, you’ll learn how to drill a perfect countersink hole in wood, what tools to use, and how to avoid common mistakes. We’ll cover everything from preparation to finishing touches. By the end, you’ll have all the confidence you need to countersink like a pro.
What Is a Countersink Hole and Why It’s Important
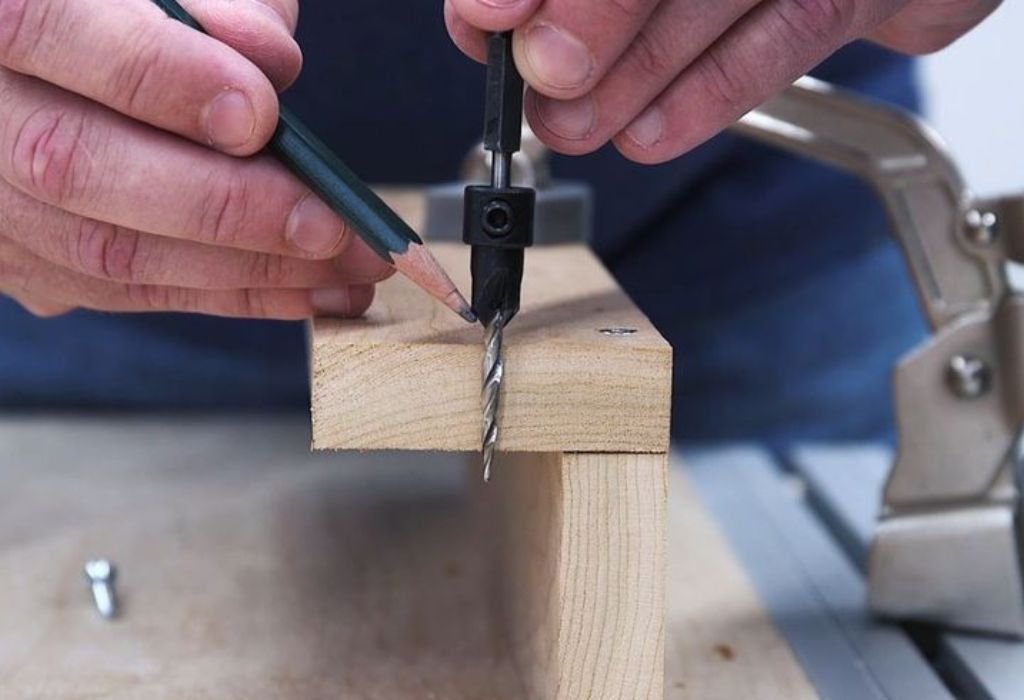
A countersink hole is a cone-shaped recess drilled around the top of a pilot hole. It allows the screw head to sit flush with or below the surface of the wood. This creates a smooth, professional appearance and prevents screws from snagging or splitting the wood.
Countersinking also helps distribute pressure evenly around the screw head. Without it, the screw can crack the wood fibers as it drives in, especially in hardwoods or near edges. Proper countersinking improves both structural strength and aesthetics.
Another reason to use countersink holes is for finishing purposes. If you plan to apply paint, stain, or wood filler, a flush screw head gives a smoother surface. This ensures your final coat looks clean and consistent.
Countersink holes also protect the screw heads from damage. When screws sit above the surface, they’re more likely to rust, strip, or wear down over time. Drilling a small recess keeps them protected and long-lasting.
In carpentry and cabinetry, countersinking is standard practice. It’s essential for joining wood panels, attaching hardware, and installing hinges. Even a simple DIY project benefits from the precision of a countersunk screw.
In short, a countersink hole makes your project stronger, smoother, and more professional. It combines both form and function — a small step with a big impact.
Tools and Materials You Need for Drilling Countersink Holes
To drill perfect countersink holes, you need the right combination of tools and accessories. Using the wrong bit or drill speed can easily damage the wood. Preparation and equipment choice are key to success.
Start with a power drill or drill press. Either works well, but a drill press offers greater precision and control for repetitive holes. A corded power drill provides consistent torque for thicker wood.
The most important tool is a countersink bit. These bits have a conical tip that matches the screw head angle, typically 82° or 90°. They come in single-piece or adjustable versions with built-in pilot bits.
You’ll also need a drill bit set to create pilot holes before countersinking. The pilot hole size should match the screw’s body diameter, not including threads. This ensures a snug fit without splitting the wood.
Gather measuring tools like a combination square, ruler, and pencil for marking hole locations. Accuracy in marking determines how straight and aligned your screws will be. Always double-check measurements before drilling.
Use clamps or a vise to secure your workpiece. A stable surface prevents movement and improves drilling accuracy. Clamping also keeps your hands safe from slipping or vibration.
Lastly, keep sandpaper and wood filler handy for finishing. After drilling, sanding smooths the edges of the countersink, and filler can conceal the screw head for a flawless surface.
How to Drill a Countersink Hole in Wood Step-by-Step
Begin by marking the exact drilling location using a pencil or awl. Precision is key because any misalignment will affect screw placement. Use a square or straight edge to ensure alignment for multiple holes.
Attach the appropriate drill bit to create the pilot hole first. The pilot hole allows the screw to drive in easily without splitting the wood. Drill to the screw’s full depth, keeping the drill perpendicular to the surface.
After the pilot hole is complete, switch to the countersink bit. Make sure the bit matches the screw head angle and size. If you’re using an adjustable bit, align the depth stop to control how deep the countersink goes.
Start the drill at a low speed and apply gentle pressure. Let the bit gradually carve the conical recess without forcing it. Too much pressure can burn or chip the wood fibers.
Periodically stop and test the fit using your screw. The screw head should sit flush or just below the surface. If it protrudes slightly, deepen the countersink in small increments until perfect.
Clean away sawdust from the hole after drilling. Sawdust buildup can hide imperfections or cause an uneven fit. Use a small brush or compressed air for better visibility.
Finally, sand the edges of the countersink lightly with fine-grit sandpaper. This smooths the surface and prepares it for finishing. Proper sanding ensures your screw holes blend seamlessly into the wood grain.
Different Types of Countersink Bits
There are several types of countersink bits, each suited for specific applications. Choosing the right one ensures cleaner cuts and smoother finishes. Understanding the differences helps you work faster and more efficiently.
Standard countersink bits are the most common type. They have a conical shape that matches flat-head screws. These bits are ideal for general woodworking and DIY projects.
Adjustable countersink bits combine a pilot drill and countersink cutter in one tool. The depth can be modified easily using a hex key. They’re excellent for consistent results in repetitive drilling.
Combined countersink and counterbore bits go a step further. They not only create a conical recess but also a flat-bottomed hole for plugs or caps. This is useful when you want to conceal screw heads completely.
Fluted countersink bits have multiple cutting edges that reduce chatter and produce smoother holes. They’re great for hardwoods and precision woodworking. The multiple flutes remove material efficiently with less friction.
For professionals, titanium or carbide-tipped bits offer superior durability. They resist wear, stay sharp longer, and handle dense materials with ease. Investing in high-quality bits saves time and money in the long run.
Selecting the right bit ensures your countersink holes are clean, uniform, and perfectly matched to your screw heads.
Tips for Getting Perfect Countersink Holes Every Time
Drilling perfect countersink holes takes practice, but following a few tips can help you master the technique quickly. Small adjustments make a big difference in precision and finish quality.
Always start slow to avoid burning or tearing the wood surface. Countersink bits cut aggressively at high speeds. Gradual drilling provides cleaner edges and better control.
Use depth stops or adjustable bits to maintain consistency. This prevents over-drilling and ensures all screw heads sit at the same level. Uniformity is especially important for visible woodworking projects.
Clear sawdust frequently during drilling. Accumulated dust can make it difficult to see the hole depth and may cause rough finishes. A clean workspace always leads to better results.
Match the bit angle to the screw type. Most flat-head screws use an 82-degree angle, while some European or specialty screws use 90 degrees. Using the wrong angle can cause poor screw seating or stripped heads.
If working with hardwood, apply light pressure and use sharp bits. Hardwoods resist cutting and can chip if forced. A slow approach ensures smooth and accurate countersinking.
Test the countersink depth on a scrap piece before drilling your actual workpiece. This simple step prevents costly mistakes and ensures perfection. Always practice before committing to your final piece.
Common Mistakes to Avoid When Drilling Countersink Holes
A frequent mistake is skipping the pilot hole before countersinking. Without it, the screw may split the wood or drive unevenly. Always drill a pilot hole first to guide the screw properly.
Another mistake is using a dull bit. Worn bits tear the wood fibers, leaving rough or burnt holes. Regularly sharpening or replacing bits maintains clean results.
Drilling too fast can cause heat buildup and burn marks. Slow, steady drilling produces smoother, more controlled cuts. High speed increases friction, especially in hardwoods.
Applying too much pressure is another common error. Pushing the drill hard forces the bit to dig unevenly, resulting in rough edges. Gentle pressure allows the bit to do the work efficiently.
Ignoring the correct screw head angle leads to poor seating. A mismatched countersink angle causes screws to sit unevenly or stick out. Always check that your bit matches the screw design.
Failing to clean sawdust and debris can hide imperfections or cause the bit to slip. Keep the drilling area clear for visibility and accuracy. Proper cleaning ensures a perfect finish every time.
Lastly, skipping a test run on scrap wood often leads to mistakes on the final project. Practicing first allows you to adjust speed, depth, and pressure. Consistency comes from preparation and patience.
Finishing the Countersink Hole
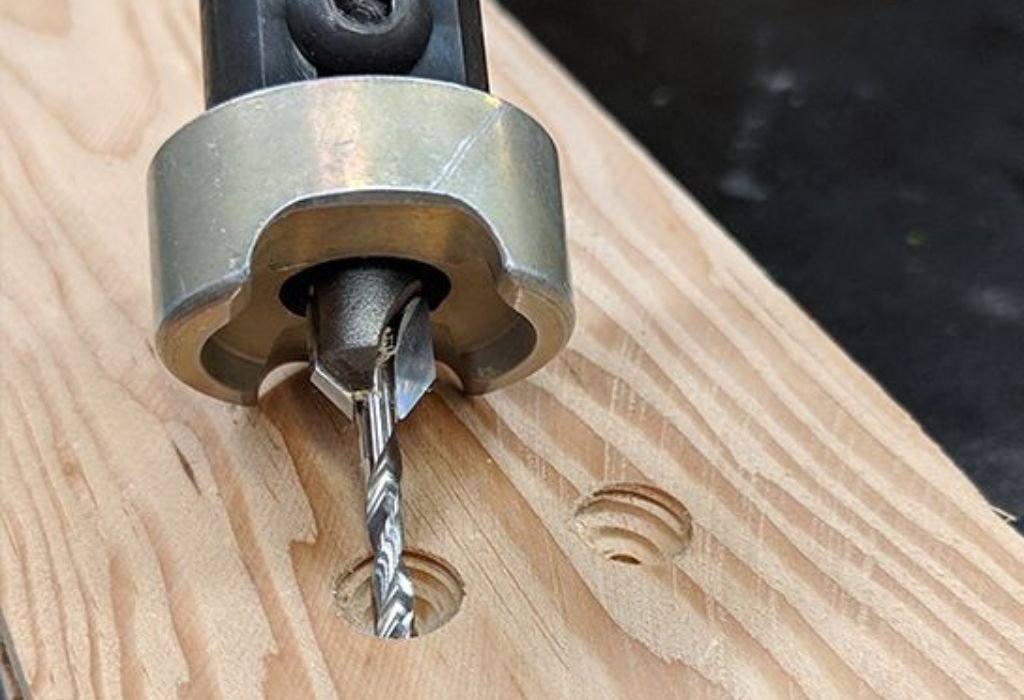
Once your countersink hole is drilled, the finishing process makes all the difference in appearance. A smooth, polished surface highlights your craftsmanship. Proper finishing ensures a seamless final look.
Use fine-grit sandpaper to smooth the edges of the countersink. Sand lightly in circular motions until the transition between hole and surface feels even. Avoid over-sanding, which can change the hole depth.
If you want a flawless surface, fill the screw head with wood filler or plugs. Once dried, sand it flush with the surface. This method is perfect for furniture or decorative pieces where screws should be invisible.
Clean the area thoroughly using a brush or compressed air. Removing sawdust prevents interference with paint or finish. Clean surfaces adhere better to coatings and sealants.
Apply stain, varnish, or paint according to your project’s design. A properly filled and finished countersink hole blends seamlessly into the surrounding surface. The result looks smooth and professional.
Check your screws after finishing to ensure they remain flush. Paint buildup or filler expansion may push them slightly upward. Tighten gently if necessary to restore alignment.
A well-finished countersink not only improves the visual appeal but also enhances durability. It protects screw heads from moisture and wear while maintaining a clean aesthetic.
Frequently Asked Questions About Drilling Countersink Holes in Wood
What is the purpose of a countersink hole in wood?
A countersink hole allows the screw head to sit flush or slightly below the wood surface. This creates a smooth, professional finish and prevents screws from catching on other materials. It also helps distribute pressure evenly, reducing the chance of wood cracking.
Do I need a special bit to drill a countersink hole?
Yes, you need a countersink bit that matches the screw head angle, typically 82 or 90 degrees. These bits have a conical tip designed to cut clean recesses. Using a standard bit may damage the wood or leave uneven holes.
Can I drill a countersink hole without a pilot hole?
It’s not recommended because the screw can split the wood or drive in unevenly. A pilot hole guides the screw and relieves pressure from the surrounding fibers. Always drill a pilot hole before countersinking for the best results.
How deep should a countersink hole be?
The depth should allow the screw head to sit just flush or slightly below the surface. Avoid drilling too deep, which can weaken the joint. Test with a screw before drilling additional holes to ensure accuracy.
What is the best drill speed for countersinking?
Use a slow to medium speed setting. High speeds can cause burning or chipping, especially on hardwoods. Controlled, gentle drilling produces smoother edges and better finishes.
How do I prevent tear-out when drilling a countersink?
Use sharp bits and apply light pressure. Drilling at low speed and cleaning sawdust regularly helps maintain smooth cuts. Practicing on scrap wood before your main piece also reduces mistakes.
Can I fill countersink holes after drilling?
Yes, you can fill them using wood filler or dowel plugs. After drying, sand the surface smooth to blend it with the surrounding area. This technique hides screws and gives a clean, finished appearance.
What angle should I use for flat-head screws?
Most flat-head screws use an 82-degree angle. However, some European or specialty screws may use 90 degrees. Check your screw type before selecting a countersink bit.
Can I use a drill press for countersink holes?
Yes, a drill press offers greater control, precision, and consistent depth. It’s ideal for repetitive drilling in furniture or cabinetry work. For smaller projects, a handheld drill also works well if handled carefully.
Do I need to sand after drilling countersink holes?
Yes, lightly sanding the hole edges removes sharp fibers and burn marks. This ensures a smooth transition between the countersink and the surface. Proper sanding also improves the look before staining or finishing.
Conclusion
Drilling a countersink hole in wood may seem minor, but it adds a level of craftsmanship that defines professional woodworking. With the right tools, careful technique, and proper finishing, your projects will look clean and polished. A flush screw head improves both aesthetics and durability.
Always start with a pilot hole, choose the correct countersink bit, and drill slowly for precision. Avoid rushing or forcing the bit, and keep your workspace clean. Consistency and patience lead to flawless results.
Countersinking isn’t just about hiding screws — it’s about protecting your work and ensuring long-term strength. Whether you’re building furniture, shelving, or frames, mastering this simple technique elevates your skill level.
By following this complete guide, you’ll be able to create perfect countersink holes every time. Smooth, symmetrical, and flush — just like a professional carpenter’s work.

I’m John F. Nicholas, the founder, lead writer, and drill enthusiast behind 101drill.com. With years of hands-on experience in power tools and DIY projects, I created this platform to share practical knowledge, expert tips, and real-world insights to help others master the art of drilling.