
You stand in front of your toolbox, staring at a dozen different drill bits. Some have sharp points, others are blunt, and a few are coated in strange colors. Choosing the right one for wood feels confusing until you know what to look for.
Wood drill bits are easy to recognize once you understand their design. They’re crafted to cut smoothly through fibers without tearing or burning the surface. Their shape, tip, and flutes tell you immediately they were made for woodwork.
Every craftsman learns to spot them by eye over time. The pointed center tip, deep spiral grooves, and sharp cutting edges distinguish them from bits used for metal or masonry. These features work together to create clean, precise holes.
Understanding the look of a wood drill bit helps you use the right tool every time. Whether you’re drilling soft pine or dense oak, the bit’s appearance reveals its specific purpose. Once you can identify these details, drilling becomes far more accurate and satisfying.
This guide will teach you to identify, compare, and choose wood bits like a professional. You’ll never again wonder if you’re using the right one.
The Defining Features of Wood Drill Bits
At first glance, wood drill bits may seem similar to others, but their unique features set them apart. The most obvious difference is the pointed tip, called a spur or brad point. This sharp center point helps position the bit precisely before drilling begins.
The flutes—spiral grooves along the shaft—are deeper than those on metal bits. They channel wood shavings efficiently, keeping the hole clean as you drill. This prevents clogging and reduces friction during operation.
The cutting edges on both sides of the tip are sharpened to slice cleanly through wood fibers. Instead of grinding like metal bits, wood bits shave material away smoothly. This design leaves a neat, round opening with minimal splintering.
The body of a wood bit often has a black, silver, or gold finish. These coatings resist corrosion and reduce friction. Though color isn’t a reliable indicator, finish quality often suggests durability.
If you compare bits side by side, the wood bit always looks sharper, cleaner, and more pointed. That aggressive design is what gives it its efficiency in woodwork.
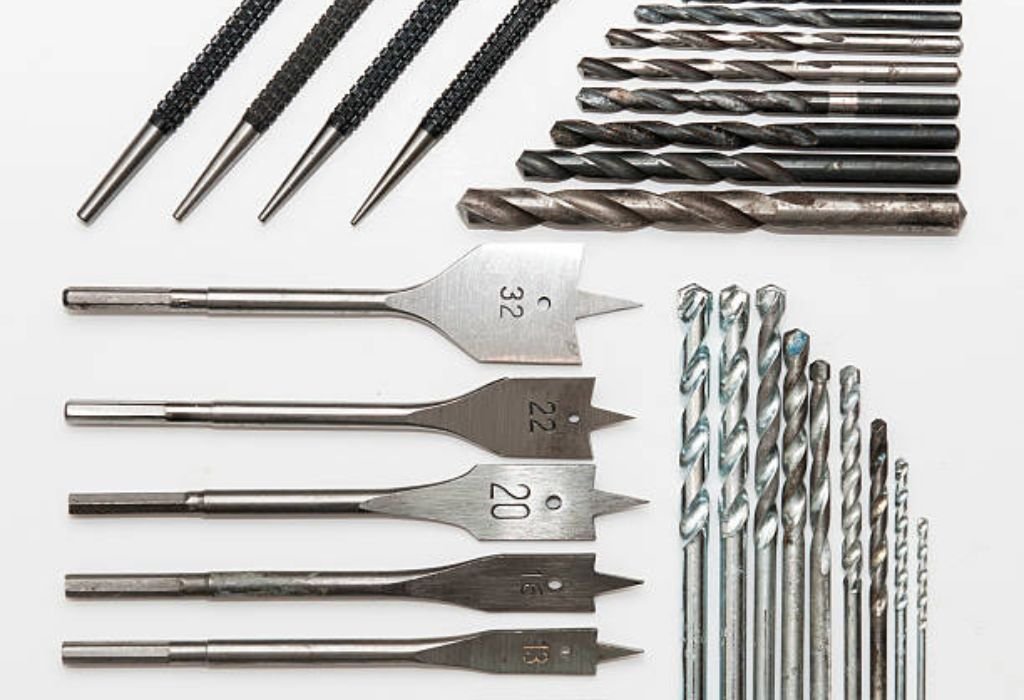
Types of Wood Drill Bits You’ll Commonly See
Woodworking involves a wide range of bits, each suited to specific tasks. The brad-point bit is the most common, easily recognizable by its sharp center tip and flared cutting edges. It creates clean holes with flat bottoms and sharp edges.
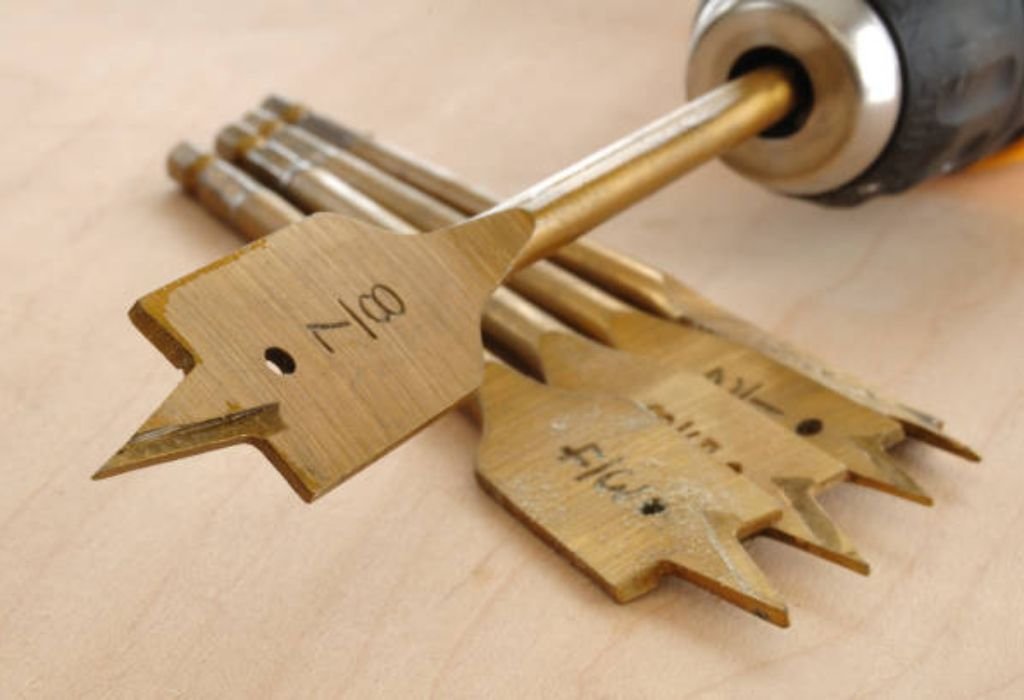
Spade bits, on the other hand, look like paddles. They’re flat, wide, and have a sharp point in the center. They’re excellent for fast drilling in softwood but tend to leave rougher edges.
Forstner bits stand out with circular rims and flat-bottom designs. They cut smooth, precise holes ideal for furniture or dowel joints. Their edges look solid and continuous, unlike the open flutes of standard bits.
Auger bits have long, screw-like bodies with wide threads. They’re used for deep holes in thick lumber. The tip looks like a small screw that pulls the bit through the wood automatically.
Hole saws resemble cylinders with saw teeth around the edge. They’re perfect for extra-large holes such as for plumbing or wiring. Each of these bits has a distinct shape and is easy to identify once you know the visual differences.
Which wood bit gives the cleanest holes?
Forstner bits are best for smooth finishes. They cut with precision and leave minimal tear-out.
Are spade bits only for rough work?
They’re mostly for utility drilling where appearance isn’t important. They’re fast but not refined.
Do auger bits need special drills?
Yes, they work best in low-speed, high-torque drills. Standard drills may stall or overheat.
What’s the largest hole I can make with wood bits?
Hole saws can cut up to 6 inches or more, depending on size and drill strength.
Can I use one bit for all wood types?
Yes, but hardwoods wear bits faster. Choose sharp, high-quality bits for dense materials.
How to Identify a Wood Drill Bit at a Glance
Once you know what to look for, spotting a wood drill bit becomes second nature. The first thing that catches your eye is the pointed tip. That brad or spur ensures perfect centering before cutting begins.
Next, look at the flutes. Wood bits have deeper, more open grooves to remove soft sawdust efficiently. Metal or masonry bits have shallower, tighter spirals suited to their materials.
The cutting edges are sharp and slightly curved forward. This allows the bit to slice through fibers cleanly instead of grinding them. When you run your finger lightly along the edge, it feels keen but not serrated.
The shank—the part inserted into the drill—is usually smooth and cylindrical. Some heavy-duty bits have hex shanks to prevent slipping during torque-heavy work. Either shape fits most standard chucks easily.
Color alone doesn’t define type, but high-quality wood bits often appear polished or black oxide-coated. The sharpness, point, and spiral shape are the real giveaways.
Can a beginner tell wood bits apart easily?
Yes, once you understand the pointed tip and deep flutes. A few comparisons make recognition effortless.
Do all wood bits have the same tip shape?
No, spade and hole saws vary, but most feature a centering spur. The concept of a guiding point remains consistent.
Why do some bits have hex shanks?
They provide better grip and prevent slipping during high-torque drilling. Hex shanks are especially common on spade bits.
What if my drill bit has no markings?
Examine the tip and flutes. A sharp point and open spiral almost always indicate it’s for wood.
Do worn bits still look pointed?
They lose sharpness over time, appearing duller at the tip. Resharpen regularly for best performance.
Understanding How Wood Bits Work
Knowing how a bit functions deepens your ability to identify and use it correctly. The pointed center tip acts as a guide, positioning the bit exactly where needed. It prevents wandering and ensures the hole starts precisely on target.
As drilling begins, the cutting edges slice into the wood fibers. The flutes then carry sawdust away from the cutting area, keeping the hole clean and preventing clogging. This smooth chip removal keeps the bit cool and efficient.
Large bits, like augers or spades, use wider blades for fast material removal. They rely on the drill’s torque rather than speed. Managing both ensures clean cuts without damaging the surface.
For precision tasks, Forstner bits create flat-bottom holes perfect for joinery. Their side rims shear wood cleanly, leaving no rough edges. This accuracy is why cabinetmakers rely on them.
Every design choice in a wood bit has purpose—geometry, tip angle, and flute depth all work in harmony. Understanding that synergy improves your results and prolongs tool life.
Comparing Wood Bits with Metal and Masonry Bits
A quick comparison clarifies how distinct wood bits really are. Metal bits are typically short, with shallow flutes and blunt tips. They grind rather than slice, suited for hard, non-fibrous materials.
Masonry bits look even more different. Their tips feature carbide inserts designed for hammering into concrete or stone. They often have dull, wedge-shaped points and thick bodies.
In contrast, wood bits are slimmer, sharper, and longer. Their deep spirals eject light material easily. This design allows high-speed drilling without binding.
The sound during drilling also differs. Wood bits produce a steady hum, while masonry bits make a harsh, vibrating noise. Each is optimized for specific material behavior.
When unsure which bit to use, check the tip. A sharp point always signals wood. A blunt one likely belongs to metal or masonry sets.
Why do metal bits look shorter?
They don’t need deep flutes since metal shavings are heavier and smaller. Compact length improves stability.
Can I use a wood bit on metal surfaces?
No, it will dull instantly. Wood bits can’t handle metal’s hardness or heat.
Why do masonry bits feel rough?
They’re reinforced for impact and abrasion, not smooth cutting. Carbide tips endure hammering action.
Is the shank size the same across all bits?
Not always. Heavy-duty bits often require larger chucks. Always check your drill’s capacity.
Can I visually tell if a bit is for concrete?
Yes, masonry bits have wide, flat tips and often appear silver-gray with thick bodies.
Choosing the Best Wood Drill Bit for Your Project
The right wood bit depends on your specific goal. Small pilot holes need precision bits like brad-point designs. Large openings call for spade or hole saws for faster cutting.
If you’re drilling furniture pieces or cabinetry, Forstner bits provide professional finishes. Their clean sides and flat bottoms give perfect results for visible work. For quick carpentry, spade bits remain a favorite for speed.
Auger bits shine when depth matters. Their threaded tips and wide spirals pull through dense beams effortlessly. Electricians and carpenters often rely on them for structural work.
When choosing, consider your drill power and speed. High-torque drills pair best with larger bits. Using lightweight tools for big cuts risks damage or inconsistent holes.
Lastly, always buy quality. High-speed steel or carbide-tipped bits outperform cheap versions. They stay sharper longer and resist heat better during continuous use.
Are all wood bits compatible with cordless drills?
Yes, if the drill has adjustable torque. Use slower speeds for larger bits to prevent strain.
What size should I start with for pilot holes?
Roughly half the screw diameter is ideal. It guides the screw without splitting the wood.
Do expensive bits really last longer?
Yes, premium steel holds an edge better. Over time, it’s more cost-effective than cheap replacements.
What’s the best brand for wood bits?
Many brands perform well; focus on build quality and reviews rather than name alone.
Can I use drill presses for all wood bits?
Yes, especially Forstner and auger bits. Drill presses offer control and accuracy unmatched by handheld tools.
Caring for and Maintaining Wood Drill Bits
Maintenance ensures lasting precision and safety. After each use, clean bits thoroughly to remove dust and resin. Residue buildup dulls cutting edges and increases heat in future use.
Inspect tips regularly for dullness or chips. Sharpen them with a fine file or dedicated sharpening stone. Sharp edges make smoother cuts and extend tool life.
Avoid moisture exposure. Even coated bits can rust over time if stored wet. Keep them dry in labeled cases or racks for quick selection.
Lubricate lightly with a thin layer of machine oil before storage. This prevents corrosion and keeps moving parts like auger screws smooth. Proper maintenance rewards you with consistent performance for years.
Store bits separately from metal or masonry types to prevent mix-ups. A well-organized kit makes project preparation faster and frustration-free.
Can wood bits be resharpened easily?
Yes, especially spade and brad-point bits. Follow the factory angle to preserve balance.
Should I oil wood bits after every use?
Not necessary each time, but occasional light oiling prevents rust. Wipe clean before drilling again.
Why do my bits squeak when drilling?
They’re dull or dirty. Clean flutes and sharpen edges to restore smooth performance.
Can I use WD-40 for storage protection?
Yes, it repels moisture effectively. Wipe off excess to prevent wood staining later.
What’s the best temperature to store bits?
Room temperature in a dry environment. Avoid damp garages or basements that accelerate corrosion.
Conclusion
Recognizing what a wood drill bit looks like marks a turning point for every DIYer and woodworker. Once you know its shape, point, and grooves, you’ll never mistake it for another type again. That simple understanding makes every project smoother, safer, and more efficient.
Each bit tells a story of purpose through design. The sharp point, spiral flutes, and precise edges aren’t just aesthetic—they’re engineering details that shape how wood responds. When used correctly, these tools cut cleanly and effortlessly.
True craftsmanship begins with observation. By learning to see tools the way professionals do, you elevate your skill and confidence instantly. Every drilled hole becomes cleaner, every finish smoother.
The next time you reach for a drill, look closely at the bit in your hand. You’ll see not just a piece of metal, but a symbol of control, precision, and understanding. That’s the mindset that turns practice into mastery.

I’m John F. Nicholas, the founder, lead writer, and drill enthusiast behind 101drill.com. With years of hands-on experience in power tools and DIY projects, I created this platform to share practical knowledge, expert tips, and real-world insights to help others master the art of drilling.