
Every mason, contractor, or DIY enthusiast eventually faces the same question: can masonry drill bits be sharpened, or is it smarter to replace them altogether?
The answer isn’t as straightforward as it seems. Picture this, you’re halfway through drilling into concrete, the bit starts smoking, dust fills the air, and progress slows to a crawl.
You press harder, but the bit just spins, making a screeching noise instead of cutting cleanly. Frustrating, right?
According to tool maintenance surveys, over 60% of drill bit users replace bits prematurely, even though many can be reconditioned for extended use. That means tons of wasted steel and unnecessary expenses every year.
Sharpening, when done correctly, restores cutting edges and saves both time and money — but only if the material and wear type allow it.
This article uncovers the truth about masonry bit sharpening — what works, what doesn’t, and when to stop wasting effort and just buy new ones.
You’ll learn how these bits are constructed, how to recognize wear patterns, which sharpening tools actually work, and how professionals decide between refurbishment and replacement. Let’s break the myth and help your next project go smoother, cleaner, and smarter.
Understanding How Masonry Drill Bits Are Made
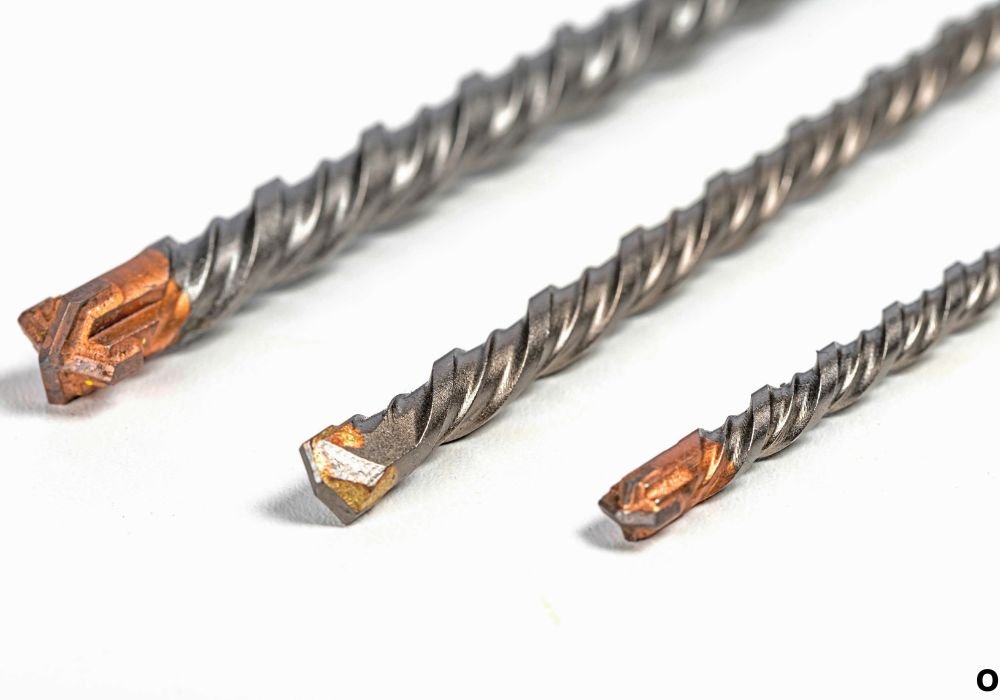
Masonry drill bits aren’t ordinary steel tools — they’re engineered to cut through the toughest materials like brick, stone, and concrete.
The body is usually made from high-speed steel (HSS) or chrome vanadium steel, while the cutting edge at the tip features a tungsten carbide insert brazed to the shaft. This carbide tip is what gives masonry bits their extreme durability and heat resistance.
Unlike metal or wood bits, masonry bits don’t have sharp spiral flutes for slicing; instead, they rely on hammering and grinding. When used with a hammer drill, the bit pulverizes material at the contact point. The carbide edge essentially crushes particles instead of shearing them away.
Because of this, sharpening becomes tricky. The carbide insert is much harder than regular steel and requires diamond grinding wheels to reshape properly.
A normal bench grinder or file won’t even scratch it. This difference in material composition is why some users mistakenly believe masonry bits cannot be sharpened — but technically, they can if handled correctly.
However, understanding how the bit is built helps you recognize whether it’s worth the effort. If the carbide tip has cracked, chipped, or detached, no sharpening can save it. If only the edges are dull or rounded, careful regrinding can restore performance for dozens more holes.
Why Masonry Drill Bits Become Dull Over Time
No matter how tough the carbide, every drill bit eventually wears out. The main culprits include friction heat, impact fatigue, and abrasive dust. When drilling into concrete, small quartz and sand particles act like sandpaper, gradually eroding the carbide tip’s edges.
Another factor is excessive heat buildup. Drilling too fast, applying too much pressure, or skipping cooling pauses can cause the brazing joint to loosen. Once the carbide tip loses its alignment, cutting efficiency drops drastically.
In professional workshops, even a slight change in the cutting angle (around 118°–135°) can alter how well the bit bites into the material.
Dull bits create more vibration and noise, which stresses the hammer drill and motor. In worst cases, worn bits glaze over — producing dust but barely cutting.
Recognizing the early signs of wear is key. If you notice slower drilling speed, burning odor, or a shiny flat spot on the tip, the bit is losing its edge.
The longer you continue using it, the more heat damage accumulates, eventually making sharpening impossible. Timely maintenance prevents deeper structural fatigue and saves replacement costs.
How to Tell If a Masonry Bit Can Be Sharpened or Not
Not every dull bit deserves a second chance. Before you grab the grinder, inspect it closely under good light. The carbide tip should still be securely attached, with no visible cracks or missing chunks. If it’s completely broken off, the bit is beyond repair.
Next, check for discoloration or blue tint along the shaft — a sign of overheating. When the steel body gets too hot, it loses temper, becoming soft and brittle. Sharpening such a bit is pointless because it will wear out again within minutes.
The length of the flutes also matters. If you’ve used the bit so much that the carbide tip has receded or the spiral flutes are packed with hardened dust, replacement is wiser.
You can perform a simple test: hold the bit vertically and press your thumbnail against the edge of the carbide. If it feels slick and rounded, it’s dull but likely recoverable. If you feel chips or rough patches, sharpening might worsen it.
In summary:
- Minor dullness → Sharpen it.
- Small flat edges → Regrind lightly.
- Cracks or tip loss → Replace.
- Overheated steel → Discard.
Making this judgment ensures you don’t waste time trying to resurrect a tool that’s already past its lifespan.
Tools You Need to Sharpen Masonry Drill Bits
Sharpening masonry bits requires specialized equipment due to the hardness of tungsten carbide. Here’s what you’ll need if you plan to attempt it at home or in a workshop:
- Bench Grinder with Diamond Wheel: A regular grinding wheel won’t work. A diamond-impregnated wheel (200–300 grit) is necessary to reshape carbide edges.
- Vise or Drill Bit Holder: To keep the bit stable during grinding and prevent uneven angles.
- Safety Gear: Always wear eye protection, gloves, and a dust mask, as carbide dust can be harmful.
- Coolant or Water Cup: Carbide can handle heat, but the brazing joint cannot. Dip the bit in water frequently to avoid overheating.
- Magnifying Glass or Light Source: Precision is crucial when restoring the original tip angle.
For professionals, drill bit sharpening machines like the Darex or Tormek systems offer precise guides to maintain consistent cutting angles. However, these are expensive investments unless you regularly sharpen dozens of bits.
If you’re doing occasional touch-ups, a small diamond hand file can work for minor re-edging, though it won’t restore heavy wear.
Step-by-Step: How to Sharpen a Masonry Drill Bit
Sharpening masonry bits requires patience and control. Follow these steps for best results:
- Secure the Bit: Clamp the bit firmly in a vise or jig, leaving only the tip exposed. This prevents wobbling during grinding.
- Identify the Cutting Edges: Each carbide insert has two main edges at the front. Focus on restoring their symmetry.
- Align the Bit to the Wheel: Hold the bit at the original angle (typically 60°–70°). Do not grind randomly — uneven sharpening ruins balance.
- Light Grinding Touches: Gently touch one edge to the diamond wheel for about one second. Lift, cool in water, then switch sides.
- Check Edge Sharpness: After several passes, inspect under a magnifying glass. The goal is a clean, bright edge without burrs.
- Maintain Tip Symmetry: Alternate sides evenly. Unequal grinding causes drilling vibration and crooked holes.
- Final Cooling and Test: Dip in water, dry, and test on a scrap piece of brick or concrete. If it cuts cleanly and dust flow looks fine, sharpening succeeded.
Avoid removing too much material; once the carbide is ground down too far, the bit loses its geometry permanently.
Common Mistakes When Trying to Sharpen Masonry Bits
Even seasoned tool users make errors when sharpening carbide tips. The most frequent mistake is using the wrong grinder. Standard aluminum oxide wheels don’t cut carbide; they just glaze over and overheat the bit.
Another issue is pressing too hard during grinding. Carbide is brittle — excess pressure can cause microfractures that spread under hammering.
Improper angle control is also common. Masonry bits have a chisel-like tip, not a point. Changing this angle even slightly alters drilling performance. The bit may start wandering, producing oval holes or breaking the concrete surface unevenly.
Skipping cooling intervals is equally dangerous. Overheating loosens the silver brazing that bonds carbide to the steel body. Once the bond weakens, the tip can fly off during use — a serious safety hazard.
Lastly, some people forget to clean the flutes after sharpening. Dust buildup reduces chip removal efficiency and makes even a sharp bit act dull. A quick brushing or air blast keeps it ready for work.
When It’s Better to Replace Than Sharpen
While sharpening saves money, it isn’t always practical. Bits that cost only a few dollars often aren’t worth the labor. Consider replacement if:
- The carbide insert is chipped, missing, or cracked.
- The shank is bent or severely discolored.
- The diameter has worn down significantly, reducing accuracy.
- You’ve already sharpened it multiple times and lost the original angle.
Replacement becomes the smart choice when the time and tool cost of sharpening exceed the price of a new bit. For example, a standard ¼-inch masonry bit costs under $5. Grinding it properly might take 10 minutes and wear your diamond wheel — not efficient.
On the other hand, for large-diameter SDS bits ($30–$80), sharpening can make sense, especially for professionals who rely on consistent performance. Industrial shops often send their bits to carbide sharpening services, which use water-cooled diamond grinders for precision results.
If you frequently drill in concrete, maintaining a rotation of sharp bits improves job speed, reduces drill stress, and prevents overheating.
How to Extend the Life of Masonry Drill Bits
Even if you never sharpen, following proper usage habits can double or triple bit lifespan. Here’s how:
- Use the Right Drill: Always pair masonry bits with hammer drills, not regular ones.
- Apply Steady Pressure: Let the hammering action do the work — pushing harder doesn’t cut faster.
- Keep It Cool: Pause every few holes and dip the bit in water or let it air-cool.
- Clean Dust Frequently: Clogged flutes cause friction and overheating.
- Avoid Metal Reinforcement: Hitting rebar dulls bits instantly. Use a rebar scanner when drilling concrete slabs.
- Store Properly: Moisture and rust weaken the shank. Keep bits in a dry, padded case.
By combining these habits with occasional sharpening or timely replacement, your toolbox will stay efficient, and your drill motor will thank you.
Can You Use a Regular Sharpener on Masonry Bits?
No — standard twist drill sharpeners designed for steel bits won’t handle carbide-tipped masonry bits. The grinding surface simply isn’t hard enough. Some multi-bit sharpening tools claim compatibility, but in reality, they only refresh the steel portion, not the carbide.
To correctly regrind the tip, you need either a diamond wheel grinder or professional carbide sharpener. These machines maintain precise angles and remove microscopic amounts of carbide without overheating.
DIY alternatives, like using a Dremel with a diamond burr, can work for quick edge cleaning but won’t restore factory-grade performance. If your bit is valuable or part of an expensive SDS Max set, it’s often worth sending to a local tool sharpening service.
The Environmental Side: Sharpening vs. Replacing
There’s a sustainability angle too. Disposing of steel and carbide tools contributes to industrial waste and energy loss. A typical masonry bit contains around 20 grams of high-grade steel and carbide. When millions are discarded yearly, the environmental impact is significant.
Sharpening extends product life and reduces metal waste. For professionals handling bulk tools, even reusing 30% of bits through sharpening can lower material costs and ecological footprint dramatically.
That said, reusing damaged bits that compromise drilling safety isn’t eco-friendly — it’s risky. Balance environmental responsibility with performance and safety by sharpening only viable bits.
Signs That Sharpening Worked Successfully
After sharpening, your masonry bit should show clear signs of improvement. Watch for:
- Smooth drilling entry without excessive vibration.
- Steady dust flow from the flutes.
- No burning smell or smoking.
- Straight hole alignment with clean walls.
- Reduced noise from the hammer drill.
If performance still feels sluggish, inspect for uneven edges or overheating marks. Inconsistent angles may require minor re-adjustment. Remember — a properly sharpened bit should cut, not grind.
Safety Tips While Sharpening Masonry Bits
Safety can’t be overstated. Always:
- Use eye protection — carbide shards can fly unpredictably.
- Avoid breathing dust — tungsten carbide particles are hazardous.
- Cool frequently to prevent overheating.
- Clamp bits firmly to avoid kickback.
- Test bits slowly after sharpening before full use.
Sharpening seems simple, but precision and caution separate professionals from beginners.
Everything You Need to Know About Sharpening Masonry Bits
Can all masonry bits be sharpened?
No, only carbide-tipped bits with intact edges can be sharpened.
What’s the best tool for sharpening masonry bits?
A diamond grinding wheel or carbide sharpening machine works best.
Can I use sandpaper or a file?
No, they’re too soft for tungsten carbide.
How many times can I sharpen a masonry bit?
Usually 2–3 times before geometry is lost.
Does sharpening change the bit size?
Slightly, but not enough to affect small jobs unless over-ground.
Is it cheaper to sharpen or replace?
Small bits — replace. Large or specialty bits — sharpen.
Can I sharpen by hand?
Yes, with a steady hand, diamond file, and patience.
Why do my bits keep dulling fast?
Likely overheating or hitting rebar inside concrete.
Do SDS and regular masonry bits differ for sharpening?
SDS bits often have more complex tips; best done by professionals.
What’s the best sharpening angle?
Maintain the factory angle — typically 60°–70° for masonry bits.
Can I sharpen with a Dremel tool?
Only for minor touch-ups, not full regrinds.
Should I cool the bit while sharpening?
Yes, dip in water after every few seconds of grinding.
How do I know when a bit is beyond repair?
Cracked, missing, or discolored tips mean it’s done.
Do sharp bits drill faster?
Absolutely. They require less pressure and produce cleaner holes.
Where can I send bits for professional sharpening?
Many local tool repair shops or industrial supply centers offer carbide sharpening services.
Conclusion
The debate over sharpening versus replacing masonry drill bits boils down to value, condition, and frequency of use.
Sharpening is absolutely possible, but only with the right tools, correct angles, and intact carbide edges. When done carefully, it can restore performance close to new and extend lifespan by several projects.
However, if your bit shows deep wear, cracks, or burns, replacing it is not just easier — it’s safer. There’s no sense grinding down damaged carbide just to save a few dollars if the result compromises your work quality.
For professionals who rely on precision and productivity, maintaining a bit rotation strategy — sharpen some, replace others — ensures efficiency and cost control. Hobbyists can benefit from learning basic sharpening to avoid unnecessary waste.
In the end, the smartest craftsmen don’t simply buy new tools; they understand their tools. Knowing when to sharpen and when to replace is what separates a casual driller from a true professional.
A sharp bit isn’t just about saving money — it’s about respect for your craft, your time, and the materials you work with.

I’m John F. Nicholas, the founder, lead writer, and drill enthusiast behind 101drill.com. With years of hands-on experience in power tools and DIY projects, I created this platform to share practical knowledge, expert tips, and real-world insights to help others master the art of drilling.