
Drilling a straight, vertical hole might look easy — until your bit wanders, the angle shifts, and your piece of wood or metal ends up ruined. Without a drill press, keeping that perfect alignment by hand feels almost impossible. Yet, with the right techniques, accuracy is absolutely achievable.
Every craftsman has faced the same problem: you need a clean, perpendicular hole, but you only have a handheld drill. The natural wobble of your hands and uneven surfaces make it difficult to stay perfectly vertical. Even a slight tilt can cause the hole to drift or misalign with joints and hardware.
The good news is that you don’t need expensive tools to master precision. With simple guides, marking methods, and visual tricks, anyone can learn to drill straight holes that rival those made with a drill press.
By combining patience, proper support, and a few reliable techniques, you can create flawless, professional-grade holes even when your drill press isn’t around.
Understanding the Challenge of Drilling Straight Holes
When drilling by hand, the biggest challenge is maintaining a 90-degree angle between the drill bit and the material surface. Human hands aren’t steady enough to sustain perfect alignment over long drilling depth.
The more the bit travels, the more friction and minor deflections amplify, pushing the bit slightly off course. Even a 2-degree deviation can cause a noticeable offset when the hole reaches full depth.
Without a drill press, the drill lacks a fixed axis, so accuracy depends entirely on how well you can stabilize and guide it. That’s why proper preparation — marking, leveling, and support — is critical before pulling the trigger.
Why do drill bits drift when drilling by hand?
Because hand drills have no fixed axis, the bit naturally follows grain direction or soft spots in the material.
Can small misalignments affect accuracy?
Yes, even a slight angle deviation can make holes misaligned with fasteners or dowels.
Is it possible to drill perfectly straight by hand?
Yes, with the right setup, steady control, and visual guides, you can get near-perfect vertical results.
Do bit types matter for straight holes?
Absolutely — sharp brad-point or twist bits cut cleaner and stay aligned better than dull ones.
Can wood grain pull the bit sideways?
Yes, softer grains cause lateral drift; slower speed and sharper bits help prevent this.
Marking and Preparing the Surface
Before drilling, proper marking is the foundation of accuracy. Begin by measuring and marking the exact center of the hole with a sharp pencil or marking knife. Precision here eliminates guesswork when positioning the drill bit.
Once the center is marked, use a center punch or awl to create a small dimple at the drill entry point. This tiny indentation keeps the bit from wandering at startup.
Next, check that your work surface is level. Any tilt in the material exaggerates angle errors during drilling. Use a bubble level or a small square to confirm alignment.
If drilling into wood, secure it with clamps to prevent shifting. For metal, use a vise or C-clamp to hold it steady.
For visual alignment, draw a small crosshair line or mark perpendicular guides extending from your center point. These give you a reference for checking drill angle as you work.
For marking and layout tools, refer to Fine Woodworking’s layout guide.
Why use a punch before drilling?
It gives the bit a guide point to start, preventing slipping or walking.
Should I level both the drill and the workpiece?
Yes, both must stay level to maintain a perfect vertical angle.
Can tape markings help?
Yes, apply tape around the drill bit to mark depth for consistency.
Is clamping necessary?
Always — unsecured material causes misalignment and vibration.
Does lighting affect precision?
Yes, good lighting makes it easier to see and correct drilling angles.
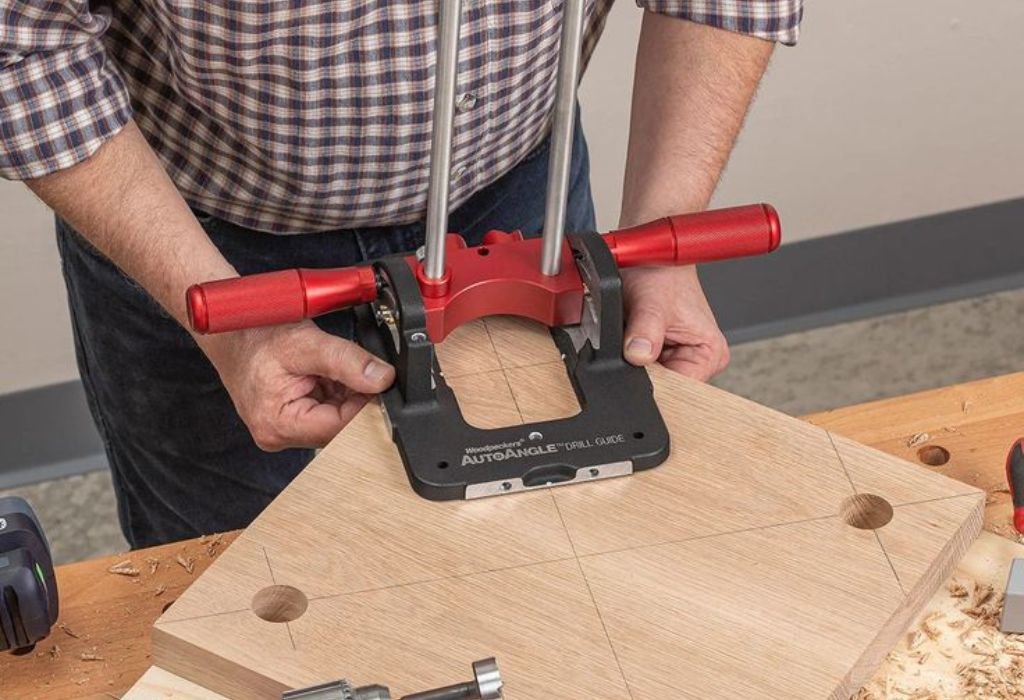
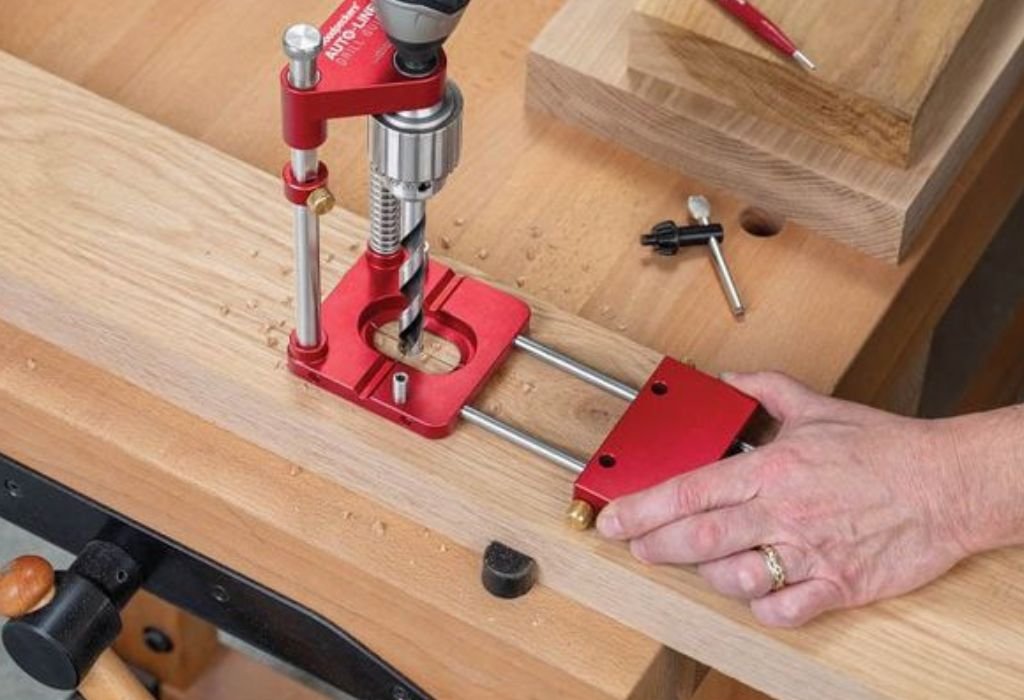
Using a Drill Guide or Homemade Jig
One of the most effective ways to achieve perfect vertical holes without a drill press is by using a drill guide or making your own jig.
Commercial drill guides come with adjustable angles and bushings that keep your bit steady while drilling. They mimic the function of a drill press by maintaining perpendicular alignment to the surface.
If you don’t have one, create a simple jig at home. Drill a perfectly vertical hole through a thick block of hardwood or metal using a drill press (borrow one if possible). Then, place your handheld drill inside that pre-drilled hole whenever you need a straight guide.
This jig ensures your drill stays fixed at a 90-degree angle every time.
For DIY jig ideas, see Family Handyman’s drill guide builds.
Can I make a drill guide from scrap wood?
Yes, as long as the hole in the block is perfectly perpendicular.
Do metal jigs work better than wooden ones?
Metal ones last longer, but both provide stable alignment.
How thick should the guide block be?
At least two inches to maintain consistent direction throughout drilling.
Can I adjust the jig for angled holes?
Yes, by drilling guide holes at the desired angle using a miter gauge.
Do commercial guides fit all drills?
Most are adjustable and compatible with standard handheld drills.
Using a Square or Level as a Visual Reference
When no jig or guide is available, you can rely on a speed square or bubble level to visually maintain your angle.
Set the square next to your drill bit so the arm forms a 90-degree angle with the surface. Keep your eyes aligned with the edge of the square while drilling. This allows you to adjust instantly if the bit begins to tilt.
For front-to-back accuracy, use a small spirit level attached to the drill’s body or chuck. Many professionals add magnetic mini-levels directly on the drill casing for constant angle monitoring.
Even though these methods rely on sight, with focus and steady motion they produce impressively straight holes.
For additional alignment ideas, see Popular Mechanics’ visual guide.
Can I drill straight using only a square?
Yes, it provides a clear 90-degree visual reference while drilling.
Where should I place the level?
On the drill body near the chuck to maintain vertical alignment.
Does the drill need to stay perfectly still?
Yes, movement introduces error — maintain slow, steady pressure.
Can I combine a square and a level?
Yes, it helps check both front-back and side-side alignment simultaneously.
Should I practice before real drilling?
Absolutely — practice helps develop muscle memory for keeping angles steady.
Building a Simple Angle Block or Corner Guide
A corner block or angle guide offers an easy mechanical solution for drilling perfect vertical holes. It eliminates human error by using two perpendicular faces as alignment references.
To make one, cut two wooden blocks and join them in an L-shape. Clamp it next to your drilling spot so the drill bit aligns perfectly along both faces. As you drill, the bit stays parallel to both sides, ensuring a straight vertical path.
Alternatively, use a corner clamp or machinist square if you work with metal. The key is maintaining constant visual contact between the bit and both guide faces during operation.
For building step-by-step guides, see The Spruce Crafts’ DIY corner jig tutorial.
What materials work best for corner guides?
Hardwood or aluminum — both resist wear and stay perfectly square.
Can I reuse the same block for multiple projects?
Yes, it’s reusable as long as the edges remain sharp and square.
Does this method work for metal?
Yes, with a sturdy metal angle block clamped securely.
Is alignment better than visual methods?
Yes, because physical guides eliminate human estimation errors.
Can I drill large holes with a corner guide?
Yes, as long as the guide is thick enough to stabilize the bit.
Drilling with a Depth Stop and Steady Motion
Consistency is crucial when drilling vertical holes by hand. Even with perfect alignment, uneven pressure or depth can ruin accuracy.
Mark your drilling depth with tape on the bit or use a depth-stop collar. This ensures you don’t push too far or pull out early, which can cause angled finishing at the bottom of the hole.
Drill slowly at first, allowing the bit to bite gently into the material. Maintain a consistent downward force without rocking or twisting your wrist.
If drilling deep holes, pull out occasionally to clear chips and reduce friction. This prevents bit deflection and overheating.
Detailed drilling control tips are shared by Fine Woodworking.
Why use tape on the drill bit?
It visually marks the target depth without over-drilling.
Should I press hard while drilling?
No, let the bit do the cutting — pressing too hard bends alignment.
Can chip buildup affect accuracy?
Yes, chips add friction that can deflect the bit sideways.
Do variable-speed drills help?
Yes, slower speeds give more control for precise vertical drilling.
Can cooling oil help when drilling metal?
Absolutely — it reduces heat and keeps the bit stable.
Using a Right-Angle Mirror for Precision Checking
When drilling freehand, it’s hard to see whether your bit remains vertical from every direction. A small mirror placed beside the work helps monitor angle consistency in real time.
Position a mirror at a 90-degree angle to your drilling side. As you drill, glance at the reflection to ensure your bit remains straight from both side and front views. This technique is particularly useful for deep holes where depth perception is tricky.
Mirrors also reveal subtle tilts early — saving your workpiece before the angle error becomes permanent.
For workshop mirror setup examples, see Family Handyman’s accuracy hacks.
Can I use any mirror?
Yes, a small flat one or cosmetic mirror works fine.
Why is the mirror angled at 90 degrees?
It lets you view both depth and side alignment simultaneously.
Does this technique replace jigs?
No, but it’s an excellent supplement for visual control.
How close should the mirror be?
Within one foot for clear visibility and immediate feedback.
Can beginners use this easily?
Yes, it’s one of the simplest accuracy tricks available.
Finishing and Checking Hole Accuracy
After drilling, inspect the hole for straightness and smoothness. Insert a dowel or straight rod to check for vertical alignment — it should stand upright without leaning.
If it tilts, identify whether the problem came from the starting angle or uneven pressure during drilling. Minor corrections can be made by slightly enlarging the hole and using a dowel insert.
For metalwork, measure the entry and exit points using calipers to verify perpendicular accuracy. A difference greater than one millimeter indicates angle drift.
You can refine uneven holes by re-drilling lightly with a larger bit or using a reamer to restore alignment.
For advanced accuracy checks, see Machinery’s Handbook alignment techniques.
FAQ
How can I tell if the hole is straight?
Insert a rod or dowel and check for upright alignment.
Can I fix slightly angled holes?
Yes, by re-drilling or filling and re-boring carefully.
Why does the bit wander mid-hole?
Uneven material density or excessive pressure causes drift.
Is reaming necessary?
For metal, yes — it ensures precise hole sizing and alignment.
Can sanding correct hole edges?
Light sanding removes burrs and improves finish but not alignment.
Conclusion
Drilling a perfect vertical hole without a drill press is a test of patience, control, and technique. While machines ensure mechanical precision, skilled hands combined with clever guiding methods can achieve nearly identical results.
By understanding why bits wander, preparing the surface correctly, and using stable references like jigs, squares, and mirrors, you transform a simple handheld drill into a tool of true accuracy. Each trick — from guide blocks to steady hand pressure — compensates for the lack of a fixed axis.
What matters most is setup and rhythm. Work slowly, avoid forcing the drill, and keep checking angles from multiple sides. A moment’s pause for realignment is better than fixing a misdrilled piece later.
Mastering how to drill vertical holes without a drill press perfectly means combining science with craftsmanship. Once practiced, your confidence grows, and every hole you drill feels effortless, smooth, and exact.
Precision, after all, isn’t about tools — it’s about technique. And when your hands learn to move like a well-calibrated machine, even a handheld drill becomes your most reliable instrument of accuracy.

I’m John F. Nicholas, the founder, lead writer, and drill enthusiast behind 101drill.com. With years of hands-on experience in power tools and DIY projects, I created this platform to share practical knowledge, expert tips, and real-world insights to help others master the art of drilling.