
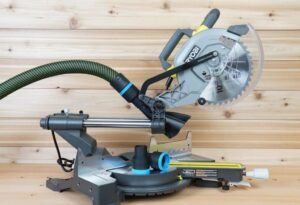
Picture this: you’re ready to tackle that weekend project, but your RYOBI miter saw is giving you trouble. Maybe it’s stuck, or you can’t seem to adjust the blade. Frustration mounts, and your project stalls. This post is your go-to guide, offering a simple, step-by-step approach to resolve these common issues and get your saw working safely and efficiently. By following these instructions, you’ll gain the knowledge to keep your tools in top shape. You’ll learn how to perform routine maintenance, identify potential issues, and ensure your cuts are always accurate. This resource aims to boost your confidence, reduce downtime, and help you get the most out of your miter saw experience, increasing your project output.
Basic Safety Checks Before Operation
Before even considering a cut, safety must be your top priority. Accidents can happen quickly with power tools, and it’s essential to perform routine checks to minimize risks. These preliminary steps are not just suggestions; they are crucial actions that will safeguard your well-being. By taking the time to thoroughly inspect your saw, you’re not just ensuring your safety; you’re also protecting the longevity and precision of your tool. These checks should become a regular part of your pre-cut routine, forming good habits that can save you from potential injuries and frustrations.
Power Cord and Outlet Inspection
The power cord is the lifeline of your saw; therefore, it requires careful attention. Start by inspecting the cord for any signs of damage. Look closely for cuts, frays, or exposed wires. Any damage to the cord increases the risk of electric shock, posing a serious threat. If you notice any damage, immediately
- Inspect the power cord for damage like cuts, frays, or exposed wires.
- Ensure the outlet is grounded and functioning correctly.
- Use a heavy-duty extension cord if necessary.
Maintaining the power cord and outlet is not just about avoiding electrical hazards; it’s about protecting your saw from power surges or inconsistent power delivery. A properly maintained power system ensures the saw receives the necessary power for optimal performance and safety. A power surge can damage the saw’s motor or internal components. These problems can be expensive to fix. Keeping an eye on your saw’s power setup is a simple but effective way to ensure both your safety and the longevity of your RYOBI.
Blade Examination
The blade is the heart of any miter saw, and its condition is critical for both safety and cutting accuracy. Begin by inspecting the blade for any damage. Look for cracks, chips, or bent teeth. A damaged blade can lead to unpredictable cuts and increase the risk of kickback. Always replace any damaged blades before using the saw. Next, make sure the blade is securely fastened to the saw. Check the blade’s arbor nut to ensure it is tight. A loose blade can come off during operation, causing serious harm. Finally, confirm the blade is the right type for the material you are cutting. Using the wrong blade can lead to poor cuts, damage the blade, and increase the risk of injury. Each blade is designed for specific materials. Select the right one for the job.
- Check the blade for cracks, chips, or bent teeth.
- Ensure the blade is securely fastened and the arbor nut is tight.
- Use the correct blade type for the material you are cutting.
Blade maintenance includes cleaning the blade regularly to remove pitch and other buildup. Use a blade cleaner or solvent to clean the blade. Always disconnect the saw from the power source before performing blade maintenance. Regularly inspect the blade for wear and tear, and replace it when necessary. This practice guarantees a cleaner, more accurate cut. A well-maintained blade also reduces the strain on your saw’s motor, extending its life. Inspecting the blade is a key part of your pre-cut procedure.
Guard and Fence Inspection
The guard and fence are essential safety features, designed to protect you from potential hazards. Start by ensuring the blade guard moves freely and fully covers the blade when not cutting. Check for any obstructions that might prevent the guard from closing completely. A guard that doesn’t close properly increases the risk of injury. Also, inspect the fence for any damage. The fence must be straight and securely attached to the saw. A bent or loose fence can cause inaccurate cuts and kickback. If you discover any damage, replace or repair the fence immediately. Make sure the fence is aligned correctly to ensure your cuts are straight and accurate. The fence should be parallel to the blade. A properly aligned fence is crucial for precise cutting.
- Check if the blade guard moves smoothly and completely covers the blade.
- Inspect the fence for any damage, ensuring it is straight and secure.
- Make sure the fence is aligned correctly, parallel to the blade.
Cleaning these components is just as important as inspection. Remove sawdust and debris from the guard and fence to keep them operating correctly. Use a brush or compressed air to keep these parts in good condition. Regularly cleaning the guard and fence also helps to prevent binding, where the material being cut can get stuck between the blade and the guard or fence. This can be especially important when cutting materials like plywood or particleboard. Make sure that the guard mechanism functions properly; its smoothness ensures safe saw use.
How to Unlock Your RYOBI Miter Saw’s Features
Getting familiar with your RYOBI miter saw’s features is essential for safe and efficient operation. This section focuses on essential adjustments and functions, from unlocking the bevel and miter angles to understanding the depth-of-cut adjustments. By learning how these features work, you can create precise cuts and tackle a wider range of projects with confidence. These tools are there to help you create better results. Knowing these elements is a key part of using the saw.
Adjusting Bevel and Miter Angles
Adjusting the bevel and miter angles allows you to cut materials at various angles, opening up a world of possibilities for your projects. The bevel angle is the angle at which the blade tilts. The miter angle is the angle at which the saw rotates. To adjust the bevel angle, you’ll typically find a lever or knob. Loosen this lever, then tilt the blade to the desired angle. The saw should have markings indicating the angles. Once the desired angle is set, tighten the lever or knob to secure the blade in place. For miter angle adjustments, you will also find a lever or knob. Loosen this to allow the saw to rotate. Set the miter angle according to your needs. Once the desired angle is reached, tighten the lever or knob. Always double-check your angle settings before making a cut to ensure accuracy.
- Loosen the bevel lever/knob, tilt the blade, and tighten the lever/knob.
- Loosen the miter lever/knob, rotate the saw, and tighten the lever/knob.
- Double-check angle settings before cutting for accuracy.
The accuracy of your cuts depends heavily on the precision of your angle settings. To ensure accuracy, use a square or angle finder to verify the settings. Place the square or angle finder against the blade and the fence. These tools confirm the angles are exactly what you need. Small deviations in the angle can lead to significant problems. When cutting multiple pieces at the same angle, make a test cut on scrap material. This test helps confirm the accuracy of your settings before cutting your final pieces. Always ensure the saw is unplugged when making angle adjustments. This process ensures your safety.
Depth-of-Cut Adjustments
Controlling the depth of cut is vital when working with your RYOBI miter saw, helping prevent cutting through the material, protecting your blade, and ensuring accurate cuts. The depth adjustment feature allows you to control how far the blade descends into the material. The adjustment mechanism might vary depending on the model, but it often involves a knob or a lever. Find the depth adjustment mechanism on your saw. Unlock the mechanism by loosening a knob or lever. Lower the blade to the desired cutting depth. Set the depth so the blade goes through the material, but does not cut into the base or support underneath. Once the desired depth is set, tighten the knob or lever to lock it in place. Always make adjustments incrementally. Small changes are easier to control.
- Find the depth adjustment mechanism.
- Unlock the mechanism.
- Set the depth and lock it.
Precise depth adjustments are particularly useful when making grooves, dados, or rebates. These processes involve cutting a slot or recess into the material. Overcutting can ruin your material. Under-cutting can make the groove ineffective. When making a dado, you’ll typically make multiple passes, gradually increasing the depth of cut until the desired depth is reached. Use a piece of scrap material to test your depth setting before cutting into the final material. Depth control extends the life of your blades. It also protects the saw’s table. Carefully adjust the depth settings to avoid damage.
Blade Alignment and Locking Mechanisms
Blade alignment is essential for accurate cuts, and knowing how to secure the blade is crucial. Begin by making sure your saw is unplugged before touching the blade. Locate the blade locking mechanism. It is often a pin or lever that, when engaged, prevents the blade from rotating. Engage the locking mechanism to stop the blade. Use the appropriate wrench, typically provided with the saw, to loosen the arbor nut. Once the nut is loose, remove it and carefully remove the blade. If you are replacing the blade, ensure the new blade is the right type and size. Install the new blade, ensuring the teeth are pointing in the correct direction. Re-tighten the arbor nut securely using the wrench. Make sure the blade is correctly aligned with the fence and the base of the saw.
- Ensure the saw is unplugged.
- Locate and engage the blade locking mechanism.
- Use the wrench to loosen the arbor nut and change the blade.
After changing the blade, it’s wise to check the blade’s alignment with a square. This step is a must for cutting accuracy. Place the square against the blade and the fence to confirm they are perpendicular. If adjustments are needed, refer to your saw’s manual for alignment instructions. Make adjustments. After replacing the blade, remember to always remove the wrench before plugging in the saw and beginning a cut. Using the saw with the wrench in place can lead to serious injury. Consider safety precautions. These precautions are the difference between a successful project and a potentially hazardous event.
Troubleshooting Common RYOBI Miter Saw Issues
Even with regular maintenance, issues can arise with your RYOBI miter saw. This section focuses on typical problems and how to solve them. By identifying the root causes and applying effective solutions, you can keep your saw running smoothly. By learning the techniques to get your saw in good shape, you’ll be well-prepared to diagnose and fix problems, reducing downtime and maintaining your cutting efficiency. This information helps you maintain a working saw.
Blade Binding
Blade binding is a common and dangerous issue that can occur when the blade gets stuck in the material. This can cause kickback, which is when the material is thrown back towards the operator. Blade binding can occur for several reasons. One common cause is cutting material too quickly. When you force the saw through the material, the blade can bind. The solution is to slow down your cutting speed. Let the blade do the work. Another cause of binding is using a dull or damaged blade. A dull blade requires more force, increasing the risk of binding. Ensure your blade is sharp and in good condition. Be certain you’re using the correct blade type for the material you are cutting. Finally, the material itself can contribute to binding. If the material is warped or uneven, it can pinch the blade.
- Slow down your cutting speed and let the blade do the work.
- Make sure the blade is sharp and in good condition.
- Use the correct blade type for the material.
To avoid blade binding, ensure that the material is properly supported during the cut. Use clamps or a support system to prevent the material from moving or shifting. Always make sure the saw is unplugged before attempting to free a bound blade. If the blade is stuck, stop the saw immediately. Turn off the power and unplug the saw. Carefully use a pry bar or other tool to gently separate the material from the blade. Never force the blade, as this can cause kickback or damage the saw. Proper technique and safety practices are vital to protect yourself.
Motor Issues
Motor issues can prevent your RYOBI miter saw from functioning. If the saw doesn’t start, the first step is to check the power supply. Make sure the saw is plugged into a working outlet. Check the circuit breaker to ensure it hasn’t tripped. If the saw starts but then stops during operation, the motor may be overheating. Overheating can be caused by excessive use or cutting through thick materials too quickly. Allow the saw to cool down before continuing use. You can prevent this problem by using the correct blade type for the material. If the motor is still not working, inspect the motor brushes. These brushes wear down over time. Worn brushes can interfere with the motor’s operation. Replace them if necessary. For advanced motor problems, it’s best to consult a qualified technician.
- Check the power supply and circuit breaker.
- Allow the saw to cool down if it overheats.
- Inspect and replace worn motor brushes.
Regular maintenance can prevent several motor problems. Keep the saw clean. Remove sawdust and debris from the motor’s vents. This aids in cooling the motor. Avoid overloading the saw. Do not force it to cut through materials it is not designed for. Following the manufacturer’s instructions can also extend the life of your motor. This advice will help keep your saw running. If you are not comfortable performing repairs, always seek professional help. Electrical work can be dangerous. Safety is the top priority.
Miter Saw Blade Issues
Issues with the blade can compromise both the saw’s performance and the quality of your cuts. A dull blade is a common problem, leading to rough cuts and increased cutting time. Sharpen or
- Sharpen or replace a dull blade.
- Check the blade for chips, cracks, or missing teeth.
- Make sure the blade is correctly aligned.
A blade that is not sharp or is not properly aligned is inefficient. Also, a damaged blade can be dangerous. The blade’s state has a huge effect on how the saw cuts. When the blade is clean, sharp, and properly aligned, you’ll be able to make precise and clean cuts. This process will significantly enhance your woodworking or construction experience. By regularly inspecting and maintaining your blade, you ensure both your safety and the quality of your work. This will save you both time and effort.
Frequently Asked Questions
Question: How do I remove the blade from my RYOBI miter saw?
Answer: First, unplug the saw. Then, engage the blade lock, loosen the arbor nut with the provided wrench, and carefully remove the blade. Remember to follow the instructions in your owner’s manual for specific details.
Question: My RYOBI miter saw is not cutting straight. What should I do?
Answer: Check the blade alignment using a square to ensure it is perpendicular to the fence and the base. Make sure the fence is straight and secure. Also, check the blade for any damage.
Question: What should I do if my RYOBI miter saw blade binds?
Answer: Immediately stop the saw, unplug it, and carefully separate the material from the blade using a pry bar or other non-damaging tool. Avoid forcing the blade. Re-evaluate your cutting speed and the material you’re cutting.
Question: How often should I clean my RYOBI miter saw?
Answer: Clean your saw after each use to remove sawdust and debris. Regular cleaning helps to keep the moving parts in good condition and prevents binding or other operational issues.
Question: What type of blade should I use for cutting wood with my RYOBI miter saw?
Answer: Use a blade designed for wood. These blades usually have more teeth than blades designed for other materials. Check the blade’s specifications to ensure it is suitable for the specific type of wood you plan to cut.
Final Thoughts
Now, you’ve explored the process of understanding the how to unlock ryobi miter saw capabilities, from pre-cut safety checks to troubleshooting common problems. Knowing these key steps is critical for ensuring both a safe and efficient workflow. Remember, regularly inspecting your power cord and outlet, blade, guard, and fence is a non-negotiable step before every use. Maintaining a keen eye on your saw’s performance and knowing how to adjust its angles and depth of cut will greatly impact your ability to create precise, accurate cuts. Finally, the ability to recognize and address issues like blade binding or motor problems will help to extend your saw’s life. With these insights, you can approach your woodworking or construction projects with a much higher level of confidence. By making these practices a routine, you protect both yourself and the longevity of your valuable equipment. Now get out there and start creating, safely and efficiently!

I’m John F. Nicholas, the founder, lead writer, and drill enthusiast behind 101drill.com. With years of hands-on experience in power tools and DIY projects, I created this platform to share practical knowledge, expert tips, and real-world insights to help others master the art of drilling.