
Drilling into a metal pole feels simple until the moment your drill bit slips and scratches the surface instead of cutting through it.
Many people assume that a metal pole is the same as wood or plastic, but the hardness and surface finish make it more challenging than expected. Heat builds up quickly, the bit becomes dull, and the pole refuses to accept a clean hole unless you follow the proper method.
One of the most common problems is starting the hole in the wrong way because metal is slippery and unforgiving.
A tiny mistake at the beginning creates a crooked hole, a damaged drill bit, or even an unsafe kickback from the drill. These issues happen not because drilling metal is difficult but because the technique is wrong.
The good news is that drilling into a metal pole becomes very simple when you use the right preparation, drill speed, drill bit, and pressure.
The process is predictable and safe if you understand how metal reacts to heat and friction. This guide will show you everything step by step so you get clean, accurate holes without damaging the pole or your drill bit.
Whether you’re installing a security camera, a flagpole bracket, a gate hinge, or running electrical wiring, the same principles apply.
A polished finish, controlled speed, and stable drill positioning make a huge difference in the final result. Let’s dive into the complete method for drilling into metal poles the right way.
What Makes Drilling Into a Metal Pole Difficult
Metal poles are usually made from steel or iron, and both materials have significantly higher hardness than wood or plastic.
This hardness increases friction when a drill bit makes contact, causing heat to build up faster than most beginners expect. That heat softens the drill bit tip and can even change its color if it gets too hot.
Another issue is the curved surface of a metal pole, which doesn’t provide a flat starting point for the drill bit. A curved surface increases the chance of slipping and reduces the accuracy of the hole. Beginners usually push the drill too hard, and the bit slides off, scratching the metal.
Metal poles also vary in wall thickness, and this affects how easily a drill bit can penetrate the material.
Thin-walled poles need less force but require precision to avoid tearing or deforming the hole. Thick-walled poles require slower drilling and more lubrication because they hold heat longer.
Heat buildup is one of the biggest challenges because it affects both the drill bit and the metal surface. Excessive heat can burn the cutting edges of the bit and create rough edges around the hole. Without proper lubrication, the drilling friction increases dramatically and makes the job harder.
Finally, metal poles amplify vibration because of their hollow structure. This vibration transfers through the drill and makes it harder to maintain steady pressure. Understanding these challenges helps you choose the right technique for smooth and safe drilling.
Tools You Need to Drill Into a Metal Pole
The first tool you need is a power drill capable of variable speed control because metal drilling requires slower RPM settings.
A corded drill usually maintains stronger torque, but a good cordless drill works fine as long as it has low-speed torque. Always choose a drill with a comfortable grip for maximum control.
You will also need specialized metal drill bits because regular wood bits will not survive metal drilling.
The best options are cobalt drill bits, titanium-coated drill bits, and carbide-tipped bits for harder metals. Step drill bits are excellent for enlarging holes in thin-walled poles and provide a clean finish.
A center punch is essential for preventing the drill bit from slipping on the curved surface. You strike the punch to create a small dent where the drill bit can sit securely. Without a punch mark, drilling a round pole becomes risky because the bit constantly slides sideways.
Clamps or a vise help stabilize the metal pole so it does not move or vibrate during drilling. Even a small movement can misalign the hole or cause the bit to break. Keeping the pole locked prevents vibration from transferring to your hand and makes drilling smooth.
Lubrication oil such as cutting oil, machine oil, or even WD-40 reduces heat buildup and protects the drill bit.
Apply a few drops while drilling to keep the bit cool and extend its life. Safety gear like gloves, eye protection, and hearing protection must always be worn during drilling.
Finally, marking tools such as a permanent marker or masking tape help you identify the spot where the hole will be drilled.
Clean markings improve precision because metal surfaces reflect light and make pencil marks hard to see. With the right tools prepared, drilling becomes a straightforward process.
Choosing the Right Drill Bit for Metal Poles
Cobalt drill bits are one of the best options for metal because they handle high heat and maintain sharpness. These bits are ideal for thick, hard metal poles because they cut smoothly without wearing out quickly.
Cobalt bits usually come in M35 and M42 grades, with higher numbers indicating stronger metal composition.
Titanium-coated drill bits are another good choice because the coating reduces friction and improves drilling speed.
These bits are suitable for thin or medium-thickness metal poles where heat buildup is moderate. The titanium coating prevents rust and increases durability, making them ideal for general metal drilling tasks.
Carbide-tipped drill bits are the strongest and sharpest among common bit types. They are used for drilling extremely tough metal or hardened steel poles. Carbide bits stay sharp longer than cobalt or titanium bits but are more expensive and brittle if dropped.
Step drill bits work best for thin-walled metal poles because they create clean, perfectly round holes.
Instead of drilling multiple hole sizes, a step bit allows smooth enlargement of holes without switching tools. These bits reduce tearing around the hole because the cutting surface gradually increases.
High-speed steel drill bits are an entry-level option for soft metal poles. They are cheaper but wear out faster during heavy drilling. If you drill metal frequently, cobalt or titanium bits provide better longevity.
Choosing the correct bit depends on the metal thickness, your drill speed, and how clean you want the hole to be. Once you match the right bit with the right material, drilling becomes easier and safer.
How to Prepare the Metal Pole Before Drilling
Start by cleaning the area where you intend to drill because dust, rust, or dirt affects drill accuracy. A simple wipe with a cloth or sandpaper gives the drill bit a cleaner surface to grip. Rust flakes can make the bit slip, so removing them increases stability.
Next, mark the exact drilling spot using a marker or masking tape. Masking tape helps your marker stand out and also provides additional grip for the drill bit. Marking ensures that your hole is precise and aligned with your project needs.
Once marked, use a center punch to create a small indentation for the drill bit. A single hammer tap is usually enough to form a solid guiding point. This step is the most important because metal poles are curved and require a stable starting spot.
Secure the metal pole using clamps or a vise so that it cannot move. Movement during drilling causes misalignment and ruins the hole shape. Even lightweight poles need stabilization because vibrations travel through the hollow structure.
If the pole is part of a fixed structure, such as a gate or railing, make sure you have stable footing. A stable stance reduces hand fatigue and helps apply consistent pressure during drilling. Good body positioning improves accuracy through the entire drilling process.
Finally, choose the right lubrication before starting the drill. Apply a small amount of cutting oil to the marked spot to reduce friction immediately. Proper preparation ensures a cleaner hole and preserves your drill bits.
Step by Step Process to Drill Into a Metal Pole
Begin by setting your drill to the lowest speed because high RPM generates too much heat when drilling metal. Starting slow allows the bit to bite into the punch mark without slipping. This gives you immediate control over the drilling direction.
Place the drill bit directly into the punch mark and apply steady, gentle pressure. Let the bit cut naturally instead of forcing it. Forcing the drill increases overheating and may break the bit.
Once the bit grips properly, increase the speed slightly while keeping the pressure consistent. The sound of the drill will tell you if it’s cutting smoothly or struggling. A smooth cutting sound means the bit is working efficiently.
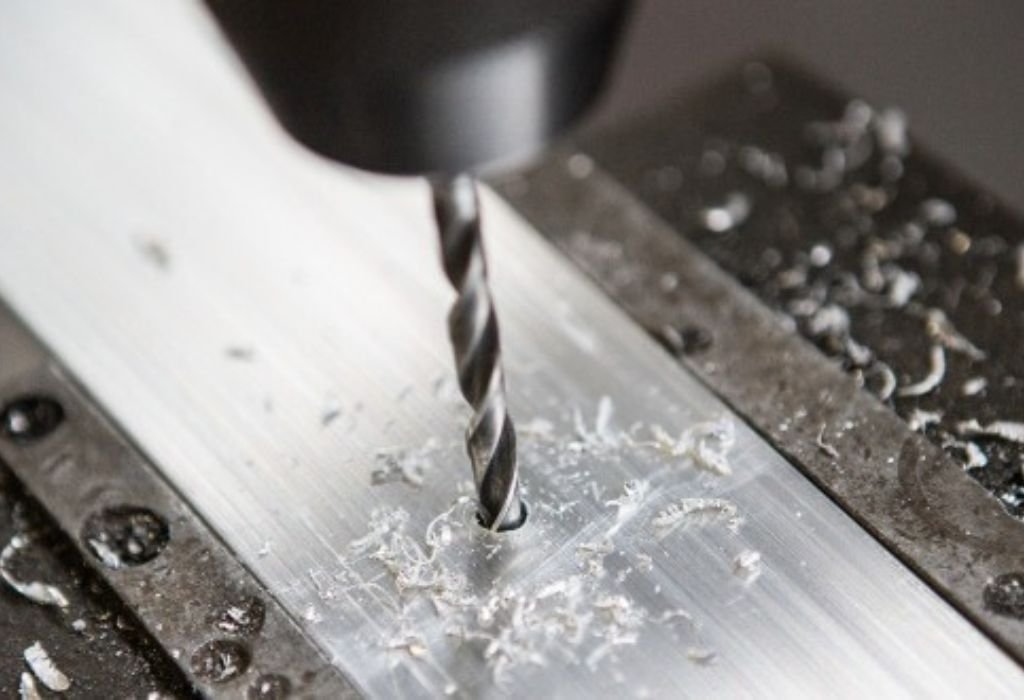
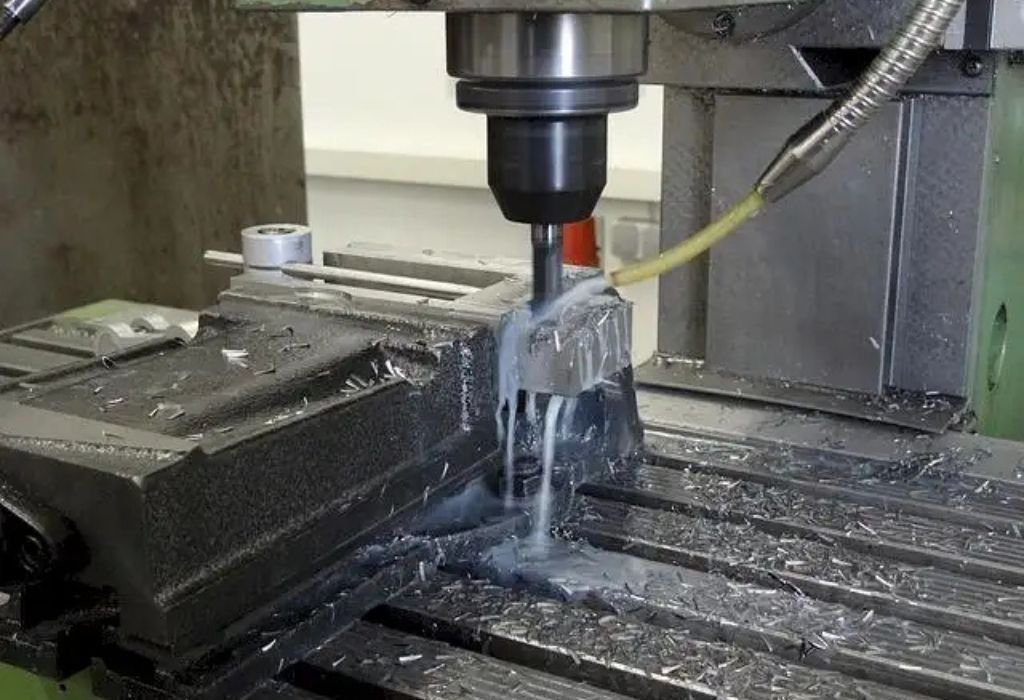
Apply cutting oil continuously to keep the drill bit cool and reduce friction. A small drop every few seconds prevents overheating and protects both the bit and metal. Metal drilling always improves with proper lubrication because it prevents burning.
When drilling deep, periodically pull out the drill bit to remove metal chips. These chips can clog the cutting surface and slow down drilling. Clearing chips also allows fresh oil to reach the cutting area.
If you need a larger hole, start with a smaller pilot hole first. A pilot hole gives your larger bit a precise path to follow and prevents wandering. Once you drill the pilot hole, switch to your preferred bit size and enlarge the hole smoothly.
How to Prevent the Drill Bit from Slipping on Metal
Drill bit slipping is the most common problem beginners face when drilling curved metal surfaces. The first solution is to always use a center punch to create a guiding dent. This dent stops the drill bit from moving sideways when pressure is applied.
Applying masking tape on the drilling area gives additional grip for the drill bit. The tape creates friction and reduces the chances of slipping. It also makes your marking more visible on shiny metal surfaces.
Start drilling at an extremely slow speed to let the bit sit in place. High speed at the beginning causes immediate slipping because the bit has no grip. Slow speed helps the bit “bite” and lock into the metal.
Use both hands on the drill for maximum stability. One hand controls direction while the other controls pressure. A firm grip reduces vibration and makes the bit more stable during the initial cut.
Avoid tilting the drill because even a small angle leads to slipping. Keep the drill perfectly perpendicular to the metal pole. Consistent angle control improves accuracy and prevents scratches.
Adding lubrication reduces overheating but also makes the surface slippery, so apply small drops sparingly during the initial seconds. After the bit has started cutting, you can increase lubrication safely without risk of slipping.
How to Drill Large Holes in a Metal Pole
Drilling large holes requires a slightly different method because the bit size affects stability. Always begin with a small pilot hole because a large drill bit cannot bite properly on a curved metal surface. The pilot hole guides the larger bit and prevents slipping.
Once the pilot hole is drilled, switch to a step drill bit. Step bits are perfect for enlarging holes gradually because each step expands the diameter smoothly. This prevents tearing or sharp edges around the hole.
Apply plenty of cutting oil when drilling large holes because friction increases with size. Large bits generate more heat and need more cooling. Overheating creates rough hole edges and damages the bit.
Take frequent breaks to cool the drill bit when drilling thicker metal poles. Heat weakens the metal and changes its cutting angle. Continuous cooling keeps the bit sharp throughout the process.
Use slower drilling speeds when enlarging holes because large bits behave differently at high RPM. Slow and steady drilling ensures a clean finish. Large holes require patience to maintain accuracy.
Check the hole edge after drilling because large holes often need extra smoothing. Use a file or sandpaper to remove any sharp burrs. Smooth edges make your hole safer and more professional.
Why does the drill bit smoke when drilling metal?
Smoke comes from overheating caused by high speed, no lubrication, or too much pressure.
Can I drill a metal pole with a regular drill?
Yes, but the drill must support slow speed and have enough torque to cut through metal.
Should I use water instead of oil for cooling?
Water cools but does not lubricate. Cutting oil is the correct choice for metal drilling.
Why is the hole not smooth after drilling?
Rough edges happen when the drill bit is dull, overheated, or used at the wrong speed.
How long should a drill bit last when drilling metal?
A good cobalt bit lasts long if cooled properly. Overheating shortens lifespan quickly.
How to Avoid Overheating While Drilling Metal
Overheating is one of the biggest risks when drilling metal because it damages both the drill bit and the pole surface. The easiest way to prevent it is by using cutting oil generously throughout the drilling process. Lubrication reduces friction and keeps the drill bit sharp.
Use the lowest drill speed possible when starting the hole because heat builds rapidly at high RPM. Slow speed allows controlled cutting and reduces stress on the bit. Increasing speed gradually helps maintain a consistent temperature.
Another method is to take breaks while drilling. Pull the bit out every few seconds to clear the chips and let the bit cool. Metal-on-metal friction creates heat fast, so short pauses prevent burning.
Avoid applying too much pressure because force increases friction. Let the drill bit do the cutting naturally. Excess pressure also increases the risk of breaking the bit.
Using high-quality drill bits helps prevent overheating because they are designed to withstand heat better. Cheap bits overheat quickly and lose sharpness faster. Investing in good bits makes drilling safer and smoother.
Clean the metal chips regularly because chips act like insulation and trap heat around the cutting area. Removing them exposes the bit to a cooler surface. Proper chip removal keeps drilling efficient and manageable.
Mistakes to Avoid When Drilling Into a Metal Pole
One of the biggest mistakes is starting drilling without a center punch mark. Without the dent, the bit slips instantly on the curved metal and ruins the alignment. This mistake wastes time and damages the surface.
Another mistake is using wood drill bits to drill metal. Wood bits are not designed for metal hardness and become dull instantly. Always use metal-specific bits like cobalt or titanium.
Many beginners drill too fast, thinking speed will increase cutting power. High speed overheats the bit and burns the cutting edge, reducing its life. Slow-speed drilling is always better for metal.
Not applying cutting oil is another common error. Drilling metal without lubrication creates excessive friction and heat. Lubrication keeps the drill bit sharp and cool.
Failing to secure the metal pole is also risky. Movement during drilling creates jagged holes and misalignment. Always clamp the pole or stabilize it firmly.
Finally, pushing too hard on the drill causes the bit to jam. Natural cutting pressure gives the best results. Controlled drilling keeps the bit safe and prevents breakage.
Why does my drill bit stop cutting the metal?
It becomes dull due to heat or long use. Sharpening or replacing may be necessary.
Should I pre-drill a pilot hole every time?
Yes, especially for larger holes. A pilot hole ensures accuracy and prevents slipping.
Why is my metal pole vibrating so much?
Because it is hollow. Clamping or holding it tightly reduces vibration.
Can I use a hammer drill to drill a metal pole?
Hammer mode should be off. Hammering damages both the pole and the bit.
Is WD-40 good for drilling metal?
Yes, it works as a light lubricant but cutting oil performs better.
Safety Tips When Drilling Metal Poles
Wear safety gloves to protect yourself from sharp edges and hot metal chips. Metal chips can fly at high speed and cause injuries. Gloves improve grip and prevent cuts.
Always use eye protection because metal shavings are extremely sharp. Even a small chip can cause serious eye damage. Protective glasses are mandatory for safe drilling.
Secure the metal pole before drilling because movement creates an unsafe situation. A moving pole can cause the drill bit to break or kick back. Clamps keep everything stable and predictable.
Maintain a firm grip on the drill with both hands. One hand stabilizes the drill while the other applies pressure. A strong grip reduces vibration and keeps the drill aligned.
Avoid leaning too close to the drilling area because metal chips can scatter. Maintain a safe distance while still controlling the drill effectively. Good body positioning keeps you safe.
Never touch the drill bit immediately after drilling because it may be extremely hot. Let it cool naturally or dip it in oil. Hot bits cause burns instantly.
How to Smooth and Clean the Hole After Drilling
Use a deburring tool to remove sharp metal edges because drilling leaves burrs naturally. A few twists of the deburring tool smooth the edges instantly. If you don’t have a deburring tool, a round file works well.
Sand the area around the hole using fine-grit sandpaper. Sanding removes scratches and improves the finish. It also smooths the transition between the drilled hole and metal surface.
If the hole needs to be perfectly round, run the drill bit through it once more. This ensures the edges are even. Avoid applying too much pressure because it may enlarge the hole unintentionally.
Clean the area with a cloth to remove metal dust and chips. Metal debris can cause rust or interfere with any mounting hardware. A clean surface improves installation quality.
Apply a rust-prevention spray if the metal pole will be outdoors. Drilling exposes raw metal that can rust quickly. Protective spray preserves durability and appearance.
Check the hole size using the hardware you plan to install. Ensuring the correct fit prevents future adjustments. A clean and accurate hole makes your project look more professional.
When to Replace Your Drill Bit
Replace your drill bit when it begins producing smoke during drilling. Smoke signals that the cutting edges are burned or dull. A dull bit cannot cut metal efficiently.
If the drill bit slips even inside a punch mark, it may be too dull. Sharp bits grip instantly and require less pressure. Slipping reduces accuracy and increases scratching.
Examine the drill bit tip regularly to check for chipping. Chipped edges cannot cut smoothly. Using a damaged bit causes jagged holes and increases drilling time.
Replace the bit when you hear a grinding noise instead of a clean cutting sound. Grinding indicates that the bit is scraping instead of cutting. Proper sound ensures proper function.
If the hole edges are becoming rougher than usual, the bit is losing its sharpness. Clean cuts require a sharp cutting surface. Rough holes increase finishing time.
When drilling takes longer than normal, it’s a sign that the bit has worn down. Fresh bits restore efficiency instantly. Replacing bits on time makes drilling easier and safer.
How do I know if my drill bit is overheating?
Discoloration, smoke, or burning smell signals overheating.
Which drill bit lasts longest for metal poles?
Cobalt drill bits last the longest due to heat resistance.
Can I sharpen my drill bits myself?
Yes, using a drill bit sharpener. It restores cutting edges efficiently.
What happens if I drill metal too fast?
The bit overheats and dulls quickly, making drilling harder.
Should I clean drill bits after every use?
Yes, cleaning removes metal debris and extends lifespan.
Common Questions About Drilling Into Metal Poles
Many people wonder if drilling a metal pole weakens its structure. A single small hole usually has minimal effect on strength. However, multiple holes close together can reduce stability.
Some beginners ask whether cordless drills can handle metal. Modern cordless drills with high torque perform very well. Just ensure slow speed and proper lubrication.
People often worry about drill bit durability. A high-quality bit lasts many drilling cycles if kept cool. Overheating is the fastest way to ruin a drill bit.
Another question is whether drilling direction matters. Drilling straight and perpendicular ensures the cleanest hole. Angled drilling increases slipping risk and makes rough edges.
Many individuals ask if step drill bits work on thick metal. Step bits work best on thin metal but struggle on very thick poles. For thick metal, cobalt bits are more effective.
Some users ask about drilling through stainless steel poles. Stainless steel requires slow speed, plenty of oil, and strong drill bits. With proper technique, the process is manageable.
Conclusion
Drilling into a metal pole may seem difficult at first, but with the right technique, it becomes a smooth and predictable process.
Using the correct drill bit, preparing the surface, and controlling your speed makes the job much easier. Consistent lubrication and proper alignment ensure clean, professional-looking holes every time.
The key to success is understanding how metal behaves under pressure and heat. A slow drilling speed, steady pressure, and frequent cooling protect your tools and improve accuracy. With these methods, even beginners can drill metal poles with confidence.
Whether you’re installing a bracket, hanging a sign, or running electrical conduit, the steps remain the same. A safe, controlled drilling approach gives you the best results without damaging the metal pole.
Now that you know the complete method, you can tackle any metal drilling project with ease and precision.

I’m John F. Nicholas, the founder, lead writer, and drill enthusiast behind 101drill.com. With years of hands-on experience in power tools and DIY projects, I created this platform to share practical knowledge, expert tips, and real-world insights to help others master the art of drilling.