
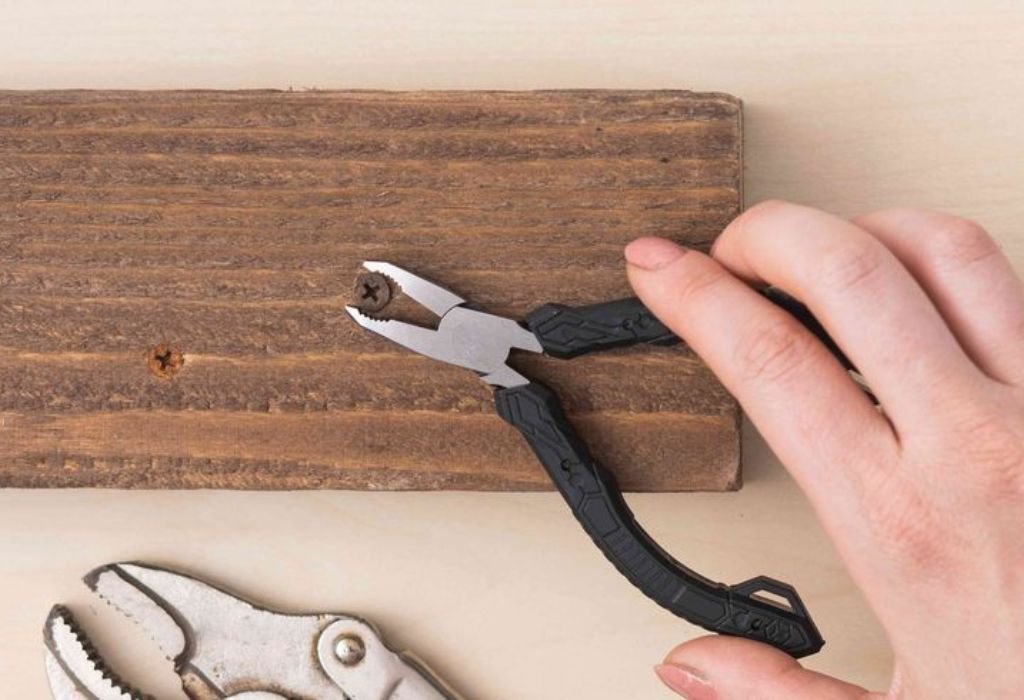
Removing a rusted screw from metal can quickly turn into a nightmare when the head strips, the screw seizes, and nothing seems to loosen it. Many people try forcing it with pliers or screwdrivers, only to make the damage worse and push the screw deeper into the metal.
I once watched someone spend nearly an hour trying to unscrew a rusted bolt from a steel bracket before they realized that drilling was the only real solution left.
Rusted screws get stuck due to corrosion that expands the metal inside the threads. Over time, moisture reacts with steel and bonds the screw tightly to the metal surface. When this happens, traditional tools fail because the threads are literally fused together.
The good news is that drilling out a rusted screw is a safe and reliable method when done properly. Using a cobalt drill bit, penetrating oil, and slow RPM allows you to cut into the screw without harming the surrounding metal.
This guide will walk you through every step so you can remove even the most stubborn rusted screws with confidence.
Why Rusted Screws Get Stuck in Metal
Rusted screws get stuck because corrosion causes the metal to expand inside the screw threads.
This expansion locks the screw tightly into place and prevents it from rotating normally. When rust fills the gaps between the threads, no amount of force can turn the screw without damage.
Moisture plays a major role in creating rust, especially when steel meets other metals. When water enters small gaps, it triggers oxidation and forms layers of rust that bond the screw to the metal permanently. Over time, these layers harden and make removal much more difficult.
Galvanic corrosion also contributes to stuck screws when different metals interact. If a steel screw is inserted into aluminum or zinc-coated metal, an electric reaction accelerates oxidation. This reaction makes the screw seize faster and more aggressively.
Environmental exposure makes rust worse in outdoor metal structures. Screws in fences, machinery, vehicles, and industrial equipment rust quickly due to rain, humidity, and temperature fluctuations. Over time, the screw essentially becomes part of the metal around it.
When rust forms inside the screw head, tools lose grip and cause stripping. Once stripped, the screw offers no driving surface for a screwdriver or bit. At this point, drilling becomes the only reliable removal method.
Finally, weak or worn screws rust faster than high-grade alloy screws. Cheap metal corrodes more rapidly because its coating wears off easily. Understanding why rusted screws get stuck helps you choose the right method to remove them.
Tools You Need to Drill Out a Rusted Screw
Drilling out a rusted screw requires specific tools designed for metal cutting. Cobalt drill bits are the most important because they resist heat and cut through hardened steel effectively. Using weak bits will cause them to dull quickly or break during drilling.
A variable-speed drill is essential because rusted screws must be drilled slowly. Slow RPM prevents overheating and ensures controlled cutting. Cordless or corded drills both work as long as they have sufficient torque.
Penetrating oil is useful for loosening rust before drilling begins. Oils like WD-40 Specialist, PB Blaster, or Liquid Wrench seep into corroded threads. They help soften rust and reduce friction.
A center punch helps you make an indentation on the screw head. This indentation guides your drill bit and prevents slipping when you begin drilling. Without it, the bit may wander off the center.
Screw extractor bits are optional but extremely useful. Once you drill a pilot hole, extractors grab onto the screw and twist it out in reverse. These bits can remove screws even when their heads are badly damaged.
Safety gear is essential when drilling metal. Safety glasses protect your eyes from metal chips, and gloves protect your hands from sharp edges. Having the right tools makes drilling out a rusted screw smooth and controlled.
How to Prepare the Rusted Screw Before Drilling
Before drilling, you must prepare the rusted screw to make removal easier. Begin by cleaning the screw head with a wire brush to remove loose rust. This improves tool grip and visibility.
Next, apply penetrating oil generously to the screw. Allow the oil to soak for at least 15 minutes so it can travel into the threads. For heavily rusted screws, reapply multiple times over several hours.
After the oil has soaked, tap the screw head lightly with a hammer. The vibrations help break rust bonds inside the threads. Tapping also helps the oil penetrate deeper into the metal.
If the screw is exposed, attempt to warm the metal around it slightly. A heat gun or small torch can expand the metal around the screw. This expansion sometimes frees rusted areas and helps drilling.
Clamp or stabilize the metal object holding the screw. Movement during drilling causes slipping and makes the drill bit wander. Stable surfaces ensure precision and safety.
Finally, use a center punch to make a deep indentation exactly in the middle of the screw head. This indentation guides the drill bit into place. Proper preparation increases the success rate of drilling dramatically.
Method 1: Drilling a Pilot Hole into the Rusted Screw
Start by selecting a small cobalt drill bit that matches the size recommended for screw extractors. Small pilot bits reduce stress and cut through rust more easily. Position your drill at the lowest RPM setting before starting.
Place the drill bit into the center punch mark. Hold the drill perpendicular to the screw head to avoid angled cutting. Angle mistakes will damage the surrounding metal or snap the bit.
Begin drilling slowly with light pressure. Let the bit cut gradually without forcing it. Excessive pressure increases heat and causes premature dulling.
Apply cutting oil while drilling to keep the bit cool. Lubrication reduces friction and prevents overheating. Reapply oil frequently during drilling.
Once the pilot hole begins forming, continue drilling deeper slowly. The depth should match the extractor’s recommended size. A proper pilot hole is crucial for a clean removal process.
If the screw head is stripped, drilling will help break the outer surface and expose clean edges. This makes extraction easier and safer. A well-made pilot hole is the foundation of successful screw removal.
Method 2: Using a Screw Extractor After Drilling
After drilling a proper pilot hole, insert a screw extractor bit into the drill. Extractor bits are designed to bite into the drilled hole and turn the screw backward. They remove rusted screws by gripping more tightly as pressure increases.
Set the drill to reverse mode and slow speed. Reverse rotation allows the extractor to dig deeper into the pilot hole. Slow drilling avoids snapping the extractor tip.
Apply steady pressure while drilling in reverse. The extractor will begin biting into the screw and rotating it counterclockwise. As it turns, the screw loosens and begins backing out.
If the screw starts moving, stop drilling and remove the extractor. Use pliers to twist the screw out the rest of the way. This prevents over-torque and preserves threads.
If the extractor slips, increase the depth of the pilot hole slightly. More depth provides stronger grip. Avoid widening the hole because this reduces extractor effectiveness.
Extractor bits work on moderately rusted screws but may fail on screws fused deeply by corrosion. In those cases, full drilling becomes necessary. Extractor use is ideal when the screw still has some structural integrity left.
Method 3: Fully Drilling Out the Screw When Extraction Fails
If the extractor cannot remove the screw, you must drill the screw out completely. Start with a slightly larger bit than the pilot size. Gradual expansion helps cut the screw without damaging surrounding metal.
Drill slowly and apply cutting oil regularly. This keeps the screw cool and prevents binding during drilling. Heat makes rust expand, so cooling is important.
Increase the drill bit size step by step until the screw material breaks away. The goal is to remove all screw material from inside the threads. Controlled enlargement prevents metal damage around the screw.
Once the screw shaft is drilled out, remove any remaining fragments with a pick or pliers. These small pieces often fall out easily once the main body is removed. Work slowly to avoid scratching the metal around the hole.
Inspect the screw hole afterward. If the threads are intact, you can insert a new screw directly. If the threads are damaged, you may need to repair them.
Full drilling is the final solution when rust has fused the screw completely. This method ensures you can continue the project without structural compromise. It requires patience but guarantees success.
How to Prevent Damage to the Metal Surface During Drilling
Preventing surface damage requires controlling drill angle and pressure. Keep the drill perfectly straight to avoid scraping the surrounding metal. Misaligned drilling causes oval holes and weakens the metal.
Using cutting oil reduces friction and minimizes scratches. The smoother the drilling, the less chance of scarring the surface. Frequent oil application keeps the drill bit cutting cleanly.
Clamping the metal prevents unwanted movement. Movement during drilling causes the bit to slide across the surface. Stable workpieces ensure perfect accuracy.
Use the correct drill bit size for the screw being removed. Oversized bits remove too much material and create unnecessary damage. Precision is key when working with metal.
Avoid rushing the drilling process. Fast drilling overheats both the bit and the metal. Slow and steady pressure produces the cleanest results.
Inspect the metal surface regularly during drilling. Stop immediately if you see excessive wear or metal distortion. Continuous observation helps prevent major mistakes.
How to Restore or Re-Tap Threads After Removing the Screw
Once the screw is removed, examine the internal threads for damage. Rusted screws often tear metal threads when removed. Inspect the depth and shape carefully.
Use a thread repair kit to restore damaged threads. These kits include taps that clean and reshape metal threads. Apply tapping oil for smoother cutting.
Insert the tap slowly and rotate gently to avoid cross-threading. Taps must enter straight to maintain thread alignment. Slight misalignment weakens the repaired threads.
Rotate the tap back and forth as you cut. This removes debris and prevents binding inside the hole. Clean threads improve new screw engagement.
If the threads are too damaged to repair, install a thread insert. Thread inserts restore the original diameter and strengthen the hole. They are ideal for high-load applications.
Test a new screw after thread repair. It should turn smoothly and fit snugly. Proper thread restoration ensures long-term durability.
Common Questions About Drilling Out Rusted Screws
How do I know if the screw is too rusted to extract?
If the head is completely fused or the screw does not turn after lubrication and tapping, extraction may not work.
Can I use a regular drill bit for drilling out rusted screws?
No, regular bits dull quickly; cobalt bits are required for hardened rusted screws.
Should I use heat before drilling?
Yes, controlled heat expands the metal and loosens rust, making drilling easier.
Why does my drill bit slip off the screw head?
You need a deeper center punch mark to guide the bit and prevent sliding.
Can penetrating oil really help?
Yes, penetrating oil softens rust inside the threads and improves drilling success.
How deep should my pilot hole be?
It should be deep enough to allow the extractor to bite firmly, usually a few millimeters.
What if the extractor breaks inside the screw?
Extractor steel is extremely hard and difficult to drill; often the only option is full drilling.
Can I damage the metal around the screw?
Yes, if you drill too fast or apply too much pressure, surrounding metal may scratch or deform.
Should I re-tap threads after removing the screw?
Only if the threads appear torn or the new screw does not fit properly.
Can rusted screws be prevented in the future?
Using stainless screws, applying anti-seize compound, and keeping metal dry helps prevent rust.
Conclusion
Fixing a rusted screw that refuses to move can feel overwhelming at first, but the process becomes much easier once you understand the right method and tools.
By combining patience with the precision of cobalt drill bits and the cooling power of lubricating oil, even the toughest rusted screws become manageable.
When drilling is done slowly and strategically, you protect both your tools and the metal surface beneath them.
Every step, from preparing the screw with penetrating oil to drilling a clean pilot hole — contributes to a smooth and safe removal.
Extractors offer a powerful advantage when they bite correctly, and gradual bit expansion ensures full removal if extraction fails. These controlled methods eliminate the risk of forcing the screw and damaging the surrounding material.
Once the screw is out, restoring or re-tapping the threads brings the metal back to full working strength.
A carefully repaired thread ensures that new screws fit perfectly and hold securely without wobbling or weakening. Taking the extra time to clean, smooth, and protect the metal also helps prevent future corrosion.
In the end, drilling out a rusted screw is not just a repair task, it’s a skill that gives you confidence for all future metalwork projects.
With the right technique and a calm approach, what once felt like a major problem becomes a simple, predictable process. This method guarantees strong results, professional finishes, and metalwork that stays reliable for years to come.

I’m John F. Nicholas, the founder, lead writer, and drill enthusiast behind 101drill.com. With years of hands-on experience in power tools and DIY projects, I created this platform to share practical knowledge, expert tips, and real-world insights to help others master the art of drilling.