
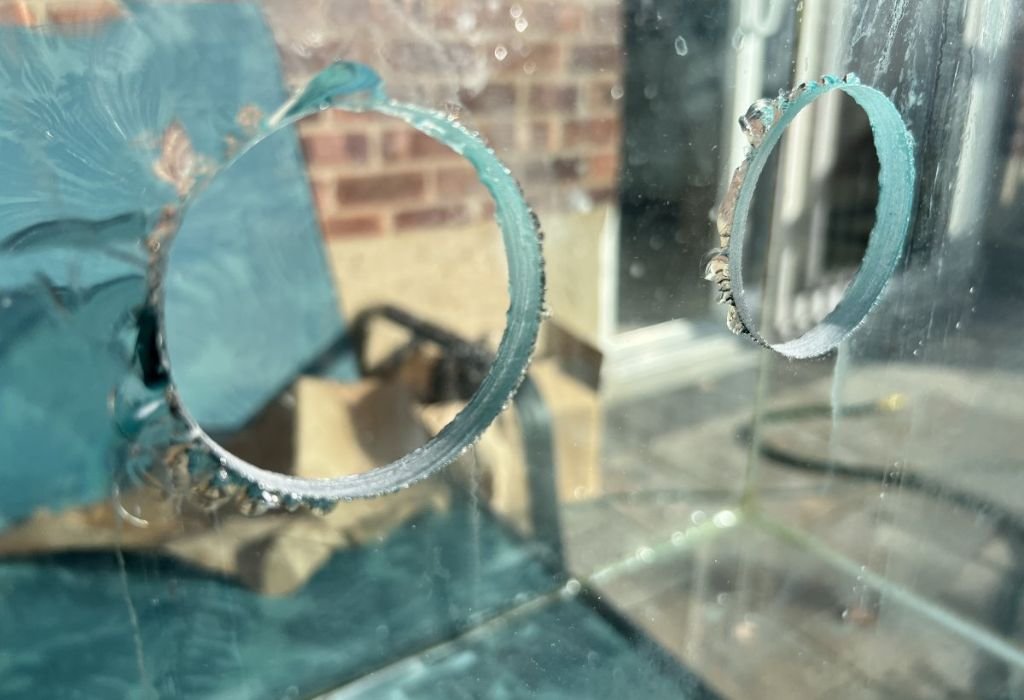
Drilling a hole in a glass fish tank can feel like the most stressful part of setting up an aquarium system. The idea of placing a drill against a panel that holds gallons of water makes many hobbyists hesitate. One wrong step could mean cracks leaks and a costly replacement.
The main challenge is that aquarium glass behaves differently once pressure is focused on a single spot. It cannot flex or absorb force the way other building materials can. Even a small change in speed or temperature can cause a sudden fracture.
Many fish keepers try to avoid drilling because they are unsure how safe the process really is. Some rely on second hand advice while others fear damaging the tank they worked hard to build. In most cases the issue comes from missing information rather than difficulty.
There are also aquarists who drill tanks successfully without any trouble. They move slowly keep the surface cool and let the drill bit grind gently into the glass. The result is a clean hole that supports plumbing without weakening the tank.
This guide is designed to give you the same confident and safe experience. You will learn how to confirm the glass type prepare the drilling area and control speed and pressure correctly. Each step focuses on protecting the tank while creating a precise opening for your setup.
Why Drilling a Fish Tank Requires Extra Caution
Drilling a glass fish tank feels risky because the panel holds water pressure. The glass is strong while intact but becomes sensitive when pressure is focused on one spot. One mistake can result in cracks that spread faster than expected.
Aquarium glass reacts differently than standard window glass. It does not flex and cannot absorb drilling force evenly. This is why drilling requires patience instead of speed.
Temperature changes also affect fish tank glass. Heat from drilling expands the surface while the rest of the panel stays cool. This imbalance creates stress that can lead to sudden cracking.
Some tanks use tempered glass which cannot be drilled under any condition. Tempered panels shatter instantly if drilled because of internal tension. Identifying the correct panel type is the most important step before starting.
Understanding these factors makes the process predictable instead of risky. Preparation prevents damage and ensures the tank stays safe during drilling. With the right technique drilling becomes a controlled procedure.
Tools and Supplies Needed Before Drilling
A variable speed drill is required for safe drilling. Slow rotation allows the bit to grind instead of cutting sharply. This prevents heat from building too quickly.
Diamond coated hole saw bits are the best option. They remove glass slowly and create smooth circular openings. These bits are commonly used for aquarium bulkhead installations.
Masking tape helps the drill bit stay centered. The smooth surface of aquarium glass offers no grip without tape. Tape also reduces early edge chipping while drilling begins.
A putty dam or clay ring is useful for holding water. Constant cooling protects the glass from thermal stress. Water must remain in contact with the drilling point throughout the process.
Safety glasses and gloves should always be worn. Tiny particles may fly when the bit breaks through the panel. Proper protection keeps the process safe and controlled.
Checking Glass Type Before Drilling the Tank
Never drill tempered glass because it will explode into small pieces. Tempered panels are often used for the bottom of large tanks. Confirming glass type prevents complete tank failure.
Look for a small marking that indicates tempered or safety glass. Not all panels are labeled so visual identification may not be enough. When unsure contact the tank manufacturer.
Most side and back panels are non tempered. These can be drilled safely with the correct method. However every panel must still be verified individually.
Do not guess based on tank size alone. Mixed construction is common in many aquarium models. One safe panel does not guarantee the others are the same.
If the tank already has cracks do not drill it. Even tiny hairlines can spread during drilling. Damaged tanks should not be modified for safety reasons.
Preparing the Fish Tank for Drilling
Always empty the tank completely before drilling. Water pressure inside changes how the glass reacts. Drilling a full tank is extremely dangerous.
Clean the drilling surface to remove dust and residue. Dirt prevents tape from sticking and causes the bit to slip. A clean surface increases precision and safety.
Apply masking tape to both sides of the panel. This helps control chipping during entry and exit. Mark the drilling point using a waterproof marker.
Support the tank so it cannot shift during drilling. Use a level stable surface with a towel or foam pad. Never apply body weight to the tank while working.
Remove lids lights and nearby equipment before starting. Keeping the area clear prevents accidents and vibration. Preparation makes the process smoother and safer.
Can I drill the fish tank while it has water inside?
No the tank must be completely empty and dry before drilling begins for safety.
Should I lay the tank down before drilling?
It can stay upright as long as it is supported securely and does not move.
Do I need to remove silicone before drilling?
Only if silicone covers the drilling point otherwise it does not affect the process.
Can I drill near the edge of the fish tank glass?
Avoid drilling close to edges because those areas are weaker and more likely to crack.
Is it safe to drill a tank with scratches on the surface?
Scratches weaken the panel so avoid drilling if the damage is near the drilling spot.
Choosing the Right Drill Bit for Fish Tank Glass
Diamond hole saw bits grind through glass slowly. They do not cut with force which keeps the panel stable. The smooth action reduces cracking risk during drilling.
Select the exact bit size required for the bulkhead. Bulkheads need a precise opening for watertight sealing. Choosing the wrong diameter can lead to leaks.
Continuous rim bits work better than segmented versions. Smooth rims reduce vibration and chipping during drilling. This helps create a cleaner circular hole.
Cheaper bits wear out quickly on thick aquarium glass. Worn coatings increase friction and heat buildup. Using a quality bit protects the tank during drilling.
Clean the bit regularly to remove glass dust. Dust blocks grinding action and slows progress. Keeping the bit clean ensures smoother drilling.
How to Start Drilling Without Slipping
Starting is the most sensitive part of drilling a fish tank. The drill bit should not slide across the panel. Masking tape provides grip and control.
Begin drilling at the lowest speed. High rotation makes the bit skate instantly. Slow speed allows the bit to create a shallow guide ring.
Hold the drill at a slight angle for the first few seconds. Once the bit catches straighten it gradually. This prevents slipping and scratching.
Do not apply pressure during the first stage. Let the bit work lightly into the glass. Forcing creates internal stress that may not be visible immediately.
Use both hands to stabilize the drill. One hand controls speed and the other guides direction. A steady hold prevents vibration and wandering.
Drilling Speed Cooling and Pressure Explained
Speed should remain between 400 and 600 RPM. Faster drilling generates heat and increases cracking risk. Slow grinding keeps the process controlled.
Pressure must stay light during the entire procedure. The bit should remove glass gradually without force. Pushing down creates vibration and stress inside the panel.
Water cooling prevents thermal shock. A putty dam holds water around the drilling point. Cooling maintains stable temperature across the glass.
Take short pauses to allow natural cooling. Drilling continuously heats the panel too quickly. Breaks help prevent star cracks from forming.
Keep the drill straight once the guide ring forms. Angle changes create uneven grinding. Alignment is essential for a smooth hole.
Why does the drill bit stop cutting through the glass?
The bit may be overheating or clogged so cooling and cleaning help restore progress.
How much pressure should I apply while drilling fish tank glass?
Use light pressure and let the bit grind instead of pushing down.
Can I drill faster if I add more water?
No speed must remain low because water cools but does not prevent cracking from force.
What if the panel becomes warm during drilling?
Stop immediately and allow cooling before continuing to avoid stress fractures.
Why is there a grinding noise while drilling?
The bit may be dry or dull and adding water helps reduce friction.
Preventing Cracks and Leaks During Drilling
Never drill near the bottom corners or seams. These areas hold the most structural tension. Drilling there increases the chance of cracking.
Always confirm that the panel is non tempered. Tempered glass shatters instantly if drilled. Verification prevents tank failure.
Do not drill tanks with existing stress marks. Even tiny cracks can expand during drilling. Damaged tanks should not be modified.
Support the tank to prevent shifting. Movement creates uneven pressure on the drilling point. Stable positioning keeps the panel protected.
Drill slowly through the final layer. The breakthrough point has the highest stress. Reducing pressure prevents chipping on the inside surface.
Finishing the Hole and Preparing for Bulkhead Installation
Lift the drill slowly after the hole is complete. Pulling too quickly can chip the entry edge. Smooth removal keeps the opening clean.
Rinse the area to remove glass dust. Particles interfere with bulkhead sealing. A clean surface ensures a watertight installation.
Inspect both sides of the hole carefully. Sometimes cracks appear inside even when the outside looks perfect. Early detection prevents leaks after setup.
Use fine grit sanding only if necessary. Light polishing removes minor sharp spots. Never over sand because it weakens the surrounding glass.
Allow the panel to dry before installing the bulkhead. Moisture prevents silicone from bonding properly. Dry surfaces create a secure seal.
Common Mistakes to Avoid When Drilling a Fish Tank
Using high speed is the most common error. Fast drilling generates heat and cracks the glass quickly. Slow operation is always safer.
Applying pressure instead of letting the bit grind creates stress. Patience prevents damage and maintains control. Light pressure is the safest method.
Skipping cooling leads to thermal shock. Water keeps the drilling point temperature stable. Cooling is essential for preventing cracks.
Changing angle during drilling causes vibration. Keeping the drill straight ensures a clean circular hole. Angle shifts weaken the drilling area.
Finishing too quickly causes chipping at exit. Slow completion protects both sides of the panel. Clean edges prevent leaks after installation.
Conclusion
Drilling a hole in a glass fish tank becomes safe when the correct method is followed. Slow speed cooling and light pressure prevent cracking during the process. Confirming glass type before drilling protects the tank from sudden failure.
Diamond hole saw bits grind through the panel gradually instead of cutting sharply. Water cooling keeps the temperature balanced and reduces stress buildup. Finishing carefully and inspecting both sides ensures smooth clean edges.
Avoiding common mistakes such as rushing or applying pressure prevents costly damage. Patience and preparation make the process easier even for beginners. With the right approach you can drill a glass fish tank safely without cracks leaks or tank replacement.

I’m John F. Nicholas, the founder, lead writer, and drill enthusiast behind 101drill.com. With years of hands-on experience in power tools and DIY projects, I created this platform to share practical knowledge, expert tips, and real-world insights to help others master the art of drilling.