
Drilling a hole in a glass jar sounds risky because glass is brittle and prone to cracking, but the process becomes safe and predictable when the correct method is used.
People often need holes in jars for DIY lamps, terrariums, soap dispensers, fountains, and creative home projects. With the right tools and a careful approach, even beginners can drill clean holes without breaking the jar.
Imagine holding a glass jar that you want to turn into a decorative light or a stylish kitchen dispenser. You search your home for tools and wonder whether a standard drill bit will work.
Soon you realize that drilling glass requires specialized equipment and a slow, steady technique.
Many beginners try drilling too fast or apply too much pressure, causing the jar to shatter unexpectedly.
Glass reacts differently from wood or metal because it cannot flex or compress under force. This makes understanding the proper drilling technique essential before making the first cut.
Drilling a glass jar safely depends on controlling speed, using water for cooling, choosing a diamond tipped drill bit, and preparing the surface properly.
These steps reduce stress on the glass and prevent temperature buildup that causes cracks. Once you learn these fundamentals, the risk of breaking the jar becomes very low.
This comprehensive guide explains every tool you need, every preparation step, and every detailed technique required to drill a hole in a glass jar successfully.
From selecting the correct drill bit to cooling the glass with water and finishing the drilled edge, each chapter teaches you how to avoid mistakes while achieving clean, smooth holes.
By the end of this tutorial, you will have complete confidence to drill holes for any project involving glass jars.
The method works for mason jars, recycled jars, thick jars, thin jars, and decorative glass containers. With patience and correct technique, drilling glass becomes a safe and rewarding DIY skill.
Why Drilling a Glass Jar Requires Special Technique
Glass is brittle, meaning it cannot bend or absorb pressure like metal or wood. When sudden force is applied, the surface fractures instantly. This is why beginners often crack jars the moment they start drilling.
Unlike other materials, glass heats up quickly during drilling. Heat creates internal stress, expanding the glass unevenly and causing cracks. Keeping the surface cool is essential for clean drilling.
Glass also has a smooth surface that offers little grip for a drill bit. Without preparation, the bit slides across the surface instead of cutting into it. This slipping can scratch the jar or create weak spots.
Glass jars often have molded shapes that vary in thickness. Thick sections require longer drilling time, while thin areas are more fragile. Understanding these thickness differences helps reduce the chance of breakage.
Glass cannot compress under pressure. Too much downward force causes radial cracks that spread from the drilling point. Drilling must rely on rotation, not force.
Glass drilling depends on abrasion rather than cutting. Diamond bits grind the glass gradually, producing fine dust. Slow abrasion prevents stress buildup.
Knowing why glass behaves differently helps you use the correct drill bit, cooling method, and pressure technique. This understanding greatly increases your success rate. With knowledge, drilling glass becomes a controlled process rather than a risky experiment.
Essential Tools You Need to Drill a Hole in a Glass Jar
A variable speed drill is the main tool required. Drills with slow speed settings provide better control and reduce stress on the glass. Cordless drills also work well because they allow smoother speed adjustment.
A diamond tipped drill bit is essential for cutting through glass. These bits grind the surface instead of slicing it. Standard metal or wood bits cannot penetrate glass safely.
Water is necessary for cooling the bit and preventing overheating. Without water, the bit becomes hot and cracks the glass. A simple bowl of water or spray bottle works effectively.
Masking tape helps prevent the drill bit from slipping. The tape creates friction and gives the bit a more stable starting point. Using tape on curved surfaces improves safety.
A clamp or jar holder stabilizes the jar during drilling. Jars can roll or twist when drilling starts. Clamping prevents unexpected movement.
A sponge or rubber pad placed under the jar protects the surface and absorbs vibration. Hard surfaces can increase pressure and cause breakage. Soft padding distributes the force evenly.
Safety equipment such as gloves and safety glasses protect against tiny glass particles. Although drilling is slow, glass dust still forms. Protection ensures safe work conditions.
Using the correct tools makes the process predictable. With the right setup, drilling a glass jar becomes significantly easier. Each tool serves a clear purpose in protecting the jar from stress.
How to Prepare the Glass Jar Before Drilling
Begin by cleaning the jar with soap and water to remove dust and grease. Dirt creates friction that increases heat. Clean glass responds better to the drilling process.
Dry the jar completely before applying tape. Moist surfaces make tape lose adhesion. Dry surfaces give the best stability for drilling.
Apply two or three layers of masking tape over the drilling spot. The tape prevents the bit from wandering during the first few seconds. This helps achieve a precise starting point.
Mark the exact drilling location using a permanent marker. Clear markings guide your drill alignment. Accurate marking ensures a clean hole.
Check the glass thickness by holding the jar up to light. Thicker areas require more drilling time. Thin areas require extra caution.
Fill a bowl with enough water to submerge the drilling area halfway. If using a spray bottle, keep it ready. Water cooling prevents stress cracks.
Place a sponge or soft cloth under the jar to stabilize it. Stable surfaces help maintain even pressure. Wobbling jars increase cracking risk.
Once the jar is prepared, take a moment to check your setup. Make sure your drill bit, speed setting, and safety equipment are ready. Preparation increases your success rate dramatically.
Can I drill glass without water?
It is possible but very risky because heat builds quickly.
Do I need special drill bits for glass?
Yes, diamond or carbide bits are required.
Can tape prevent the drill bit from slipping?
Yes, masking tape improves grip for the drill bit.
Should the jar be empty before drilling?
Yes, drilling a full jar increases pressure inside.
Can I drill recycled jars?
Yes, but some thin jars require extra caution.
Choosing the Right Drill Bit for Cutting Glass Cleanly
Diamond hole saw bits are ideal for making larger holes. They come in different sizes for different projects. These bits are perfect for soap dispensers and lamp wiring.
Diamond spear point bits are best for smaller holes. Their pointed shape helps start drilling smoothly. They are suitable for small decorations or ventilation holes.
Carbide bits are a cheaper alternative but less durable. They can drill glass but dull faster. Diamond bits remain the best option for beginners.
Some bits have side openings to help remove glass dust. This improves cutting speed. Cleaner bits drill faster with less heat.
Select a bit size based on your project’s needs. Larger holes require more stability and water cooling. Small holes require more control and precision.
Always inspect the bit for cracks or wear before drilling. Damaged bits increase the chance of breaking the jar. A sharp bit produces cleaner results.
Using the correct bit is the most important factor in drilling glass successfully. Wrong bits cause chipping and uneven holes. Diamond bits ensure smooth edges and safe drilling.
How to Drill Different Types of Glass Jars Safely
Different types of glass jars behave differently when being drilled, so understanding their characteristics helps reduce risks.
Thick mason jars are the easiest to drill because they can handle more pressure and heat. Thin decorative jars are fragile and require slower drilling and extra cooling.
Recycled commercial jars often vary in thickness depending on the manufacturer. Some are extremely thin near the neck and thicker at the base. This variation means pressure must be adjusted throughout the drilling process.
Colored glass jars heat up faster because pigment affects heat absorption. Darker glass becomes hot more quickly, increasing the chance of cracks. Continuous cooling helps maintain even temperature.
Tempered glass jars should never be drilled because tempered glass shatters into small fragments when damaged. These jars are designed to withstand force but not drilling. If you must make a hole, choose a non tempered alternative.
Frosted or etched glass creates more friction during drilling. These surfaces require slow drilling and gentle pressure to prevent stress cracks. Cooling must be consistent to avoid overheating.
Decorative jars with patterns or embossed textures create uneven surfaces. These textures make the drill bit slip easily during the first few seconds. Using two layers of masking tape improves stability.
Extra thick jars, such as fermentation jars, take longer to drill. They resist heat better than thin jars, but their density requires slow drilling and strong diamond bits. Patience ensures a clean hole without stress fractures.
Step by Step Method for Drilling a Hole in a Glass Jar
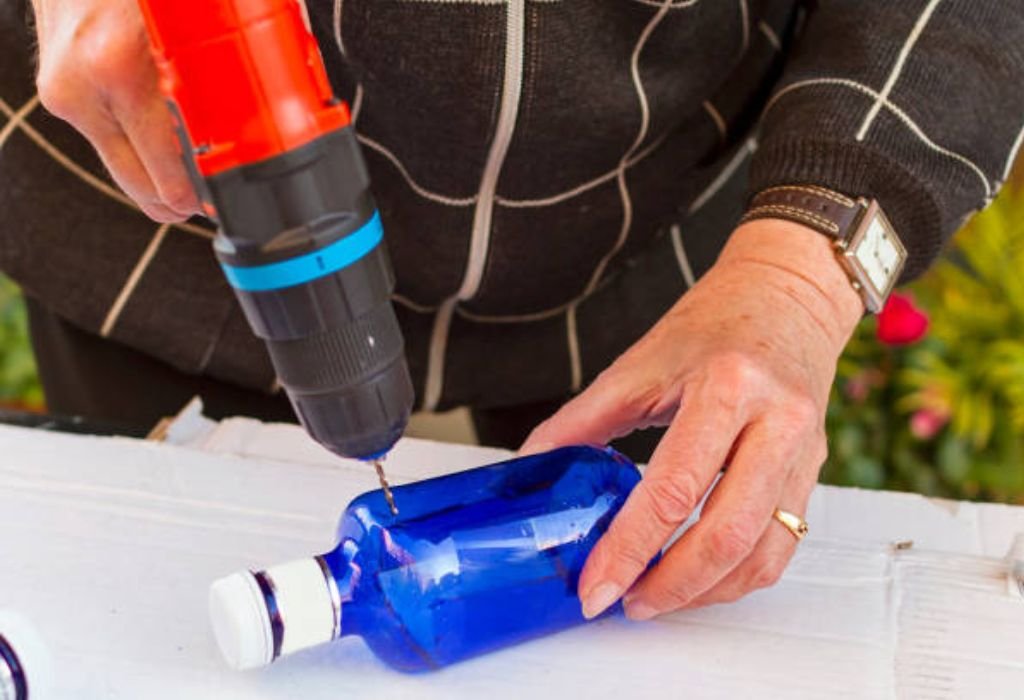
Place the jar in a stable position on a padded surface. Use clamps if needed to prevent rolling. Stability is essential for clean drilling.
Set your drill to the lowest speed setting. Slow speed reduces heat and prevents stress cracks. Glass requires careful control rather than power.
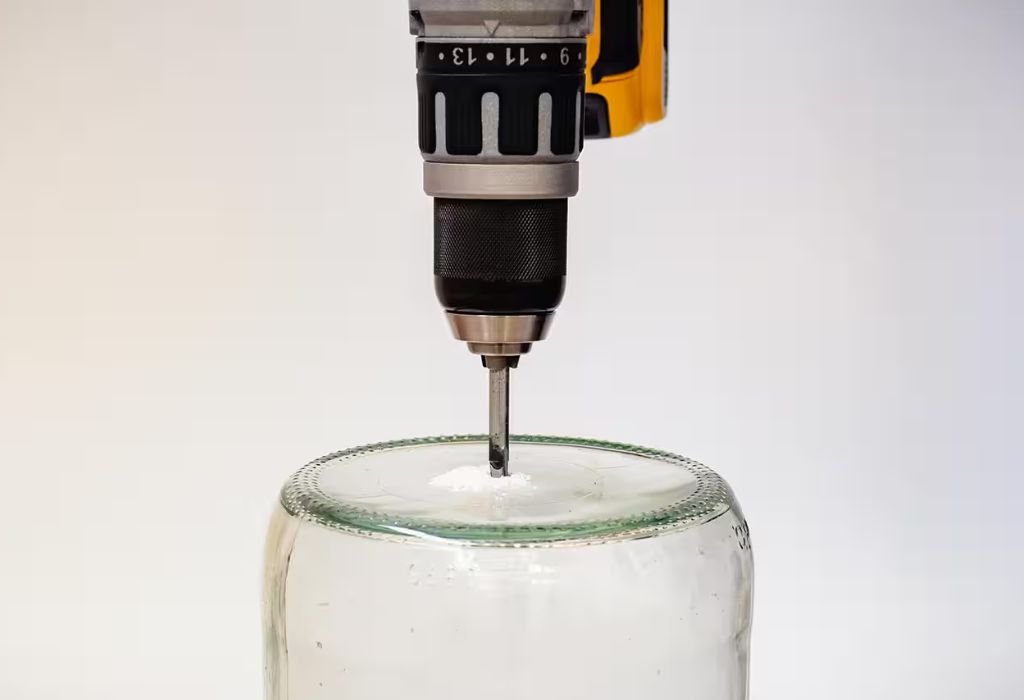
Position the diamond bit at a slight angle on the marked spot. Starting at an angle prevents the bit from slipping. Once it begins cutting, gradually straighten the drill.
Apply light pressure as the bit begins to grind. Do not push downward forcefully. Let the bit grind slowly through the surface.
Add water continuously using a spray bottle or sponge. Water keeps the bit cool and reduces crack formation. Regular cooling helps maintain clean drilling.
After a shallow groove forms, increase speed slightly. The groove guides the bit so it does not slip. Stay patient during this stage.
Allow the bit to penetrate slowly until it breaks through the inside surface. Reduce pressure in the last few seconds. This prevents chipping on the inner edge.
How long does it take to drill glass?
Depending on thickness, it can take a few minutes.
Should I use high speed?
No, high speed cracks the glass.
Can the drill bit overheat?
Yes, always keep it cool with water.
Do I press hard while drilling?
No, use light pressure only.
Will the hole chip on the inside?
It may chip slightly without gentle finishing.
How to Prevent Cracks While Drilling Glass
Use constant water cooling to avoid heat buildup. Heat is the main cause of cracks. Water keeps the temperature stable.
Avoid applying heavy downward pressure. Glass cannot flex or compress. Gentle pressure reduces internal stress.
Do not drill on uneven or curved sections unless experienced. Curved surfaces create uneven stress distribution. Flat areas remain the safest.
Start slowly and create a shallow groove first. This groove stabilizes the drill bit. Starting too fast increases slipping.
Avoid changing drill angles during drilling. Constant alignment prevents cracking. Sudden movement ruins the hole.
If the bit squeals, stop immediately. Squealing indicates overheating. Cool the area before continuing.
Take breaks during drilling if needed. Slow drilling preserves both the jar and the bit. Patience improves success.
Why did my jar crack even with water?
You may have applied too much pressure.
Can old jars crack more easily?
Yes, aged glass becomes more brittle.
Do thick jars break less?
Thick jars are stronger but require longer drilling.
Can curved surfaces be drilled?
Yes, but they require more experience.
Is overheating the main cause of cracks?
Yes, heat causes sudden fracture lines.
Common Mistakes People Make When Drilling Glass
One of the biggest mistakes is drilling too fast during the initial contact. High speed causes instant heat buildup and cracks the glass quickly. Starting slow prevents pressure shocks.
Many beginners press the drill too hard hoping to speed up the process. Heavy pressure forces the glass to absorb stress it cannot handle. Using light pressure protects the surface from cracking.
Some people forget to use water, believing a drill alone can make clean holes. Drilling without water causes rapid overheating and weakens the glass. Water cooling is essential for stability and safety.
Starting drilling on a curved or uneven section of the jar leads to slipping. The bit skids across the surface and creates scratches or fractures. Always begin drilling on a flat or taped surface.
Using the wrong type of drill bit is another common mistake. Standard bits designed for wood or metal cannot cut glass safely. Only diamond or carbide bits should be used for drilling glass jars.
Skipping the marking and punching step leads to misaligned holes. Without a guide, the bit wanders during the first seconds. Clear markings ensure accuracy.
Another mistake is drilling directly on a hard surface without padding. The jar transfers vibration to the table and cracks easily. Soft padding distributes pressure and keeps the jar stable.
Finishing the Hole After Drilling the Glass Jar
After drilling, examine the edges for chips or sharp spots. These edges must be smoothed for safety. Sharp edges can cut skin easily.
Use fine grit sandpaper to smooth the opening. Wet sanding works best for glass. Gentle circular motions create a smooth finish.
Diamond files can be used for precise edge finishing. They remove tiny chips and make the hole uniform. Files work well for small holes.
Rinse the jar to remove glass dust. Dust is harmful if ingested or inhaled. Clean jars ensure safe use in kitchen projects.
Test the hole by inserting the accessory you plan to use. If the fit is loose, widen with gentle sanding. If too tight, polish the inner edge carefully.
Dry the jar completely before installation. Moisture inside the hole may affect glues or fittings. A dry surface ensures proper sealing.
Add rubber grommets if the project involves wiring or pumps. Grommets protect the glass edge from damage. They also reduce friction.
How do I smooth rough glass edges?
Use fine sandpaper or diamond files.
Can I enlarge a hole after drilling?
Yes, polished sanding gradually widens it.
Is polished glass safe to touch?
Yes, once fully smoothed.
Should I clean after sanding?
Yes, glass dust is harmful.
Can grommets improve safety?
Yes, they protect both the glass and inserted parts.
Alternative Methods to Make Holes in Glass Without Drilling
Glass cutting tools can create holes without the use of a drill. These tools use a circular scoring wheel to scratch the surface gently. Once scored, pressure is applied to remove a small round piece of glass.
Laser cutters can also create holes in glass if you have access to specialized equipment. The laser heats a precise area until it fractures in a controlled manner. This method creates clean and accurate holes.
Glass etching compounds offer a non mechanical method for making small openings. These chemicals remove thin layers of glass gradually. Although slower, they avoid cracking caused by drilling pressure.
Dremel rotary tools with diamond tips are an alternative for smaller holes. They grind the surface gradually and provide more control around curves. Rotary tools work well for delicate jars or detailed projects.
Manual glass files can create openings in very thin glass. Although slow, filing gives precision and reduces risk. This method is best for small decorative holes.
Some people heat metal rods and press them onto glass to make holes. This melting technique must be used carefully because uneven heating creates fractures. It works only on very thin glass.
Waterjet cutting is a professional method for making perfect holes. The machine uses high pressure water mixed with abrasive particles. This technique produces flawless results but requires specialized services.
Best Projects to Create After Drilling a Glass Jar
Turning glass jars into soap dispensers is one of the most popular DIY projects. A small drilled hole allows the pump mechanism to fit securely. Decorative jars create unique and stylish dispensers for kitchens and bathrooms.
Drilled jars make excellent lamp bases for home decor. Wiring can pass through the drilled hole safely. Adding warm lights creates beautiful ambient lighting.
Aquarium hobbyists often drill holes to create mini terrariums or humidity chambers. Small openings help with air circulation. These jars become perfect homes for plants, moss, or small aquatic species.
Drilled mason jars are ideal for making fairy light lanterns. The hole allows the wire to enter the jar cleanly. The result is a stunning light decoration.
Jars with drilled holes make great water fountains or humidifiers. Pumps can be inserted through the hole for circulating water. These functional DIY projects add relaxation to your space.
Gardeners often use drilled jars for irrigation systems. A small hole controls water flow and delivers moisture slowly to plants. These jars act as eco friendly watering devices.
Drilled jars can also be used in spice rack designs. Tiny holes create shaker lids for seasoning containers. This brings both style and practicality to kitchen storage.
CONCLUSION
Drilling a hole in a glass jar becomes safe and easy when using the correct tools and techniques. Diamond bits, slow speed, and steady water cooling protect the jar from cracking. With patience and careful control, the process becomes predictable.
Proper preparation ensures the drill bit stays stable. Using tape, padding, and clamps reduces movement and improves accuracy. Understanding how glass reacts to pressure helps guide the entire drilling process.
After drilling, finishing the hole with sanding and filing gives the jar a clean, professional look. With these steps, you can confidently create DIY lamps, dispensers, terrariums, or decorative pieces. Mastering the technique opens the door to endless creative projects involving glass jars.

I’m John F. Nicholas, the founder, lead writer, and drill enthusiast behind 101drill.com. With years of hands-on experience in power tools and DIY projects, I created this platform to share practical knowledge, expert tips, and real-world insights to help others master the art of drilling.