
If you have ever admired decorative lights inside a glass bottle or seen handmade fountains or terrariums created from recycled bottles, you may have wondered how people drill holes in glass without breaking it.
Glass feels delicate and unpredictable, and many beginners fear that the moment the drill touches the surface, the bottle will crack or shatter.
This fear is normal, especially for those who have seen broken glass pieces from rushed or incorrect drilling attempts. But with the right tools and a slow, controlled method, drilling a hole in a glass bottle becomes a safe and surprisingly simple process.
Many people remember the first time they tried to drill into glass using the wrong drill bit or too much pressure. The bottle cracked instantly, leaving them frustrated and unsure whether glass drilling was even possible.
The truth is that glass cannot be drilled like wood or metal. It requires cooling, lubrication and gentle pressure because it reacts strongly to heat and vibration.
Once you understand these rules, everything changes. The process becomes calm and predictable instead of stressful and dangerous.
Drilling glass bottles opens endless creative opportunities for home decor and craft projects. From inserting string lights to building water features, feeding tubes, hanging planters or even custom lamps, a single hole unlocks many possibilities.
The beauty of drilling glass lies in the transformation of an ordinary bottle into something artistic, functional and meaningful. You begin to notice shapes, colors and thicknesses differently, imagining what you can create next.
This complete guide explains every part of the process in detail, ensuring you understand not only what to do but why each step matters.
You will learn how to select the right drill bits, prepare the glass, maintain the correct temperature and control the pressure. By the end, you will feel confident drilling glass bottles safely, creating clean, smooth holes with minimal risk of cracking.
Why Drilling a Hole in a Glass Bottle Requires Special Technique
Glass is a unique material that behaves differently under stress. Unlike wood or metal, glass does not bend or compress. Instead, it breaks when too much force or heat is applied. This makes drilling more sensitive.
The first challenge comes from vibration. Any sudden shake or uneven movement causes shock within the glass structure. This shock can travel quickly and form cracks. Controlling vibration becomes essential.
Heat buildup is another major issue. Drilling glass generates friction, and friction generates heat. If the heat rises too fast, the glass expands. Expansion creates internal tension that leads to cracking.
To avoid heat buildup, water must be used throughout drilling. Water cools the glass and the drill bit. Consistent cooling prevents temperature spikes.
The drill bit used must be designed for glass. Regular bits are too aggressive. Only diamond coated bits can grind through glass gently.
The drilling technique must be slow and controlled. Fast drilling shocks the glass. Slow drilling creates smooth pressure.
Glass bottles vary in thickness and shape. Curved surfaces are harder to drill because the bit can slip easily. This increases the need for careful starting.
Understanding the nature of glass helps you avoid cracking. Knowing its weaknesses empowers you to use the right method. With proper technique, drilling becomes safe and effective.
Tools You Need Before Drilling a Glass Bottle
A rotary drill or Dremel tool with speed control is essential. Speed control helps maintain gentle drilling. Lower speeds work best on glass.
Diamond drill bits are required to cut through glass. These bits grind rather than cut. Grinding prevents sudden breakage.
A shallow container of water is necessary for cooling. The drilling area must stay wet. Water protects the glass from heat.
A sponge or folded cloth can help hold water in place. The cloth stays wet on the bottle surface. Wet cloths offer steady cooling.
Masking tape is helpful for grip. It gives the drill bit traction. Traction prevents slipping.
A marker is useful for marking the hole location. Marking ensures accuracy. Clear marks prevent mistakes.
Gloves protect your hands from sharp edges. Glass can become slippery. Gloves improve grip.
Safety goggles protect from tiny glass dust. Even wet drilling produces particles. Goggles ensure safety.
These tools allow you to drill smoothly. Each tool plays an important role. When combined properly, drilling becomes controlled and safe.
How to Prepare the Glass Bottle for Drilling
Start by washing the bottle thoroughly. Remove dust, grease and labels. Clean surfaces reduce slipping.
Inspect the bottle carefully for cracks or chips. Weak areas will break easily. Choosing a strong bottle is important.
Mark the exact spot where you want the hole. Keep the mark visible through the drilling process. Proper marking increases accuracy.
Place a piece of masking tape over the drilling spot. The tape gives grip to the drill bit. Grip helps the bit start smoothly.
If the bottle is round, place it inside a towel cradle. The cradle prevents rolling. Rolling bottles create instability.
For better control, place the bottle in a basin and add water until the drilling spot is submerged. Submerged drilling keeps everything cool. Cooling prevents heat cracks.
Some people place a small wet sponge under the drilling area. This holds water in place. The sponge also stabilizes the bottle.
Once the preparation is complete, the bottle is ready. Proper preparation reduces risks significantly. It sets up a safer drilling process.
How to Set Up the Drilling Area for Maximum Stability
Choose a flat, stable workspace. A shaky table increases vibration. Stable work surfaces protect the bottle.
Use a deep towel or rubber mat to prevent slipping. Soft surfaces keep the bottle still. Stillness improves accuracy.
If you are drilling outdoors, avoid windy areas. Wind may dry the water quickly. Dry surfaces increase friction.
Set your drill to the lowest speed. Low speed offers control. High speed overheats the glass.
Keep water ready for refilling the basin. Water evaporates during drilling. Fresh water maintains cooling.
Check the drill bit before starting. It must be sharp and clean. Dull bits create extra heat.
Hold the drill with both hands if possible. Two hands reduce shaking. Stability improves the hole quality.
Proper setup prevents accidental slips. A well prepared workspace makes the entire job easier. It increases your chances of success.
Step by Step Guide to Drilling a Hole in a Glass Bottle
Place the drill bit gently on the marked spot. Do not apply full pressure immediately. Let the bit rest lightly.
Start the drill at a low speed and tilt it slightly. The slight angle helps the bit bite into the surface. Biting prevents slipping.
Once a small dimple forms, slowly straighten the drill. Straightening keeps the hole even. Even drilling reduces cracking.
Apply very light pressure as the bit begins grinding. Let the bit do the work. Forcing pressure causes stress.
Drill for a few seconds, then lift the bit slightly to let water cool the area. Cooling is essential. It prevents heat buildup.
Continue slowly with gentle motion. The grinding sound should be soft. Loud grinding means too much pressure.
When the hole is halfway through, reduce the pressure even more. Thin glass near the exit can crack easily. Slow drilling protects the glass.
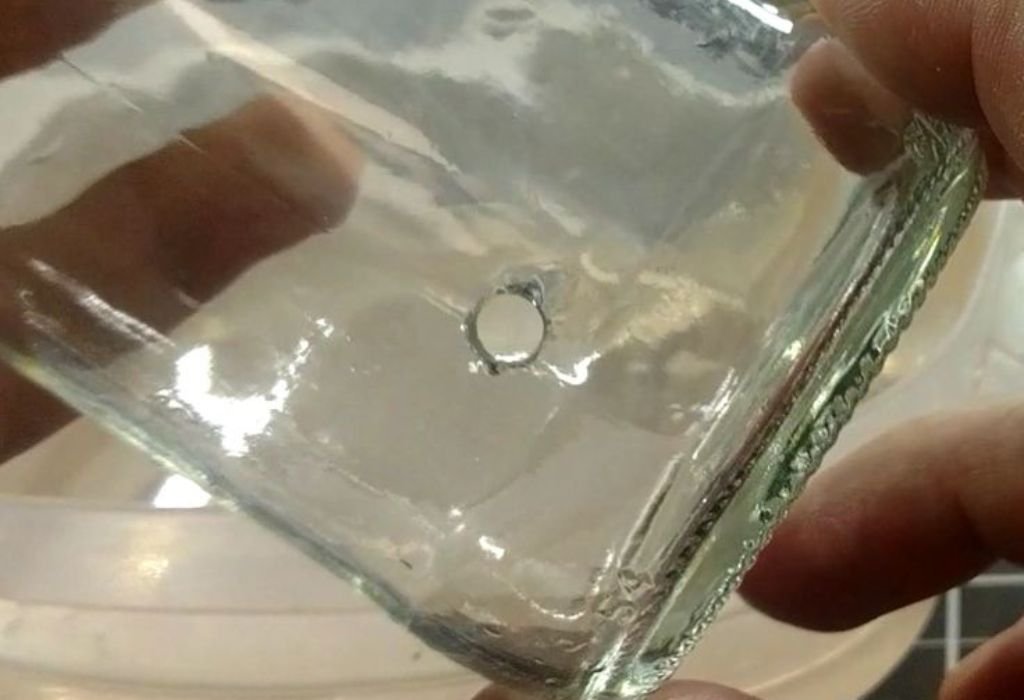
When the bit breaks through, stop immediately. Over drilling damages the edges. Smooth handling ensures clean results.
This completes the initial drilling phase. The hole will look clean but may need smoothing. Smoothing improves safety and appearance.
How to Prevent Cracks While Drilling Glass
Always drill at the lowest possible speed. High speed creates vibration. Vibration cracks glass.
Apply only light pressure. Heavy pressure stresses the surface. Stress lines expand into cracks.
Keep the drilling area submerged or constantly wet. Water cools the surface. Cooling prevents thermal shock.
Start at an angle to prevent slipping. Stability ensures proper entry. Slips create scratches.
Never drill on cracked or weak spots. Weak areas break instantly. Strong areas handle pressure.
Use only diamond bits designed for glass. Other bits cut too aggressively. Aggressive cutting breaks the bottle.
Take frequent breaks during drilling. Breaks allow the glass to cool. Cold surfaces resist cracking.
Following these techniques keeps the glass safe. They help you achieve smooth drilling. With patience, cracks become rare.
How to Enlarge, Smooth and Finish the Hole Safely
Use a slightly larger diamond bit to widen the hole. Widening should be slow. Slow widening prevents chipping.
Move the drill in gentle circular motions. Circular movement smooths the edges. Smooth edges look professional.
Keep the area underwater as you widen. Water reduces friction. Low friction prevents overheating.
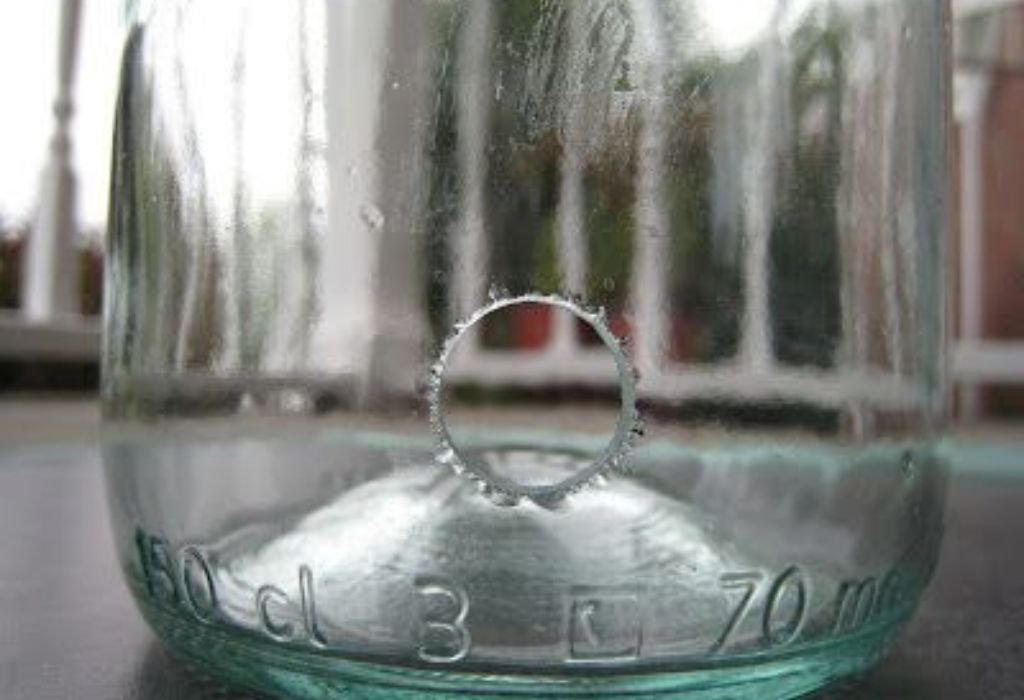
Once the hole reaches the desired size, switch to a diamond file. Files help refine the inner edges. Inner edges become polished.
Rotate the file lightly inside the hole. Light pressure removes sharpness. Smooth holes protect wires or cords.
Check for chips around the rim. If you notice rough spots, file them gently. Filing maintains clean outlines.
Rinse the bottle thoroughly when finished. Rinsing removes glass dust. Clean surfaces look better.
A smooth finished hole transforms the bottle. It becomes safe for decorations or wiring. Good finishing highlights craftsmanship.
Common Mistakes Beginners Make When Drilling Glass Bottles
Many beginners start drilling too fast, thinking speed will help cut into the glass more easily. Fast drilling causes friction heat. Heat leads to instant cracking.
Another common mistake is applying too much pressure on the drill. Pushing down hard weakens the bottle surface. When pressure spikes, cracks form quickly.
Some people forget to keep the drilling area wet. Dry drilling generates heat rapidly. A dry surface cannot cool the bit effectively.
Starting the drill at a flat angle often causes slipping. When the bit slips, it scratches the bottle. Scratches weaken the glass.
Using the wrong drill bit is a major problem. Wood or metal bits cannot cut glass. They cause chips and break the bottle.
Not securing the bottle properly is another mistake. A rolling bottle increases vibration. Vibration spreads stress across the glass.
Some beginners continue drilling after the bit breaks through. Over drilling damages the inner edge. Damaged edges require extra finishing.
Avoiding these mistakes helps you drill cleanly. With practice, drilling becomes predictable. Good technique results in beautiful holes.
Safety Tips for Working With Glass Surfaces
Always wear safety goggles to protect your eyes from tiny glass fragments. Even underwater drilling produces fine particles. Eye protection is essential.
Wear gloves that give grip without squeezing too hard. Gloves protect from sharp edges. They also prevent slipping.
Handle the bottle slowly and avoid sudden movements. Sudden pressure shocks the glass. Shocks can spread cracks.
Always place the bottle on a padded surface. Hard surfaces reflect vibration. Soft surfaces absorb movement.
Keep children and pets away from the workspace. Drilling glass requires full attention. Distraction increases risk.
Check the glass for any temperature changes. Hot glass is more fragile than cool glass. Cool surfaces reduce stress.
Never drill near the edge of the bottle. Edges are thinner and weaker. Weak edges crack easily.
Following safety rules ensures a smooth experience. Safe habits protect you and the bottle. Preparedness leads to success.
How to Choose the Right Drill Bit Size for Glass Bottles
Choosing the correct drill bit size is one of the most important steps when drilling a glass bottle. The bit size determines how clean and stable the hole will be. Using the wrong size often leads to chipping or uneven edges.
Most people begin with small bits because smaller sizes create less stress on the glass. Starting small also allows you to gradually enlarge the hole if needed. This reduces the risk of cracking.
It is important to select diamond coated bits rather than standard metal bits. Diamond bits grind the glass smoothly rather than cutting aggressively. Smooth grinding protects the bottle’s structure.
Consider what you will insert through the hole before choosing your bit. For wiring, small bits work well, while wider bits are needed for tubing or rope. Planning ahead avoids the need for re drilling.
If you need a larger hole, use a step up method instead of one big bit. Drill a small hole first, then gradually switch to larger sizes. This keeps the glass cool and avoids sudden pressure changes.
Measure your object carefully before drilling. Matching the diameter ensures the object fits comfortably. Proper measurements prevent loose or overly tight fittings.
Always test your bit on a sample glass piece if available. Testing gives confidence and ensures compatibility. Practice pieces help refine technique.
Choosing the right bit size improves accuracy and reduces breakage. When bit size matches the purpose, drilling becomes easier. This knowledge guarantees smoother results.
How Glass Thickness Affects the Drilling Process
Glass bottles come in many thickness levels, and each behaves differently under drilling pressure. Thin bottles respond quickly to heat and vibration. Thicker bottles distribute stress more evenly.
Thin glass bottles require the lightest pressure possible. Even small force can crack the surface. Gentle handling becomes essential.
Thicker bottles allow slightly stronger pressure, but they still need water cooling. Thick surfaces trap more heat inside. Controlled cooling prevents internal tension.
You should always check bottle thickness before starting. Lightly tap the bottle to feel resonance or inspect it visually. Recognizing thickness helps adjust drilling technique.
For thin bottles, use the smallest diamond bits and slowest speeds. Small bits create less friction. Slow speed prevents sudden heat.
For thicker bottles, gradual drilling is still necessary. Applying consistent pressure prevents surface shock. The goal is smooth grinding without forcing the bit.
Different bottle shapes also affect drilling. Curved surfaces behave differently than straight ones. Curves require steady hands and careful alignment.
Understanding glass thickness helps you plan your entire drilling approach. Adapting technique to thickness increases success rates. This knowledge prevents unnecessary breakage.
How to Support and Secure the Bottle for Better Drilling Control
Supporting the bottle properly is essential for safe drilling. A rolling or unstable bottle increases the chances of cracks. Proper support absorbs vibration.
Place the bottle on a folded towel or thick rubber pad. Soft surfaces help stabilize the bottle. They reduce sliding or unexpected movement.
If the bottle continues to roll, build a cradle using towels. The cradle keeps the bottle firmly in place. Firm placement ensures better drilling accuracy.
Some people use bottle holders or clamps for more control. However, clamps must be gentle to avoid cracking. Light pressure keeps the bottle steady.
Holding the bottle with both hands is not recommended because the drill may slip. Instead, allow the towel or pad to do the securing. This prevents sudden fingertip pressure.
When drilling in a basin of water, place small stones or rubber blocks around the bottle. These barriers prevent rolling inside water. Stable positioning ensures safe drilling.
Always make sure the bottle cannot shift during drilling. Any movement increases stress on the surface. Stillness leads to safer, cleaner holes.
Supporting the bottle correctly makes the entire process smoother. Stability reduces vibration and protects the glass. This increases your confidence and drilling success.
Creative Uses for Glass Bottles After Drilling
Drilled glass bottles can be turned into beautiful string light decorations. Lights shine through the glass softly. This creates a warm aesthetic.
You can turn bottles into small indoor fountains. The drilled hole allows water to flow through tubes. Bottle fountains create soothing displays.
Drilled bottles make unique hanging planters. Water drainage through the hole keeps plants healthy. The clear glass adds charm.
You can build DIY lamps using drilled bottles. The hole allows wiring to pass through easily. Glass lamps add elegance to homes.
Crafters use bottles for bird feeders too. The hole acts as a feeding port. This makes the project functional and decorative.
Drilled bottles work well for terrariums. They hold soil, plants and moisture beautifully. The hole helps with ventilation.
You can create wind chimes using colored bottles. The drilled hole holds string or metal connectors. Wind chimes made from glass look artistic.
These creative uses show how versatile drilled bottles can be. A single hole opens endless project ideas. Creativity grows with each craft.
Beginner Glass Drilling Questions Answered
Can I drill a glass bottle with a regular drill bit?
No, only diamond or carbide glass bits work safely.
Do I need water for drilling glass bottles?
Yes, water prevents heat and reduces cracking.
What speed should I use when drilling glass?
Use the lowest possible speed for full control.
Can I drill a thick wine bottle?
Yes, but it requires slower drilling and more water.
Why is my glass bottle cracking?
Heat, pressure or using the wrong bit causes cracks.
Do I need to put tape on the bottle first?
Yes, tape prevents the bit from slipping.
How long does drilling a glass bottle take?
Usually a few minutes with slow movement.
Can I drill near the base of the bottle?
Avoid drilling near edges because they are weaker.
What happens if the drill slips?
It can scratch or crack the glass instantly.
Can I use oil instead of water?
No, oil does not cool glass effectively.
Should I drill from the inside or outside?
Always drill from the outside for better control.
Do I need protective gear?
Goggles and gloves are highly recommended.
How do I smooth the hole after drilling?
Use diamond files or polishing bits.
Can I drill colored glass bottles?
Yes, the technique is the same for all colors.
Is drilling glass safe for beginners?
Yes, with patience and proper technique.
Conclusion
Drilling a hole in a glass bottle may seem intimidating at first, but once you understand the process, it becomes a calm and controlled technique. The key lies in working slowly, using proper tools and ensuring the glass remains cool and lubricated throughout the drilling.
Because glass reacts strongly to heat and pressure, small adjustments in speed, angle and force make a big difference in achieving a clean result.
With diamond bits, low drilling speeds and constant water cooling, you can safely drill through most types of bottles without cracking them.
The process becomes more predictable as you practice, and soon you will feel confident creating holes of different sizes for various projects. The satisfaction of seeing a perfectly drilled hole in a delicate bottle is incredibly rewarding.
Whether you plan to create decorative lighting, build custom fountains, design plant holders or craft unique household decor, this skill unlocks endless creative opportunities.
Once you master the technique, you can transform ordinary bottles into functional and beautiful art pieces. Your craftsmanship will show in every project you complete, giving new life to recycled glass.

I’m John F. Nicholas, the founder, lead writer, and drill enthusiast behind 101drill.com. With years of hands-on experience in power tools and DIY projects, I created this platform to share practical knowledge, expert tips, and real-world insights to help others master the art of drilling.