
When Ayaan tried to drill a hole into a glass bottle for a small home decoration project, he pushed the drill too fast without thinking.
Within seconds, the glass cracked loudly and shattered into pieces all over the table. That moment taught him that drilling glass is completely different from drilling wood or metal.
Glass is a sensitive material that reacts instantly to vibration, pressure, and heat. A small mistake can turn a simple drilling task into a dangerous situation. Many beginners end up breaking the glass because they do not understand how delicate the surface truly is.
However, drilling a hole in glass is not difficult when you follow the correct method. With slow speed, proper cooling, and the right drilling angle, you can make a clean hole without cracks. Once you understand the nature of glass, the process becomes simple and safe.
This complete guide will teach you how to drill through bottles, jars, windows, tiles, and other glass surfaces easily.
You will learn how to prepare the surface, use the right drill bits, and avoid the mistakes that cause glass to break. By the end, you will be able to drill perfect holes confidently and safely.
Why Drilling Glass Requires Proper Technique
Drilling glass requires a proper technique because glass is extremely fragile and does not bend like metal or wood.
Instead of deforming under pressure, it breaks instantly the moment it feels vibration or uneven force. This is why using slow speed becomes the most important part of the drilling process.
Glass also reacts differently to friction because friction creates heat. When the drill bit rubs against glass at high speed, heat builds up quickly and causes the surface to expand.
This expansion creates internal tension that leads to cracking even before the drill makes a visible dent.
Unlike other materials, glass does not provide a grip for the drill bit. The surface is smooth and slippery, so a normal bit slides around without catching the starting point. This is why proper preparation, such as using masking tape, helps the drill bit stay in place and work safely.
Another reason proper technique is required is because glass has weak points all over its surface.
These weak points are invisible but they fracture easily when pressure is applied unevenly. Keeping the drill steady and straight prevents stress from spreading across the surface.
Glass is also sensitive to sudden temperature changes. If the bit heats one spot too quickly, the surrounding area remains cooler, and the temperature difference causes the glass to break. Consistent cooling with water prevents this problem and keeps the drilling zone stable.
For all these reasons, drilling glass demands patience, control, and the right tools. When the technique is correct, the drilling process becomes smooth and safe even for beginners.
Understanding Glass Hardness and Weak Points
Glass is a hard material, but hardness does not mean strength. It means the surface resists scratching but breaks easily under pressure. This combination makes drilling glass tricky unless you know how the material behaves.
One of the biggest issues with glass is that it has internal tension built during manufacturing. When the surface is exposed to drilling pressure, this tension tries to escape. If drilling is done too fast, cracks spread instantly in different directions.
The edges and corners of glass are weaker than the center. These areas hold less structural stability, so drilling too close to an edge is risky. Staying at least one inch away from the edge reduces the chance of cracking.
Scratches, chips, and hairline cracks also create weak points on the surface. These tiny imperfections act as starting points for fractures. If the drill bit shakes or vibrates, these weak spots expand rapidly.
Glass thickness also affects hardness. Thin glass cracks easily, while thick glass requires more time to drill but remains stable longer. Understanding thickness helps you adjust pressure and speed correctly.
Different types of glass react differently to drilling. Tempered glass cannot be drilled at all because it shatters instantly due to internal stress. Only regular non tempered glass should be drilled safely at home.
By understanding hardness and weak points, you learn how to apply the correct amount of pressure, speed, and cooling. This knowledge keeps the glass stable and reduces breakage during drilling.
Tools You Need to Drill a Hole in Glass
Using the correct tools is the most important part of drilling glass safely. A normal drill bit will not work because it is designed for wood or metal, not fragile surfaces like glass.
You must use a diamond tipped or carbide tipped drill bit because these bits grind gently instead of cutting aggressively.
A variable speed drill is essential because glass requires extremely low drilling speed. High speed creates vibration and heat that crack the surface immediately. A drill with adjustable RPM gives you full control over drilling pressure.
Masking tape is another important tool because it gives the drill bit traction. Glass is slippery, and without tape the bit will slide around. The tape stabilizes the starting point and helps maintain accuracy.
A water source or coolant is vital for reducing heat. You can use a spray bottle, a wet sponge, or even a slow drip from a container. Consistent cooling keeps the glass temperature stable and prevents sudden cracking.
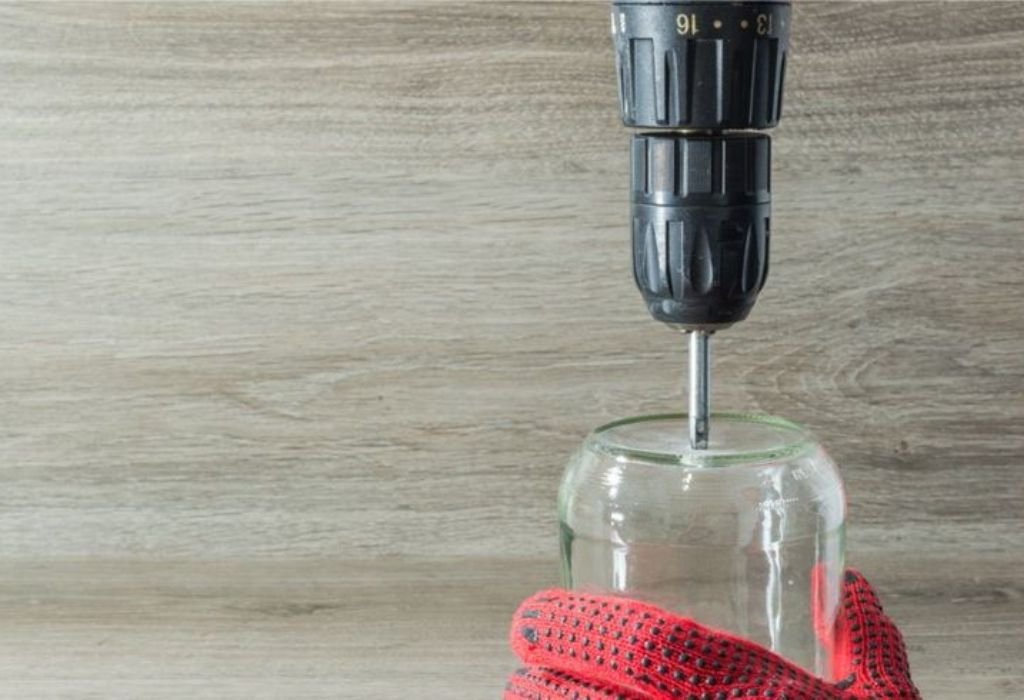
A clamp or holder is needed to keep the glass steady during drilling. Movement causes uneven pressure, which weakens the surface. Securing the glass ensures that drilling is smooth and controlled.
Safety equipment is also essential. Gloves protect your hands from sharp edges, while goggles protect your eyes from tiny glass fragments. Drilling glass always releases small particles, so safety gear is non negotiable.
Having the correct tools ensures success and reduces the risk of breakage. With proper tools, drilling becomes easier and safer for all types of glass.
Safety Precautions for Drilling Glass
Drilling glass is one of the most delicate DIY tasks, so proper safety precautions are absolutely necessary.
You must protect your hands by wearing strong gloves because even the smallest glass chip can cause deep cuts. Safety goggles are equally important to keep tiny glass fragments from reaching your eyes during drilling.
Always make sure the glass is placed on a flat, non slip surface before you begin. Any movement during drilling introduces vibration, and vibration increases the chance of cracking instantly. Using clamps or holders to secure the glass prevents accidents and keeps the surface stable.
Check the type of glass you are working with before drilling. Tempered glass can never be drilled because it is designed to shatter when damaged, and applying a drill bit will cause instant explosion. Always drill only regular non tempered glass to avoid dangerous breakage.
Keep your work area clean and free of clutter so you can focus on the drilling process without distractions. A clean surface also prevents glass particles from slipping under your hands or tools. The easier the movement, the safer your drilling session becomes.
Never apply heavy pressure on the drill because force causes stress on the glass surface. The drill bit should glide gently with slow speed, letting the bit do the work on its own. Using force increases heat and creates cracks across weak points.
Always keep a water source ready for cooling because glass reacts very poorly to heat. Overheating is the primary cause of sudden breakage during drilling. Cooling the surface continuously keeps the temperature stable and prevents shock cracks.
Preparing Glass Before Drilling
Preparation is the key to clean and safe drilling, and skipping this step often leads to cracked or damaged glass.
You should begin by cleaning the surface thoroughly to remove dust, oil, or grease because dirt prevents even drilling and creates friction. A clean surface helps the drill bit glide smoothly and makes drilling easier.
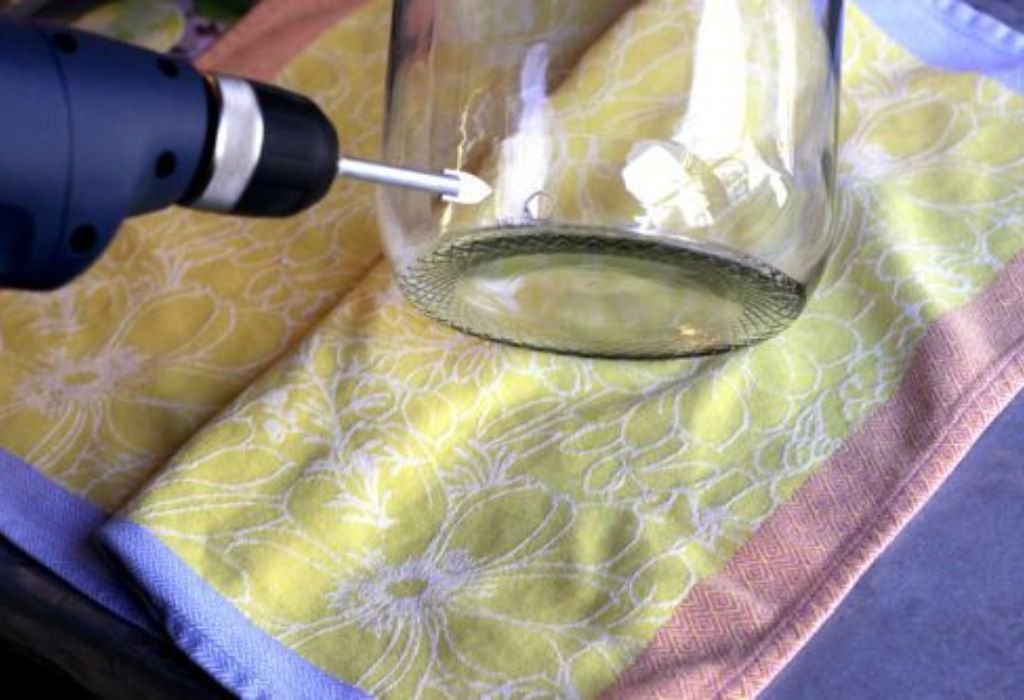
After cleaning, apply a piece of masking tape over the drilling area. The tape provides grip for the drill bit, preventing it from sliding across the glass surface when you begin drilling. It also reduces surface vibrations and keeps the drill stable.
Use a marker to clearly mark the exact spot where you want the hole. Precise marking ensures accuracy and helps you maintain the drilling angle throughout the process. The more accurate your mark, the cleaner the final hole will be.
Secure the glass with a clamp or hold it firmly using a stable stand. Movement during drilling causes uneven pressure, and even a slight shift can cause the glass to crack from internal stress. Keeping the glass still ensures smooth, controlled drilling.
Prepare a cooling method before you start, such as a cup of water, spray bottle, or wet sponge. This keeps the drill bit and glass cool, especially during long drilling sessions. Cooling prevents overheating which is the number one cause of pressure cracks.
Once everything is prepared properly, the drilling process becomes much easier. Proper preparation helps avoid mistakes and keeps both the glass and the drill bit safe. Good preparation ensures a smooth and successful drilling experience.
Step by Step Method to Drill a Hole in Glass
Begin drilling at the lowest possible speed because glass cannot handle vibration or sudden movement.
You should place the drill bit directly over the marked spot and gently touch the surface without applying pressure. Let the bit gradually create a small indent before increasing speed slightly.
Use continuous cooling by dripping water, spraying with a bottle, or pressing a wet sponge near the drilling point. Cooling reduces the heat generated by friction and prevents thermal stress. Without cooling, the glass temperature rises quickly and creates cracks.
Hold the drill at a perfectly straight angle because tilting introduces uneven pressure. Uneven angles cause the bit to slip and widen the hole incorrectly. A straight angle ensures a clean, precise circular hole.
Do not push the drill downward because pressure forces the bit too deep too fast. The bit should grind gently into the glass surface, removing tiny particles layer by layer. Patience is the most important part of drilling glass safely.
Once the drill begins biting into the surface, maintain consistent speed and movement. Changing speed suddenly can disturb the glass structure and lead to cracking. Smooth and steady motion keeps the drilling safe.
Keep drilling slowly until you pass through the other side of the glass. When you are close to breaking through, reduce pressure even further to avoid chipping the backside. A controlled finish ensures a clean, smooth hole.
Can I drill glass without water?
No, water is essential to prevent overheating.
Do I need a diamond drill bit for glass?
Yes, diamond bits work best for clean drilling.
Should the drill speed stay low?
Yes, low speed prevents vibration and cracking.
Can I drill thick glass easily?
Yes, but it requires more time and patience.
Will applying force crack the glass?
Yes, force creates stress and immediate breakage.
How to Control Heat While Drilling
Heat control is the most important part of drilling glass because heat creates sudden expansion that leads to cracking. When the drill bit rubs against the surface, friction builds up and increases temperature. Without cooling, cracks spread instantly through weak points.
To control heat effectively, you must use continuous cooling during the entire drilling process. This can be done using a spray bottle, dripping water, or placing a wet sponge around the drilling point. Water absorbs the heat and prevents the surface from becoming too hot.
Drill speed also affects temperature because higher speed produces more friction. Keeping the drill at a low RPM reduces heat production and keeps the glass stable. Lower speed gives you more control and reduces the risk of breaking the glass.
Avoid pausing for too long in the same spot because the bit continues to heat the surface. If you need to stop, lift the bit gently and allow the cooling water to settle on the area. This prevents the temperature from rising too quickly.
Always use a sharp and high quality diamond drill bit because dull bits create more friction and heat. A sharp bit cuts smoothly and reduces stress on the glass. Quality bits last longer and provide cleaner results.
Heat control is essential because glass reacts instantly to temperature imbalance. By maintaining consistent cooling, low speed, and smooth motion, you protect the glass from cracking and get clean drilling performance every time.
Why does heat crack glass while drilling?
Heat expands the surface unevenly and causes cracking.
How often should I cool the glass?
Cooling must be constant throughout drilling.
Does high speed create more heat?
Yes, high speed increases friction and temperature.
Do dull bits increase heat?
Yes, dull bits grind instead of cutting smoothly.
Can glass explode from heat?
Yes, extreme heat causes sudden shattering.
Smoothing and Finishing the Drilled Hole
Once the hole is drilled completely, the edges may remain sharp or uneven. These edges must be smoothed because rough glass can cut skin easily. Smoothing also improves the overall quality of the final result.
Use fine grit sandpaper or a diamond file to smooth the edges gently. Move the file in small circular motions around the inside and outside of the hole. This removes small chips and sharp points.
Keep the area wet while smoothing because water reduces friction. Wet filing prevents scratches and keeps dust under control. It also protects the glass from sudden temperature changes.
Work slowly and check the edge frequently to avoid over sanding. Removing too much material can widen the hole or weaken the glass around it. Gentle pressure ensures a clean and safe finish.
If the hole requires a polished look, use progressively finer grits of sandpaper. Each finer grit removes the marks left by the previous one. This creates a smoother and cleaner surface.
When the edges feel smooth to the touch, wash the glass thoroughly. Cleaning removes leftover particles that may cause scratches later. A clean hole ensures the best possible final appearance.
Common Mistakes People Make When Drilling Glass
Many beginners drill glass using the same speed they use for wood or metal, and this is the first big mistake. High drilling speed creates excessive vibration, and vibration causes the glass surface to crack instantly. Slow speed is essential to maintain stability throughout the process.
Another common mistake is applying too much pressure on the drill. Pressure forces the drill bit to dig too deep too fast, causing immediate stress within the glass structure. The drill must glide gently without pushing downward aggressively.
Some people forget to cool the glass while drilling, leading to rapid heat buildup. Heat expands the surface unevenly and creates tension between hotter and cooler zones. When the temperature shifts suddenly, the glass cracks immediately.
Using the wrong drill bit is also a frequent problem because regular bits are not designed for glass. A normal bit skids across the surface instead of cutting smoothly, increasing the risk of slipping. Diamond or carbide bits are designed for controlled grinding rather than cutting.
Drilling close to the edge of the glass is another risky mistake. Edges are structurally weaker and more prone to cracking under pressure. Staying away from the edges ensures better support during drilling.
Skipping safety precautions is another dangerous oversight. Without gloves and goggles, even small glass chips can cause injury. Proper safety ensures a controlled and hazard free drilling process.
Final Tips for Safe and Long Lasting Results
Always begin with slow drilling speed because slow speed maintains control and reduces vibration. Gradual grinding allows the drill bit to remove glass particles smoothly. This ensures the drilling surface remains stable and crack free.
Keep the glass cool at all times because temperature control is the key to success. Water, a wet sponge, or a drip system stabilizes the surface. Cooling reduces the risk of thermal expansion which leads to cracking.
Use only diamond tipped or carbide tipped drill bits because they are engineered for brittle materials like glass. Their grinding action is gentle and steady. Using proper bits extends both the drill life and the glass life during drilling.
Secure the glass firmly with clamps or holders because movement creates stress. Even slight shifts can cause unexpected cracks. A stable drill area ensures safe and accurate drilling.
Drill in short intervals to prevent heat build up. Lifting the bit occasionally allows water to reach deeper into the drilling point. This also gives the drill bit time to cool down naturally.
Smooth the drilled edges after finishing because sharp edges can cause cuts or chips later. Finishing the edges with fine sandpaper improves safety and appearance. A well smoothed hole also prevents future cracking around the drilled area.
Conclusion
Drilling a hole in glass may seem challenging at first, but with the right technique and proper safety habits, the process becomes simple and reliable. Glass is a fragile material that reacts quickly to pressure, heat, and vibration, so patience is essential throughout drilling.
When you use the correct drill bit, maintain slow speed, and apply continuous cooling, you protect the glass from cracking and achieve clean, professional results.
Understanding the natural weaknesses of glass helps you plan your drilling better. Avoiding the edges, securing the surface properly, and letting the drill bit glide slowly are important steps for successful work.
Every part of the drilling process must be controlled so that the fragile surface remains stable and safe.
Preparation is also a major factor because marking the drilling spot, adding masking tape, and cleaning the surface make the job easier.
Keeping the right tools ready ensures you work confidently without rushing. When the glass is supported and cooled properly, drilling becomes smooth and predictable.
Whether you are drilling holes for decoration, crafting, or home repairs, the methods shared in this guide help you handle any glass surface safely.
By avoiding common mistakes and maintaining the proper technique, you can create clean holes without cracks. With practice, you will be able to drill glass just as confidently as you drill wood or metal, achieving beautiful and long lasting results every time.

I’m John F. Nicholas, the founder, lead writer, and drill enthusiast behind 101drill.com. With years of hands-on experience in power tools and DIY projects, I created this platform to share practical knowledge, expert tips, and real-world insights to help others master the art of drilling.