
Drilling holes in thin metal seems simple until you apply the drill and realize how quickly the sheet can bend, twist, or tear apart. Many beginners underestimate how delicate thin sheet metal actually is, especially when the wrong drill bit or speed is used for the task.
Years ago, I watched someone attempt a small DIY job on a lightweight aluminum sheet only to see the drill bit catch and rip a long, painful tear through the surface.
Thin metal reacts very differently compared to thicker steel or wood because it flexes under even mild pressure. A small vibration or incorrect angle can cause the bit to wander and scratch the metal before the hole even forms.
This often frustrates people who expect drilling metal to feel like drilling into a stable board or wooden plank.
However, with the right technique, drilling into thin metal becomes surprisingly easy and even enjoyable.
When you focus on slow drilling, gentle pressure, and highly accurate positioning, the metal responds smoothly and cleanly. You don’t need expensive machines or professional skills, only patience and the proper setup.
This guide gives you every detail needed to drill holes in thin metal without warping or damaging it.
Whether you’re preparing sheets for a craft project, installing hardware, or creating vent holes, the method remains the same. Follow each step carefully, and your results will look clean, accurate, and professional every time.
Why Drilling Thin Metal Requires a Special Technique
Thin metal is structurally weak compared to thicker steel, which means it cannot resist strong downward force from a drill bit.
When too much pressure is applied, the metal bends downward instead of staying flat, causing the bit to tear through the surface rather than cut it smoothly. This bending effect is the most common reason why holes in thin metal look jagged or uneven.
Another difficulty is vibration, which thin metal experiences far more intensely than thicker materials. Even the smallest movement of the drill or surface can cause the bit to slip away from the marked point.
This results in off-center holes, scratches, and sometimes ruined sheet material that can no longer be used for precise work.
Heat buildup is also a major concern when drilling thin metal because the material absorbs heat quickly.
As heat spreads, the metal becomes softer and more vulnerable to warping, and the drill bit becomes dull faster. Overheated bits also create rough edges that require extensive finishing after drilling.
Additionally, thin metal offers very little resistance to aggressive drilling speeds. High RPMs increase the risk of catching, tearing, and producing sharp, uneven edges around the hole.
A slower, more controlled drilling approach helps prevent this tearing effect and ensures the metal stays intact.
Overall, drilling thin metal safely requires a balanced combination of slow speed, steady control, and proper stabilization.
When these factors work together, the process becomes predictable and produces clean, perfectly round holes every time. Without this technique, even the simplest drilling task can quickly turn into a damaged surface.
Tools Needed to Drill Holes in Thin Metal
Using the right tools determines how clean and smooth your holes will be when drilling thin metal. A variable-speed electric drill is essential because thin metal requires slow and controlled RPM to avoid tearing.
The ability to adjust speed precisely allows you to cut into the metal gradually instead of forcing the bit through too aggressively.
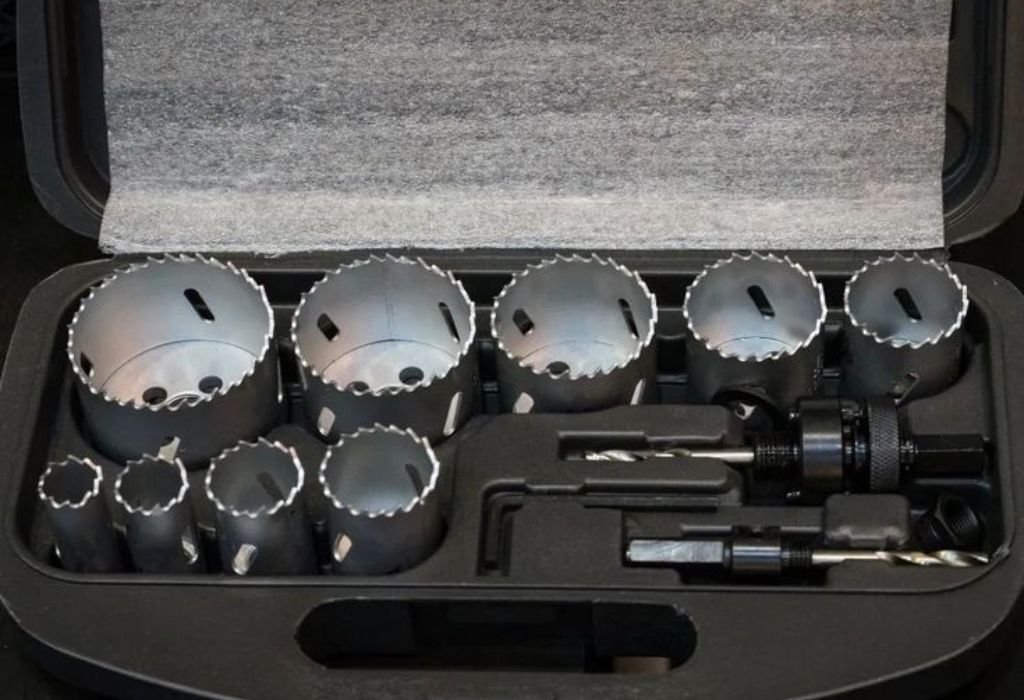
Metal-compatible drill bits such as high-speed steel (HSS), titanium-coated bits, or cobalt bits are ideal for drilling thin sheets. These bits remain sharp, cool, and precise even when penetrating delicate metal surfaces.
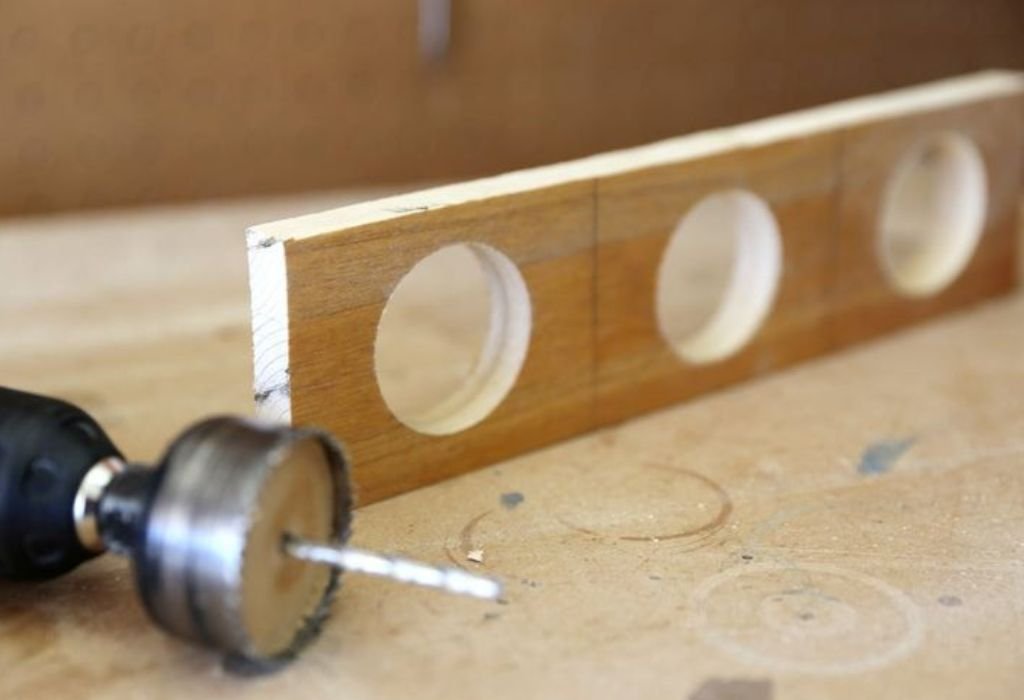
Step drill bits also work extremely well because they widen holes gradually and reduce pressure on the material.
To prevent the metal from bending or shifting, clamps are crucial for stability. Clamping the metal onto a wooden board provides the necessary support and eliminates unwanted flexing.
This wooden backing also helps the drill bit pass cleanly through the bottom without grabbing the edge.
Protective equipment such as gloves and safety glasses is very important because drilling metal releases small, sharp fragments.
These fragments can easily injure your eyes or hands if you are not cautious. Lubricating oil should also be available because it helps reduce friction and prevents overheating.
Keeping your workspace clean helps ensure the drill bit stays aligned and stable. Debris or dust under the metal surface can cause the sheet to tilt slightly, creating uneven pressure during drilling.
Overall, gathering the right tools beforehand ensures accuracy, safety, and a smooth drilling experience.
What type of drill is best for thin metal?
A variable-speed electric drill is ideal because it allows better control over drilling speed.
Do I need special drill bits for thin metal?
Yes, metal-specific bits such as HSS, cobalt, or titanium-coated bits produce cleaner holes.
Should I always use clamps when drilling metal?
Yes, clamps stabilize the metal and prevent bending or vibration.
Is lubricating oil necessary?
Lubrication helps keep the drill bit cool and prevents tearing.
Can step drill bits be used for thin metal?
Step bits are excellent for thin metal because they widen holes gradually.
Choosing the Right Drill Bit for Thin Metal
Selecting the correct drill bit is one of the most important parts of drilling thin metal. High-speed steel (HSS) bits are suitable for soft metals like aluminum, tin, or mild steel because they cut cleanly without excessive force. Titanium-coated bits offer extra durability and stay sharp longer when drilling medium-strength thin metals.
Cobalt bits provide the highest performance for drilling stainless steel or harder thin sheets. They resist heat exceptionally well, maintaining sharpness through repeated drilling. Using low-quality or worn-out bits often results in rough or jagged holes, especially in thin materials.
Step drill bits are especially useful because they minimize tearing by cutting the hole in multiple stages. Each “step” gently enlarges the hole, reducing stress on the surrounding metal. This makes them perfect for tasks requiring larger hole diameters.
Bit size selection also matters because larger bits require more force, increasing the risk of bending the sheet. For best results, always begin with a small pilot hole to guide the larger bit. This pilot hole stabilizes the main bit and ensures it stays centered.
It’s important to match the bit type with the thickness and hardness of the metal. Harder metals require stronger bits to maintain smooth cutting. Choosing the right bit prevents overheating, extends bit lifespan, and ensures professional-quality results.
How to Prepare Thin Metal Before Drilling
Proper preparation minimizes the risk of bending, tearing, or damaging the thin metal. Cleaning the metal surface removes dust, oils, and paint that may cause the drill bit to slip. A clean surface also helps your markings remain visible during drilling.
Marking the exact drilling point with a permanent marker ensures accuracy. Thin metal is extremely sensitive to misalignment, so clear markings are essential for a precise outcome. Always double-check measurements before drilling to avoid mistakes.
Creating a small indentation using a center punch helps the drill bit stay in place. This tiny dent prevents slipping and wandering, which is incredibly common when drilling thin sheet metal. Without this punch mark, the bit can skate across the surface before cutting.
Placing the metal sheet on a wooden backing prevents downward flexing. When the bit presses through the metal, the wooden board supports the sheet and ensures a clean exit. This backing also helps prevent sharp burrs from forming.
Using clamps keeps the metal sheet stable throughout the drilling process. Even slight movement can cause scratches or uneven holes, especially on thin surfaces. Once securely clamped, the metal becomes much easier to drill.
Finally, gather your tools and ensure your workspace is well lit and comfortable. A stable environment reduces errors and makes the drilling process smoother. Proper preparation ensures every hole is clean and accurate.
How to Drill Holes in Thin Metal Step-by-Step
Start by positioning the drill bit directly over the marked indentation. Hold the drill firmly with both hands to maintain control and prevent wobbling. Begin drilling at the slowest speed setting to avoid tearing the surface.
Apply very light pressure, allowing the drill bit to gradually cut into the metal. Forceful pressure can bend thin metal instantly, so slow and steady movement is essential. As the bit cuts deeper, keep the drill perpendicular to the sheet for accuracy.
If you need larger holes, first drill a small pilot hole. This pilot hole guides the larger bit and reduces tearing around the edges. Switching to a larger bit becomes much easier when you have a well-placed pilot hole.
Lubricate the drill bit frequently to reduce heat buildup. Excess heat can weaken both the drill bit and the thin metal surface. Lubrication ensures smooth, consistent drilling and reduces wear on the bit.
As the drill bit approaches the bottom layer of the metal sheet, reduce pressure even more. Too much pressure when breaking through the backside creates sharp, uneven edges. After drilling, remove the bit slowly to avoid scratching the hole edges.
Always check the hole for debris or sharp fragments. Clean the area with a cloth before drilling additional holes. Consistency and patience are the key to producing clean, round holes in thin metal.
Why does thin metal tear when drilling?
It tears because excessive pressure or high speed causes the bit to grab and rip the sheet.
Should I drill at high speed or slow speed?
Always drill at slow speed for thin metal to avoid catching or tearing.
Is a pilot hole necessary?
A pilot hole greatly improves accuracy and reduces tearing for larger holes.
Why does my drill bit slip on thin metal?
You likely didn’t use a center punch to create a starting point.
Can I drill thin metal without clamps?
Clamps are strongly recommended because thin metal vibrates easily.
How to Support Thin Metal to Prevent Bending
Proper support is essential for drilling thin metal without distorting the surface. Thin metal naturally bends under drill pressure, so placing it on a sturdy wooden board helps distribute weight evenly. This backing prevents the metal from flexing downward when the drill bit begins cutting.
Clamps keep the sheet from moving or shifting during drilling. Even minor movement can cause scratches or uneven holes. A tightly secured sheet also reduces vibration, giving you better control over the drill.
For smaller pieces of thin metal, double-sided tape can add extra hold. This tape keeps the sheet in place long enough to position clamps or finish drilling smaller holes. It is especially useful for delicate or decorative pieces.
Some people use rubber pads between the metal and wood to reduce slipping. Rubber provides grip and stability without damaging the surface of the sheet. This method is ideal when drilling smooth aluminum or stainless-steel sheets.
When drilling near the edge of thin metal, always reinforce the area with extra backing. Lack of support near the edges increases bending risk dramatically. Proper support ensures holes remain clean and round even at the outer edges.
Finally, always test the stability of the setup before drilling. Push lightly on the metal to check for any movement or vibration. Once fully stabilized, drilling becomes significantly easier and more accurate.
How to Prevent Drill Bit Slipping on Thin Metal
Drill bit slipping is a common problem because thin metal surfaces are smooth and reflective. A center punch mark gives the drill bit a secure starting point, preventing it from wandering on contact. Without this indentation, the bit will almost always slide before cutting.
Slow drilling speed reduces initial slipping because the bit engages the surface gradually. High-speed drilling increases vibration and makes controlling the drill much harder. Keeping both hands on the drill helps stabilize the bit during the first few seconds.
Lubrication can reduce friction, making it easier for the bit to stay on track. A drop of oil helps the bit glide smoothly without skipping. It also lowers heat, which contributes to slipping when metal becomes soft.
You can also use masking tape on the drilling area to increase friction. Tape creates slight resistance and gives the bit a better grip when starting. This trick is especially useful for extremely thin stainless steel.
Maintaining a perpendicular drilling angle is crucial for preventing slips. Tilting the drill even slightly can cause the bit to drift during entry. A firm stance and steady grip will keep the drill aligned with the marked point.
Lastly, avoid using dull or worn drill bits because they skate easily on metal surfaces. Sharp bits dig into the punch mark instantly, providing better control. Slipping becomes minimal when the drill setup is stable and technique is precise.
How to Smooth and Finish Holes After Drilling
After drilling thin metal, the edges of the hole often have sharp burrs that need to be removed. A deburring tool works best because it shaves off raised metal cleanly. This tool glides around the hole and smooths the surface in seconds.
If you don’t have a deburring tool, sandpaper or a fine metal file also works well. Running the sandpaper in circular motions helps round the edges evenly. Files are useful for reaching narrow or deep burrs left from thicker drill bits.
Smoothing the holes is important for safety because sharp edges can easily cause cuts. It also improves the appearance of the finished metal piece. Proper finishing ensures screws or bolts fit correctly without catching on rough edges.
Wearing gloves during smoothing protects your hands from small metal fragments. Thin flakes can stick into your skin if not handled carefully. Always wipe the area with a cloth afterwards to remove loose shavings.
If the holes are larger, power tools like rotary grinders can speed up the finishing process. Using a light touch helps maintain the round shape without enlarging the hole. A smooth, even finish gives your project a professional, polished look.
Taking the time to finish each hole properly increases durability and prevents stress cracks later. It also ensures the sheet metal fits perfectly into whatever structure or project you’re working on. Smooth edges make thin metal safer and more visually appealing.
How do I remove sharp burrs after drilling?
Use a deburring tool, sandpaper, or a small metal file for best results.
Is sanding enough for finishing thin metal holes?
Yes, sanding works very well for smoothing thin material.
Should I wear gloves while finishing?
Yes, gloves protect your hands from sharp flakes.
Can I use a rotary tool for smoothing?
A rotary tool with a grinding bit works great for larger holes.
Why do drilled holes look rough sometimes?
The hole may be rough if the drill bit was dull or the drilling speed was too high.
Common Mistakes When Drilling Thin Metal
One of the most common mistakes is drilling too fast, which causes the bit to catch and rip the metal. High RPM increases heat and makes thin material unstable. Beginners often assume faster drilling means faster results, but the opposite is true for thin metal.
Another mistake is skipping the center punch step before drilling. Without a punch mark, the bit slips, scratches, and creates crooked holes. This ruins the appearance and accuracy of the metal piece.
Not supporting the metal properly leads to bending and distortion. Thin sheets must always be placed on a flat board to keep them stable. Unsupported metal bends downward and causes the drilled hole to become jagged.
Using dull or incorrect drill bits also produces poor results. Wood bits or worn-out bits create rough edges and excessive heat. Metal-specific bits prevent these issues and ensure smoother drilling.
Applying too much pressure is another beginner error. Thin metal requires gentle drilling because the surface flexes easily. Pushing too hard results in damaged surfaces or torn holes.
Failing to cool the bit or use lubrication shortens bit lifespan and increases burr formation. Overheating weakens both the bit and the thin metal. Avoiding these mistakes helps produce clean, consistent holes every time.
Best Drill Speed Settings for Thin Metal
Thin metal always requires the lowest speed setting on your drill. Slow RPM prevents slipping, tearing, and excessive heat buildup. High-speed drilling may work for thick materials but is disastrous for thin sheets.
Starting at the lowest speed gives you full control during initial entry. Once the bit begins cutting smoothly, you can slightly increase speed if needed. However, staying slow ensures the cleanest, safest results.
Sharp drill bits allow you to drill even slower because they cut efficiently. A dull bit forces you to use more pressure, which increases bending and tearing risk. Slow drilling combined with a sharp bit produces ideal holes.
Drilling without lubrication at high speed causes the bit to overheat quickly. Heat softens the metal and creates burrs around the hole. Slow drilling helps maintain cooler temperatures and smoother edges.
Using two hands on the drill stabilizes your control at low speed. One hand alone may cause wobbling, which affects hole shape. A secure grip ensures the drill stays aligned from start to finish.
Patience is the key when drilling thin metal at slow speeds. It may take a little longer, but the results are much cleaner. Consistency and control always outperform speed when working with thin materials.
When to Replace Drill Bits for Drilling Thin Metal
Drill bits should be replaced when they show visible signs of wear or dullness. Dull bits struggle to cut through metal and generate excess heat, which damages both the bit and the sheet. If you notice burning marks on the metal, the bit may be worn out.
A bit that squeals loudly or creates smoke while drilling is losing sharpness. These symptoms indicate increased friction and reduced cutting efficiency. A fresh, sharp bit produces cleaner holes with minimal effort.
Bent or warped drill bits should be replaced immediately. Bent bits wobble inside the hole and cause uneven cutting. Using a bent bit can also damage your drill motor over time.
Discoloration on the bit, especially blue or purple, is a sign of overheating. Overheated bits lose hardness and sharpness quickly. Once hardness is lost, the bit cannot cut metal effectively.
If you find that your holes have become rougher than usual, the bit may be wearing out. Clean cuts require sharp, well-maintained bits. Replacing worn bits ensures smoother and more accurate drilling.
Storing your drill bits properly also reduces wear. Keeping them clean and lubricated after use extends their lifespan significantly. Regular maintenance helps you avoid frequent replacements and ensures reliable performance.
Conclusion
Drilling holes in thin metal becomes simple and precise when you use the correct tools and slow, steady technique.
Thin metal bends easily, vibrates intensely, and tears quickly if you apply too much force or incorrect speed, which is why preparation and control matter so much.
When you use a center punch, stable backing, sharp metal bits, and slow drilling, the sheet remains flat and produces clean, accurate holes.
Taking time to smooth the edges after drilling improves both safety and appearance. Supporting the metal properly and avoiding common mistakes ensures your project looks professional and lasts longer.
Whether you’re working on a DIY craft, ventilation holes, hardware installation, or home repairs, following these steps will help you drill thin metal flawlessly every time.

I’m John F. Nicholas, the founder, lead writer, and drill enthusiast behind 101drill.com. With years of hands-on experience in power tools and DIY projects, I created this platform to share practical knowledge, expert tips, and real-world insights to help others master the art of drilling.