
You grab your drill, press the bit against the wood, and quickly realize something’s wrong. The bit digs in, whines loudly, and stalls halfway. The hole you’re trying to make is simply too wide for a standard bit.
Drilling wide holes isn’t just about using a bigger tool. It’s about understanding how wood reacts to pressure, friction, and cutting angles. Without proper technique, you can scorch the wood, jam the drill, or ruin your bit entirely.
Every wide hole requires preparation, patience, and precision. Whether you’re installing wiring, running plumbing, or creating furniture joints, large holes demand control. A small mistake can lead to uneven or splintered edges that ruin the finish.
The secret lies in choosing the right bit, managing drill speed, and keeping everything aligned. Once you master these principles, even the widest holes become clean, accurate, and professional-looking.
This guide will take you through every detail, from tool selection to finishing touches. By the end, you’ll know exactly how to drill wide holes safely and beautifully in any type of wood.
Understanding the Science Behind Wide Hole Drilling
When drilling a wide hole, you’re not just cutting wood—you’re removing a large amount of material. This process generates more heat, friction, and torque than small holes. Without the right technique, the wood can burn or split under pressure.
Wood fibers behave differently depending on direction. Drilling across the grain requires slower speeds and sharper bits, while drilling along the grain allows more aggressive cuts. Knowing how your bit interacts with the fibers makes a big difference.
Large bits also need greater control. The wider the diameter, the more torque your drill must deliver. Holding it firmly with both hands prevents twisting or kickback when resistance increases.
Proper chip removal keeps the bit from binding. Flutes or open slots along the bit’s body eject sawdust as it spins. If chips clog the path, friction builds quickly, dulling your bit and damaging the wood.
Wide hole drilling is all about balance—between speed, pressure, and cooling. Once you find that balance, your results will always look clean and precise.
Why does my drill slow down on wide holes?
Because the bit is removing more material than it can handle. Reduce speed and clear sawdust frequently to prevent stalling.
Do wider holes need stronger drills?
Yes, high-torque drills perform better. Low-power drills overheat easily during heavy cuts.
Can I use the same speed as small holes?
No, larger holes require slower RPMs. Slow speeds keep the bit cool and prevent burning.
What happens if wood starts smoking?
That’s friction overload. Stop drilling, let the bit cool, and resume slowly.
Do I need pilot holes for wide drilling?
Yes, pilot holes help guide large bits and prevent wandering. They improve accuracy and reduce strain.
Choosing the Right Bit for Wide Holes
The type of bit you choose determines how easy or difficult wide drilling will be. Not all bits handle large diameters well, and using the wrong one leads to rough or uneven holes.
Spade bits are the most common option for wide holes. Their flat, paddle-like shape removes material quickly and efficiently. They’re perfect for general carpentry where speed matters more than appearance.
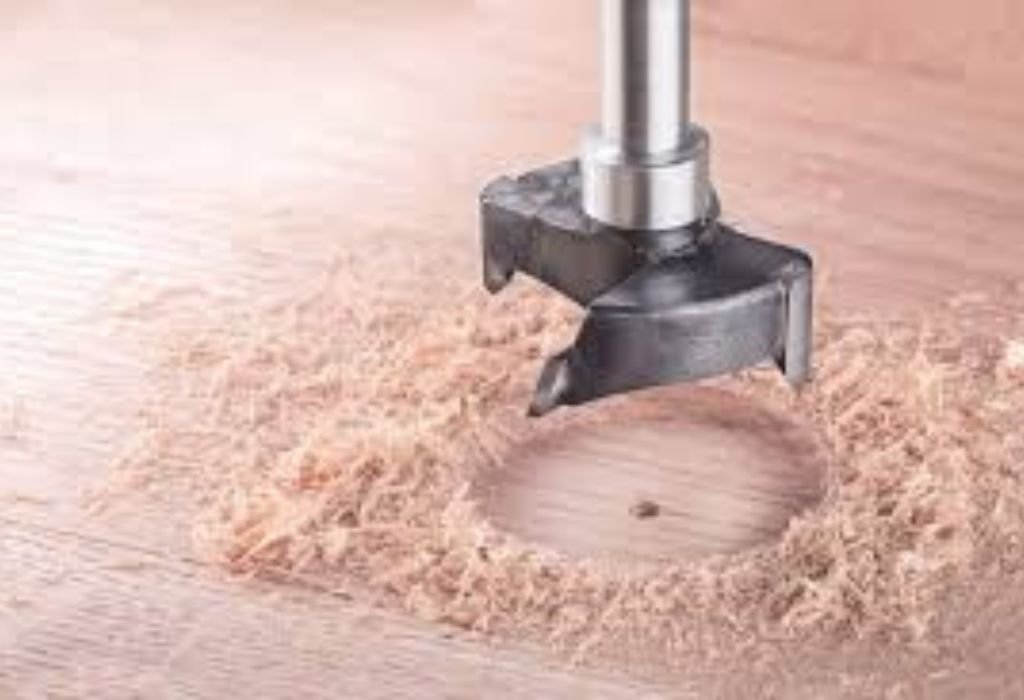
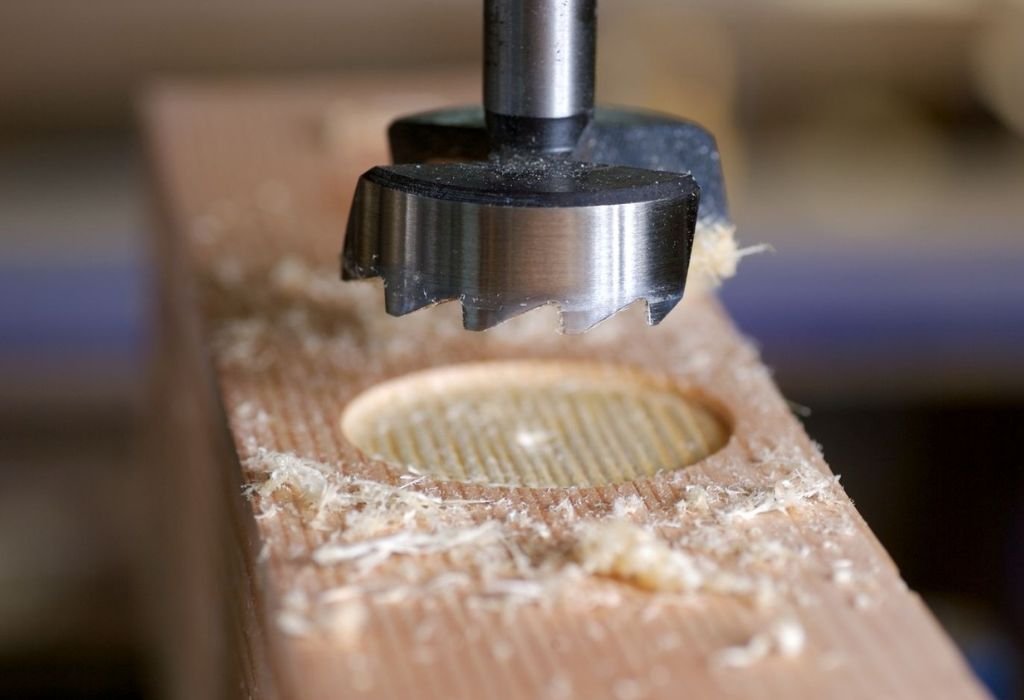
For cleaner finishes, Forstner bits are ideal. They have a circular rim and central point that cut precise edges. Cabinetmakers and furniture builders prefer them for their accuracy and smooth sides.
Hole saws are designed for the widest openings. Their cylindrical design cuts around the perimeter and removes a wood plug from the center. This method reduces friction and is perfect for holes over 1.5 inches wide.
Auger bits are best for deep drilling. Their threaded tips pull through thick lumber easily, maintaining stability and precision. Choosing the right type of bit makes every hole smoother and cleaner.
Can I use spade bits on hardwood?
Yes, but use slow speed and sharp blades. Hardwoods create more resistance and can burn easily.
Are Forstner bits expensive?
They cost more but provide unmatched accuracy. A single bit can last years with proper care.
Do hole saws work on all woods?
Yes, though softwoods cut faster. Always use moderate speed and clear debris to avoid binding.
Can auger bits drill sideways?
No, they’re designed for straight, deep cuts. Use Forstner bits for angled holes.
Do I need different bits for cordless and corded drills?
Not necessarily, but cordless models need fully charged batteries for consistent torque.
Preparing the Wood Before You Drill
Preparation ensures both safety and precision. Before drilling, mark your target area clearly using a pencil or awl. The more precise your mark, the cleaner your hole will be.
Clamp the wood securely to a stable surface. Wide-hole drilling generates strong torque that can cause wood to spin or shift unexpectedly. Stability prevents accidents and keeps holes perfectly aligned.
For extra accuracy, use masking tape on the surface. It helps prevent splintering and gives your bit more traction. Taping also reduces scratches around the entry point.
If your project requires multiple holes, measure spacing carefully. Even small alignment errors become obvious in finished work. Always double-check before drilling the first hole.
Clean the surface of dust and debris. Dirt or old finish can dull bits and reduce precision. Preparation always saves time compared to fixing mistakes later.
Should I drill a pilot hole first?
Yes, especially for bits larger than ½ inch. Pilot holes prevent slipping and guide the bit accurately.
Can I drill without clamping the wood?
It’s risky. Clamping ensures control and prevents kickback. Always secure your workpiece.
Does masking tape really help?
Yes, it prevents surface tear-out and keeps drill entry neat. It also helps catch dust.
Should I sand the surface before drilling?
Only if rough. Smooth wood reduces friction and prevents wandering.
Can I use pencil marks directly on finished wood?
Yes, but erase lightly afterward. Avoid deep lines that stain the surface.
Mastering the Technique for Wide Drilling
Technique matters as much as tools. Start by setting your drill to low speed. Wide bits need slow rotation to cut cleanly through wood fibers.
Position the bit’s point exactly on your marked center. Hold the drill perpendicular to the surface to avoid angled holes. Consistent pressure ensures even cutting across the entire diameter.
As the bit enters, let it work naturally. Pushing too hard increases friction and causes chipping. Keep your wrists firm but relaxed.
Periodically pull the bit halfway out to clear sawdust. This prevents clogging and overheating. Regular clearing keeps both drill and wood cool.
Once the bit nears the opposite side, reduce speed. A slow finish prevents blowout on the exit surface. Precision at this stage separates clean craftsmanship from rushed work.
Why does the drill vibrate while cutting?
It’s caused by uneven pressure or dull bits. Hold steady and sharpen the bit if needed.
What’s the best angle to hold the drill?
Keep it perfectly vertical unless making angled holes intentionally. Misalignment leads to uneven edges.
Can I drill from both sides?
Yes, for thicker boards. It prevents tear-out and ensures a perfect circle on both ends.
Should I cool the bit mid-way?
Yes, stop briefly to release heat. Overheated bits lose sharpness quickly.
Why does the hole look rough inside?
Chips may have jammed in the flutes. Clean often and maintain slow, steady drilling.
Managing Speed, Pressure, and Temperature
Wide hole drilling generates friction faster than you expect. Controlling speed and pressure is the key to preventing burn marks and tool damage. Every wood type reacts differently under heat, so adjust as you go.
Softwoods allow slightly higher speeds because they’re less dense. Hardwoods need slower speeds and sharper bits to prevent scorching. Monitor the sound and feel of the drill—smooth vibration means correct speed.
Apply steady, gentle pressure. Too much pressure stalls the motor or chips the bit edge. Let the bit’s design do most of the cutting for you.
When you feel heat building up, back out slowly and clear sawdust. Trapped chips cause friction that leads to smoking and dull edges. Cooling intervals extend the bit’s life and keep holes smooth.
Consistency always beats speed. Professionals know that slow, steady drilling yields cleaner and safer results every time.
Why does my bit turn black?
That’s from overheating. Reduce speed and let it cool. Blackened bits still work but dull faster.
How do I avoid burning hardwood?
Use sharp bits, lower RPMs, and clean flutes often. Friction causes most burn marks.
Can pressure damage the drill motor?
Yes, excessive force stresses the gears. Maintain moderate, consistent pressure instead.
What if my bit squeals while cutting?
It’s rubbing instead of cutting. Sharpen the edges or reduce speed to restore balance.
Do larger drills handle heat better?
Yes, high-torque drills distribute load more efficiently. Compact drills overheat under heavy use.
Preventing Tear-Out and Rough Edges
Wide holes can splinter easily at entry or exit points. Tear-out occurs when wood fibers rip instead of slicing cleanly. Avoiding it keeps your project’s surface looking professional.
Place scrap wood beneath your workpiece to support the fibers. This backing absorbs exit pressure and prevents chipping. It’s one of the simplest yet most effective techniques.
Always drill slowly when finishing a hole. The final few seconds decide how smooth the result will look. Reducing speed gives the bit time to shear fibers rather than tear them.
Tape the surface before drilling if appearance matters. Masking tape holds fibers in place and minimizes surface cracks. Peel gently once drilling is complete.
If slight roughness appears, sand lightly with fine-grit paper. A quick polish restores a flawless finish without enlarging the hole.
Why does tear-out happen even with sharp bits?
It’s due to high exit pressure. Backing wood and slower finishing speed solve it easily.
Can I drill halfway from each side?
Yes, it’s the best method for thick boards. Meet the holes in the middle for perfect edges.
Does wet wood reduce tear-out?
No, moisture softens fibers unevenly. Always work with dry wood for cleaner cuts.
Can dull bits cause splintering?
Yes, dull edges tear instead of slice. Regular sharpening prevents roughness.
What’s the easiest fix for chipped edges?
Sand lightly and apply a small amount of wood filler before finishing.
Using Hole Saws for the Widest Cuts
When holes exceed one inch, hole saws are your best choice. They look like round cups with saw teeth around the rim and a pilot bit in the center. The pilot bit guides the saw, keeping it steady throughout the cut.
Start drilling slowly to let the teeth bite gently. Once the saw finds its path, maintain consistent speed. Sudden pressure can jam or warp the blade.
Clear sawdust frequently. Wide holes create large chips that can clog easily. A quick lift every few seconds keeps the teeth cutting smoothly.
Once through, remove the wooden plug carefully with pliers or by tapping gently. Smooth the inner edges with fine sandpaper for a finished look. Clean teeth and proper speed extend the lifespan of your hole saw dramatically.
Hole saws make wide drilling easy once you understand their rhythm. They’re ideal for doorknobs, vents, and cable holes.
Can I use a hole saw without a pilot bit?
Not recommended. The pilot bit stabilizes the saw and prevents wandering.
Why does my hole saw wobble?
It’s likely uncentered. Tighten the arbor or replace worn pilot bits.
Do I need lubricant for wood cutting?
No, but wax reduces friction and helps smoother motion. Avoid oil—it stains wood.
How deep can hole saws cut?
Most reach 1.5 to 2 inches deep. For thicker wood, finish from both sides.
Can I attach hole saws to cordless drills?
Yes, but ensure full battery charge. Large hole saws demand high torque.
Finishing the Hole Cleanly
After drilling, focus on smoothing and protecting the hole. Even the most careful cut leaves minor roughness or scorch marks. Proper finishing makes your work look professional.
Wrap sandpaper around a dowel or cylinder and gently rotate it inside the hole. Work evenly to remove rough edges. Start with medium grit and finish with fine for smoothness.
If burn marks remain, rub lightly with steel wool. It removes discoloration without changing the hole’s diameter. Avoid over-sanding to maintain precision.
Seal edges with clear wood finish or polyurethane if the project involves moisture exposure. Sealing prevents fiber swelling and adds polish. Allow full drying before further assembly.
Finishing is where craftsmanship meets patience. Taking this extra time transforms rough holes into flawless details.
Do I need to sand every hole?
For visible areas, yes. Hidden holes for screws or wiring can remain unsanded.
Why does the edge feel uneven?
Uneven pressure while sanding. Rotate consistently to keep the shape round.
Can I stain inside the hole?
Yes, use a small brush for tight spaces. Match stain color for a uniform look.
Should I seal unfinished wood holes?
Yes, sealing prevents expansion and cracking from humidity changes.
What’s the best light for inspecting holes?
Natural daylight or a bright lamp reveals imperfections instantly.
Maintaining Tools for Perfect Results
Clean tools drill cleaner holes. After each use, brush away sawdust and resin buildup. Residue dulls blades and increases friction in future projects.
Sharpen bits when cutting slows down. A few strokes with a fine file restore sharpness. Dull bits create rough edges and require unnecessary force.
Lubricate moving parts of your drill occasionally. Light machine oil prevents rust and keeps the chuck smooth. Avoid over-oiling to prevent dripping onto wood.
Store bits organized by size and type in a dry area. Moisture corrodes metal quickly, especially in humid environments. Good storage extends lifespan dramatically.
Well-maintained tools not only last longer but also deliver consistent accuracy. Taking care of them pays off in every hole you drill.
Can I sharpen spade bits myself?
Yes, with a metal file. Maintain the original angle to preserve cutting balance.
Should I oil my hole saw blades?
A light coat prevents rust. Wipe clean before next use.
Can I drill with slightly dull bits?
Only for rough work. Precision tasks require sharp edges for clean results.
What’s the best way to remove resin buildup?
Use rubbing alcohol or bit cleaner. Avoid water—it promotes rust.
Do drill bits expire?
Not if maintained. Keep them clean, dry, and sharp for long-term use.
Conclusion
Drilling a wide hole in wood combines precision, patience, and control. Each step—from choosing the right bit to sanding the edges—plays a vital role in achieving clean results. Wide holes demand respect for both tool and material.
Once you understand the balance between speed, pressure, and technique, every project becomes easier. Clean cuts, smooth finishes, and professional edges are simply the result of doing things carefully.
Good drilling is more about patience than strength. When you hear the gentle hum instead of strain, you know you’re working correctly. Practice turns complexity into confidence.
Each wide hole you drill reflects your growing skill and attention to detail. The more you do it right, the more natural it becomes—until every cut feels like craftsmanship in motion.

I’m John F. Nicholas, the founder, lead writer, and drill enthusiast behind 101drill.com. With years of hands-on experience in power tools and DIY projects, I created this platform to share practical knowledge, expert tips, and real-world insights to help others master the art of drilling.